Last spring, a neighbour knocked on my door looking rather sheepish. He’d fitted a USB wall socket himself a few months earlier, felt very pleased with the whole business, and then had an electrician round for an unrelated job. The electrician took one look at the back of that socket and went quiet in a way that did not bode well. The culprit? A single loose terminal screw, one he’d never properly tightened. The socket had been generating heat inside the wall for months. He was lucky nothing more serious had happened.
Replacing a standard socket with a USB version is one of the most popular small electrical upgrades in British homes right now, and with good reason. USB charging is so common that having a wall socket with a built-in port is genuinely useful, because it frees up a three-pin socket that would otherwise be occupied by a chunky adapter. The job looks straightforward. It mostly is straightforward. But there is one step that far too many people treat as optional, and it is the step that sits directly between a job well done and a house fire.
Key takeaways
- A neighbor’s USB socket had been silently heating inside the wall for months due to one overlooked step
- The professional move almost no DIY guide mentions could mean the difference between a safe installation and a fire
- USB sockets need extra caution compared to standard outlets—and cheap alternatives online may lack crucial safety testing
The step almost everyone skips: testing the terminal connections
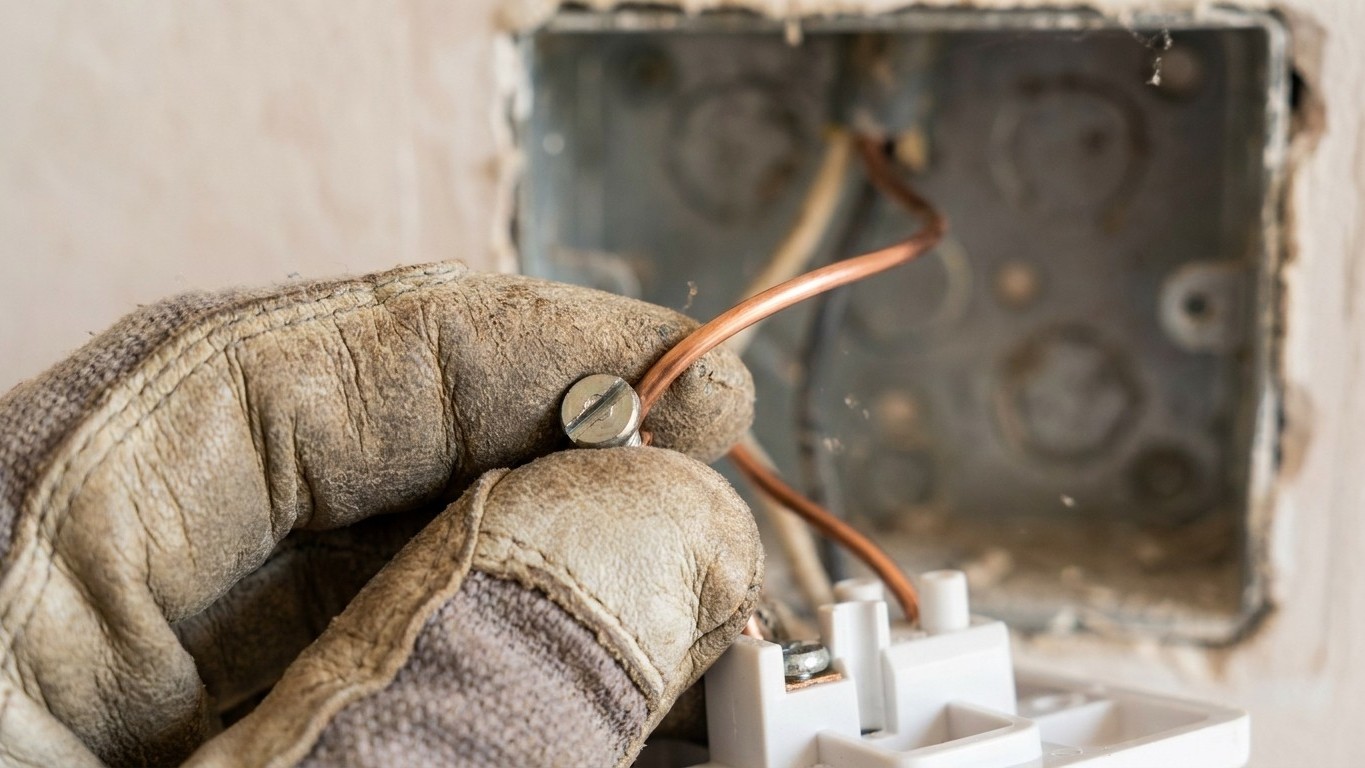
Pull off the old faceplate, photograph the wiring so you know what goes where, connect live (brown), neutral (blue), and earth (green-and-yellow) to their correct terminals, so far so good. The part people rush is what comes next. Tighten screws firmly. A loose connection can generate heat and become a hazard. That sentence sounds simple. In practice, people give the screws a half-turn and assume snug is good enough.
It isn’t. Tighten them firmly enough that they can’t come loose, but not so tightly that you damage them. Make sure the terminal and the screw are clamping the copper wire itself, not the coloured insulation, as that will stop it working or, in the case of the Earth, make it unsafe. This distinction matters enormously. Insulation gripped in a terminal looks fine from the outside. The socket switches on, Everything charges. But the actual electrical contact is poor, and when a socket has a bad connection, excessive current causes heat buildup; over time, this can damage wiring, weaken connections, and increase fire risk.
The professional move, and the one that almost no DIY guide bothers to emphasise, is the tug test. Tighten the terminal screws to hold the wires in place, then do a tug test to ensure they cannot come out. Each wire, individually, should resist a firm pull. If any wire shifts even slightly, that connection is not safe. Re-strip the wire slightly to expose fresh copper, seat it properly in the terminal, tighten again, test again.
Why USB sockets need extra attention compared to ordinary ones
A USB wall socket is not simply a regular socket with a couple of ports bolted on. Inside the faceplate sits a miniature switched-mode power supply, essentially a small transformer and circuit board, that converts your 230V mains supply down to the 5V (or higher for fast-charging) that USB devices expect. The primary safety concern identified by investigators is that products could pose a risk of electric shock or fire if the extra-low-voltage parts of the USB power supply are not sufficiently segregated and separated from the low voltage (240V) parts of the product or from the fixed wiring installation of the property.
This matters for the DIYer because the electronics inside add depth and weight to the faceplate. Some USB outlets are deeper than standard receptacles; if your back box is too shallow, you may need to install a deeper one. Forcing a too-deep socket into a shallow back box causes the wires at the back to buckle and compress. That mechanical stress gradually loosens terminal connections over months and years, even ones you tightened correctly on the day. Take care not to trap any wires between the wall and the socket. A trapped or kinked wire is just a slow-motion loose connection.
There is also the matter of product quality. Testing found that 77% of USB socket samples failed due to inadequate internal wiring and insufficient separation, with some samples failing because solder alone was used for both mechanical and electrical connection, and one sample failing due to completely inadequate separation between the mains input and USB output, just 1.74mm against a required 4mm. The troubling footnote to that finding? This was not limited to unbranded or the lower price end of the market. Only buy from a reputable retailer to ensure the product has been tested and is of a high standard; do not be tempted by cheaper unbranded alternatives online, as they may not have been safety tested and could be a fire risk in your home.
What the regulations actually say about doing this yourself
Here is where many people are either misinformed or simply unaware. Since 2005, all electrical work in dwellings in England and Wales, whether carried out professionally or as DIY, must meet the requirements of Part P of the Building Regulations. Part P applies to new domestic properties as well as any alterations or additions to electrical installations in existing properties. That said, the rules distinguish between notifiable and non-notifiable work. Minor work such as replacing a socket outlet will only have to be done safely and in accordance with the manufacturer’s instructions, provided it is not in a sensitive location such as a kitchen.
A like-for-like swap, one double socket for another double socket with USB ports, in a living room or bedroom is non-notifiable. You can legally do it yourself. That means you can replace the socket yourself as it’s a like-for-like change, which means you only need to be competent, not a qualified electrician as per the Building Regulations, Approved Document P. The word “competent” is doing a lot of work in that sentence. What it means in practice is that you understand what you’re doing and you do it safely, which absolutely includes checking every terminal connection before you close everything up.
There is a significant non-safety consequence to getting this wrong too. When selling your property, you may be asked for certificates proving that electrical work meets regulations; claims for electrical fires may be refused by insurers if the work wasn’t compliant. A botched DIY socket swap that causes a fire could leave you without an insurance payout, on top of everything else.
The right way to finish the job
Before you restore power at the consumer unit, run through this short checklist. Give every terminal a firm tug test. Check that no insulation, not a single millimetre, has been caught inside a terminal instead of bare copper. Make sure no wire is pinched between the faceplate and the back box. The product must be installed in accordance with local Building Regulations; if in any doubt, or where required by law, consult a competent person who is registered with an electrical self-certification scheme.
Once the power is back on, if all looks well and there are no cables trapped between the faceplate and back box, you can turn on the power at the consumer unit. Test each three-pin and USB socket to make sure it’s in working order. A socket tester, available from any hardware shop for a few pounds, will confirm correct wiring in seconds. A phone charger plugged into each USB port confirms those circuits are live.
One thing worth knowing: USB wall sockets are not permanent installations. USB outlets last 7 to 10 years on average. The electronics degrade before the mains socket does. That means revisiting the installation in a decade is sensible, and worth doing properly a second time, tug test included. The British Standard BS 7671, the IET Wiring Regulations, was updated to its 18th Edition, Amendment 3 in 2024; these updates, effective in 2025, introduced new requirements for Arc Fault Detection Devices (AFDDs) to prevent electrical hazards. AFDDs are designed to detect the kind of arcing that a loose connection creates — precisely the fault that a missed tug test can allow to develop silently inside your wall.
Sources : homebuilding.co.uk | southerneettesting.com