A screw that spins freely without biting is one of those small domestic frustrations that quietly erode your confidence as a home repairer. You press down harder, the drill whines, the screw head strips a little more with each futile rotation, and before long you’ve got a useless metal disc sitting proud of the surface and going absolutely nowhere. What most of us don’t realise, and I certainly didn’t for an embarrassingly long time, is that the problem almost never lies with the screw itself. It lies with how we’re approaching the whole job.
Key takeaways
- Most people grab the wrong bit size without realizing it—and this is the #1 reason screws strip
- A simple rubber band placed between the bit and screw head can rescue even severely stripped fasteners
- Professional-grade settings on your drill (clutch, speed, bit type) matter far more than raw power
The real reason screws spin without gripping
A stripped or spinning screw usually comes down to one of three things: the wrong bit size, too much speed, or a worn bit tip. Of these, the bit size mismatch is the most common culprit, and the least obvious. Most of us grab whichever Pozidriv or Phillips bit is rattling around in the drawer and assume it’ll do the job. But screw heads are sized precisely, a PZ2 bit forced into a PZ1 head will cam out (that’s the technical term for when the bit slips sideways out of the recess) almost immediately, chewing up the head a little each time. After two or three attempts, you’ve got a screw that nothing will grip.
Speed is the other great saboteur. A cordless drill set to a high RPM generates enough torque to strip a screw head before your eye can register what’s happening. The clutch setting, that numbered ring near the chuck on most modern drills, exists precisely for this reason, and yet most people leave it cranked to maximum and wonder why things go wrong. For most household screws going into timber, a clutch setting somewhere between 8 and 14 is quite sufficient. The drill should stop driving the moment the screw seats; if it keeps going, you’ve set the clutch too high.
What the handyman actually showed me
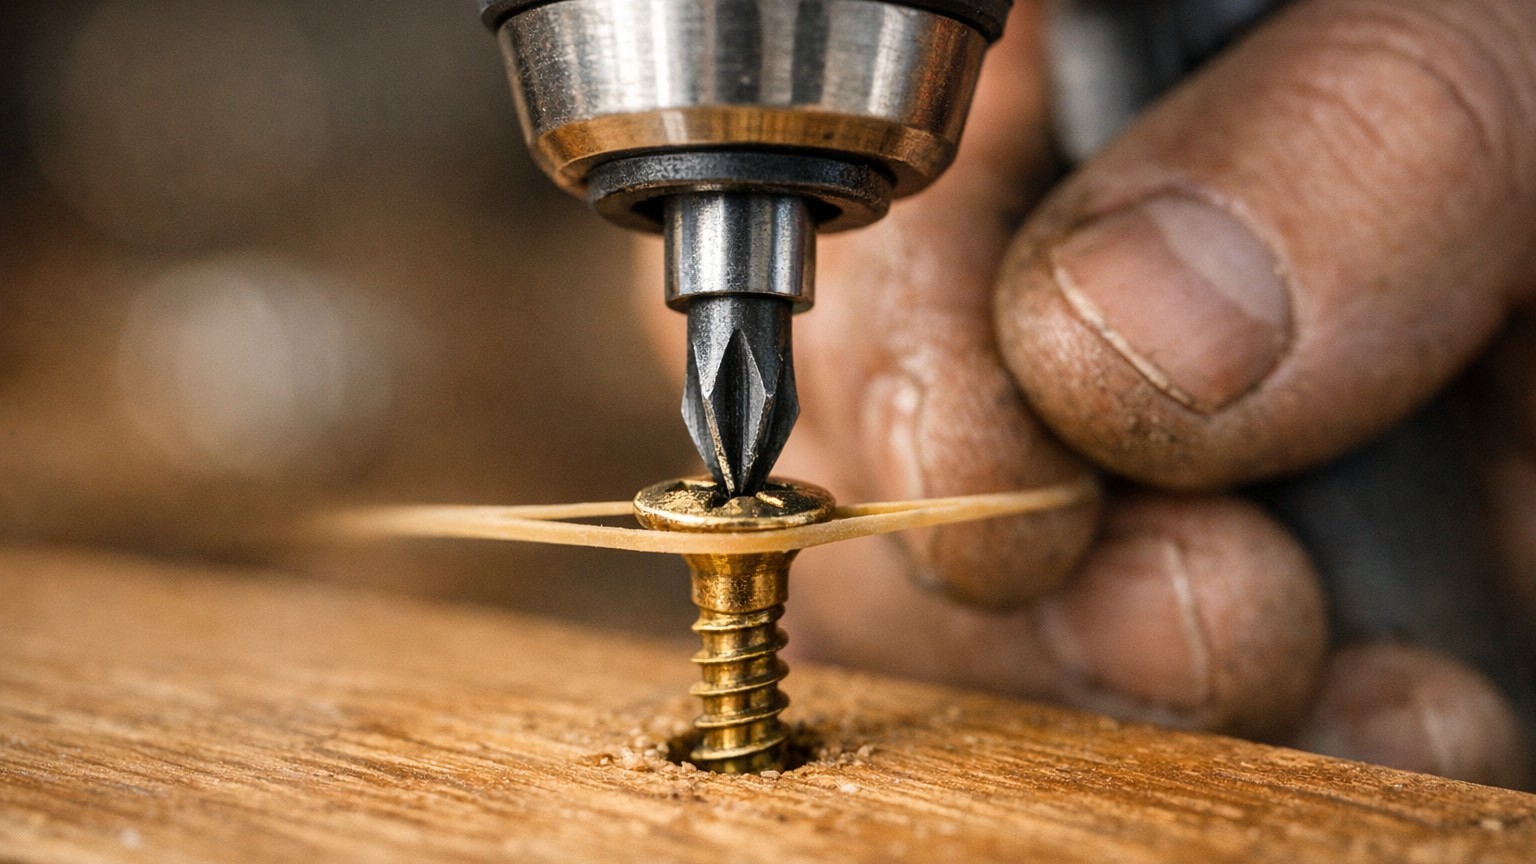
The trick that genuinely changed how I work came from watching a tradesman fix a hinge on my garden gate. He paused before driving the screw, pressed the bit firmly into the head, and pushed a short length of rubber band across the screw recess before placing the bit back on top. I thought he was being eccentric. He wasn’t.
The rubber fills the tiny gap between a worn bit and a slightly damaged screw head, giving the metal something to grip against rather than spinning on smooth steel. It’s an old joiner’s trick, widely known in the trade, and it works with astonishing reliability. A thick elastic band cut into a flat strip is ideal; you hold it between the bit and the screw, apply firm downward pressure, and drive slowly. The rubber compresses and transfers torque to the screw walls rather than the cam faces. For a screw that’s already 80% stripped, this can mean the difference between removal in ten seconds and an hour of grief with pliers.
He also showed me something about pilot holes that I’d been getting wrong. For screws going into hardwood or near the edge of a piece of timber, a pilot hole isn’t just helpful, it’s what stops the screw from splitting the wood and binding mid-drive. The pilot hole diameter should match the screw’s core (the solid metal shank beneath the thread), not the outer thread diameter. Drilling too narrow a pilot hole is almost as unhelpful as drilling none at all.
When the screw is already stuck
Extraction is a different problem, and it has its own set of solutions. If the head is still partially intact, the rubber band method usually gets it moving. But for a completely smooth, featureless crater where a screw head used to be, you’ll need a screw extractor set. These are small reverse-threaded drill bits, available from any hardware shop, that bite into the stripped metal as they turn anti-clockwise and wind the screw out. They do require a steady hand and a low-speed setting, rushing this step tends to snap the extractor inside the hole, which creates an entirely new problem made of hardened steel.
There’s also the flat-blade trick, which works surprisingly well on pan-head screws with enough head still showing. Press the tip of a flat-head screwdriver firmly into the damaged recess at an angle, apply rotational pressure anti-clockwise, and the edge of the blade often catches enough metal to turn the screw. It’s not elegant, but it saves a trip to the hardware shop at half past five on a Friday evening, which counts for something.
Penetrating oil is worth mentioning for screws that are corroded rather than stripped. A small amount applied around the head and left for twenty minutes will often free a screw that seemed impossibly seized, the oil wicks down the thread by capillary action and breaks the rust bond. Don’t use lubricating oil as a substitute; the viscosity is wrong and it won’t penetrate.
Preventing the problem next time
A bit holder with a magnetic tip keeps the bit centred on the screw head before you start driving, which alone prevents a significant number of cam-outs. Buying a proper bit set with correctly sized PZ1, PZ2 and PZ3 bits, rather than relying on one universal bit for everything, costs very little and removes the most common cause of stripping entirely.
One thing worth knowing: Pozidriv (PZ) and Phillips (PH) bits look nearly identical but are not interchangeable. Using a Phillips bit in a Pozidriv screw is one of the most common causes of cam-out in British homes, because most screws sold here are Pozidriv and most inherited bit sets are Phillips. The markings on the bit shank (PZ or PH followed by a number) are small but they genuinely matter. Checking them takes three seconds and saves considerably more time than that.