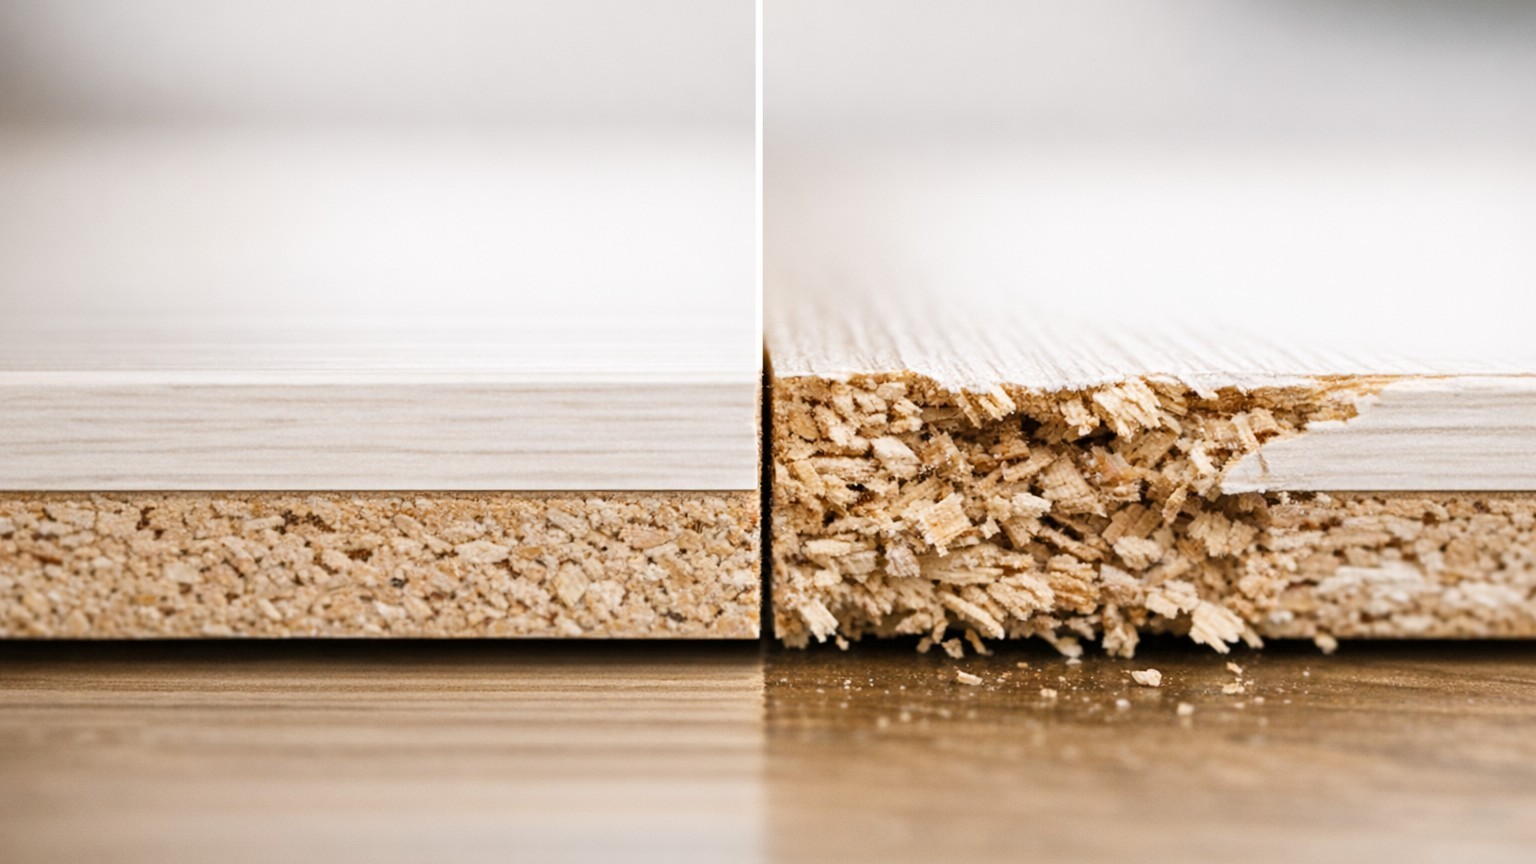
Laminate worktops chip when cut face-up with a jigsaw. There it is, the plain truth that most DIY guides bury in small print, if they mention it at all. Run the blade through your beautiful new worktop with the decorative surface facing upward, and you will almost certainly be left with a ragged, splintered edge that no amount of edge banding or careful trimming can fully hide. The culprit is the direction of the jigsaw blade itself, and understanding exactly why this happens is the key to never letting it ruin another worktop.
Key takeaways
- Standard jigsaw blades cut on the upstroke—pulling surface material apart instead of shearing it cleanly
- Laminate requires the opposite approach: place it face-down, use a fine-toothed blade, and move slowly
- Even experienced DIYers don’t know about the scoring, masking tape, and blade selection tricks that separate passable from professional results
Why the blade direction matters so much
A standard jigsaw blade cuts on the upstroke. As the teeth travel upward, they drag the surface material toward them, which means the decorative laminate on the face-up side gets torn rather than cleanly sliced. The fibres are pulled apart instead of sheared. On softwood or solid hardwood, this produces a mildly rough edge you can sand smooth in minutes. On laminate, which is essentially a thin sheet of resin-impregnated paper bonded to chipboard or MDF, the result is a crumbling, chipped margin that can extend two or three millimetres into the finished surface.
The chipboard core underneath is also notoriously unforgiving. Unlike solid timber, chipboard has no grain direction holding it together, so it crumbles eagerly whenever the blade exits through an unsupported surface. Couple that with the brittle laminate coating, and you have a material that genuinely requires a different approach to almost every other worktop in the DIY shop.
The correct method: face-down and slow
The fix is straightforward once you know it. Place the worktop face-down on your sawhorses or workbench, decorative surface pointing toward the floor. Mark your cut line on the backing paper using a straight edge and a sharp pencil. Because the blade cuts on the upstroke, the teeth now pull the laminate into the core material rather than tearing away from it. The face side, pressed against the work surface, is supported and largely protected. Your finished edge will be dramatically cleaner.
A few extra steps make the difference between a passable cut and a professional one. First, score along your cut line on the face side with a sharp craft knife, pressing firmly against a metal straight edge. Even a shallow score of about half a millimetre breaks the laminate surface cleanly, giving the blade a defined boundary to work to. Second, apply a strip of low-tack masking tape directly over the cut line on the face side before you score; the tape holds the laminate fibres together as the blade passes through, significantly reducing breakout. Third, use a jigsaw blade specifically designed for laminate or fine-finish cuts; these have much finer, closer-set teeth (typically 10 to 12 teeth per inch) and a reversed-tooth profile on some versions that cuts on the downstroke rather than the upstroke, eliminating the problem entirely.
Feed speed matters enormously too. Moving the saw too quickly through the material causes the blade to flex, wander, and vibrate, all of which worsen chipping. A slow, steady pace with gentle forward pressure lets the teeth do their work cleanly. If you feel resistance, pause. Forcing the cut never ends well with laminate.
Salvaging a chipped edge
If you have already made the cut face-up and discovered the damage, all is not necessarily lost. How bad the chipping is Determines your options. Minor splintering along a back edge that will be hidden by a wall is no problem whatsoever; a bead of clear silicone or a strip of matching edge banding covers it perfectly. Chipping along a front or visible edge is trickier, but a router fitted with a flush-trim or laminate-trim bit can sometimes remove enough material to reach clean laminate, providing you have the margin to spare.
Matching laminate repair paste, sold in small pots and available in dozens of wood and stone effects, can fill shallow chips adequately. The results are never invisible under close inspection, but from a normal standing distance they are perfectly acceptable. The paste is also remarkably cheap, which is some small consolation when you are staring at a worktop you have just spent good money on.
One option people often overlook is simply relocating the worktop. If the chipped edge is at the back, against the wall, and you have a little extra length to play with, rotating the piece so the damage is hidden under the cooker or along a less visible run can save the whole job. Measure twice, as the saying goes, and plan the orientation of your cuts before you begin rather than after.
A note on circular saws and table saws
Circular saws share the same upstroke cutting action as jigsaws, so the face-down rule applies equally. A table saw, however, cuts from below, meaning the blade exits through the top face, which means with a table saw you keep the worktop face-up. Many experienced joiners prefer a table saw for worktop cuts precisely because it gives a cleaner finish on the decorated surface with far less drama. A fine-tooth blade designed for laminated sheet material (60 teeth or more on a 250mm blade) produces an edge that needs almost no cleaning up.
A circular saw with a good laminate blade and a properly clamped straight edge guide will serve most home fitters perfectly well, as long as the piece is flipped correctly. The table saw is the more expensive and less portable option, naturally, but if you are fitting an entire kitchen worth of worktop, borrowing or hiring one for a day is worth every penny.
One small, often unmentioned fact: the type of laminate finish affects chipping risk. High-gloss surfaces chip more visibly than matte or textured finishes, even when cut correctly, because the shiny coating has less tolerance for micro-fractures at the edge. If you are choosing between finishes and plan to do your own cutting, a brushed or stone-effect matte laminate is genuinely more forgiving.