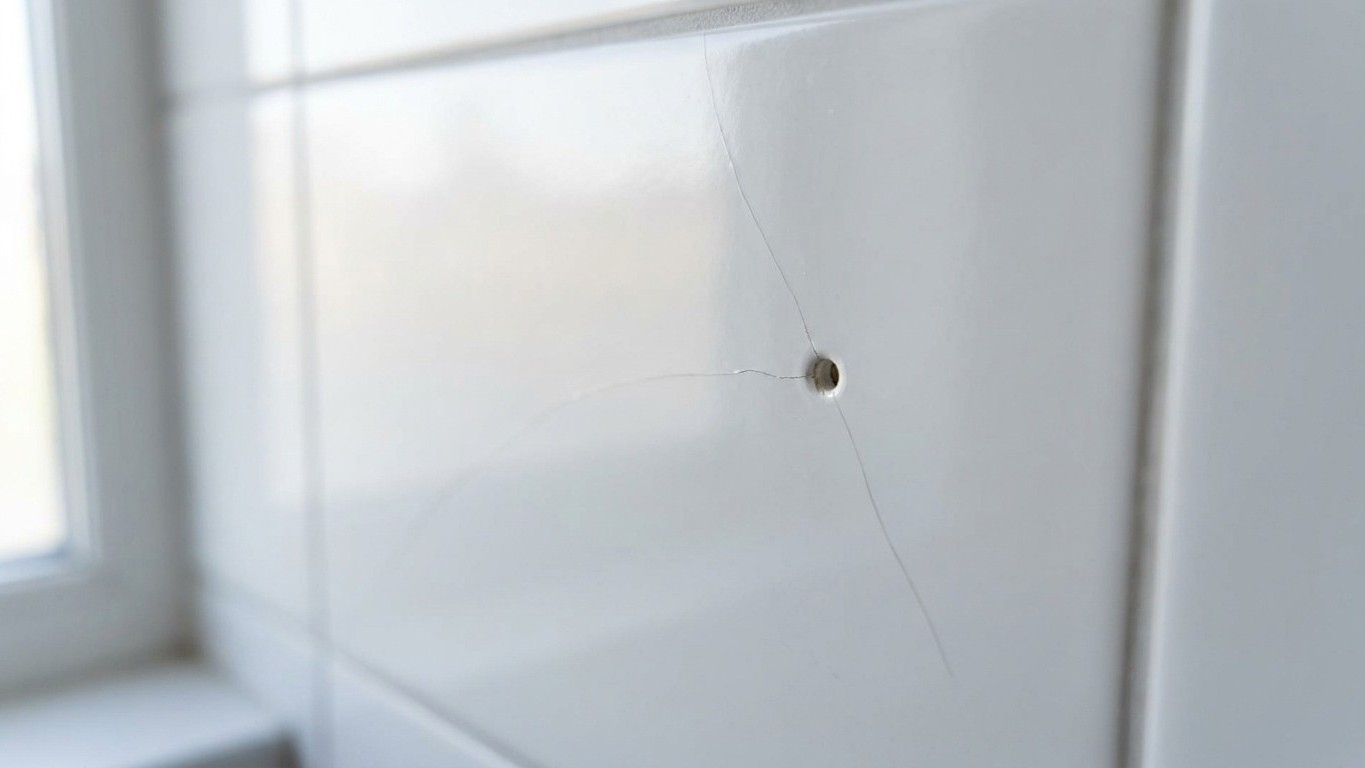
That hairline crack creeping out from a drill hole is one of the most disheartening sights in DIY, and I’ve had more than one reader write to me in a right state about it. Glossy bathroom tiles are lovely to look at but utterly unforgiving to drill into without the right preparation, because that shiny glaze is essentially a thin layer of glass fused onto the ceramic beneath. Treat it like plasterboard or brick and you’re asking for trouble.
The reason it happens comes down to simple physics rather than bad luck. A standard masonry bit, spinning at full speed, generates heat and vibration that the glaze simply cannot absorb. Unlike the tile body underneath, which has a bit of give, the glaze is brittle and rigid. The moment the bit bites in without a pilot point to guide it, it skitters across the surface, and that tiny shudder is often enough to send a stress fracture racing outward. Once you see it spreading, there’s genuinely nothing to be done, the crack has already found the path of least resistance through the glaze and there’s no glue or filler that puts that glass-like layer back together invisibly.
Key takeaways
- Why standard drilling technique causes hidden cracks to spread beneath glossy tile surfaces
- The surprising role of masking tape and water in preventing thermal shock damage
- When a single cracked tile can be saved—and when replacement is your only honest option
Why ordinary drilling technique fails on tiles
Most people drill tiles exactly as they would a plastered wall: full speed, hammer action engaged, and straight in. All three of those choices are wrong. Hammer drills deliver a percussive hit alongside the rotation, which is brilliant for masonry but disastrous for glazed ceramic, since the shock waves travel through the tile and crack it from the inside out. Even without hammer action, a bit spinning too fast will overheat the glaze and cause it to shatter rather than cut.
Then there’s the starting point. Smooth glaze offers nothing for a standard bit to grip, so it wanders before it ever begins cutting properly, scoring the surface and introducing exactly the kind of micro-fracture that grows under pressure. This is why professional tilers almost always start with a bit designed specifically for glass and ceramic, one with a spear or arrow-shaped tip rather than the twisted fluting you’d use on brick, and why they never let the drill hit full speed until the tip has actually bitten in.
The method that actually works
Switching off hammer action is the first and non-negotiable step, most combi drills have a simple dial or switch for this. Then comes masking tape, an unglamorous but genuinely effective trick: two or three strips of ordinary tape stuck across the drilling point give the bit something to grip, stopping that initial skid across the glaze. Mark your hole location on the tape with a pencil or marker rather than on the tile itself.
Start the drill at the slowest speed your machine allows, holding it as close to perpendicular to the wall as you can manage, and let the weight of the tool do the work rather than pushing hard. Once you’ve gone through the glaze, roughly two to three millimetres depending on the tile, you’ll feel the resistance change as you reach the softer ceramic body beneath. That’s the moment you can increase speed slightly and, if you’re drilling into the wall behind for a plug and screw, switch hammer action back on once the bit is safely through the tile itself.
Keeping things cool Matters More Than people expect. A small spray bottle of water, or even a wet sponge dabbed at the drilling point every few seconds, stops the glaze overheating and reduces the chance of thermal shock cracking. Some tilers work with the drill bit and hole submerged in a thin bead of water for exactly this reason. It feels excessive for a single hole, but it’s the difference between a clean job and a tile you’ll be replacing.
What to do if you’ve already cracked one
If the damage is done, don’t panic and don’t drill any further into that tile, the crack will only continue to spread under any further stress. Small cracks confined to a single tile, especially in a spot that isn’t structurally load-bearing (a splashback rather than a shower wall taking constant water pressure), can sometimes be stabilised with a clear silicone sealant worked gently into the crack, though this is cosmetic rather than a true repair and won’t stop it being visible up close.
Replacing the single tile is the honest fix, and it’s more achievable than people assume. You’ll need to carefully rake out the grout around the damaged tile with a grout saw or multi-tool, work a chisel or thin scraper behind it to lift it free without disturbing its neighbours, then clean the adhesive back before fixing a new tile in place with fresh adhesive and grout. The hardest part is usually sourcing a matching tile, which is why it’s worth keeping a spare or two whenever you have bathroom tiling done, tucked away in the airing cupboard for exactly this situation.
One thing worth remembering for next time: the position of your hole matters almost as much as your technique. Drilling near the edge or corner of a tile, within about two centimetres, dramatically increases the risk of cracking regardless of how careful you are, because there’s simply less material there to absorb the stress. Whenever you can, plan your fixings to land nearer the centre of a tile, and if you’re hanging something like a heavy mirror or a towel rail, consider whether the grout line itself might take the fixing instead, since it’s far more forgiving than glazed ceramic and any small chip there is much easier to disguise.