That little paper globe from IKEA, the one everyone assumes cost you fifty quid at some boutique, is almost certainly the REGOLIT. It is a plain white paper lantern that has been quietly winning hearts for costing as little as the price of a filter coffee, and with about twenty minutes of fiddling on a Saturday morning, it stops looking like a student halls staple and starts looking like something from a Scandinavian design house. I’ve had three separate guests ask where I’d “sourced” mine. None of them believed me when I said the answer was a blue-and-yellow warehouse on the ring road.
Key takeaways
- A £3 IKEA lampshade fooled multiple dinner guests into thinking it came from an expensive boutique
- The transformation takes under 20 minutes using everyday materials like twine, paint, or a storage basket
- The secret isn’t the materials—it’s the finishing details that separate homemade from high-end
Why this particular shade takes to a makeover so well
The REGOLIT has been kicking about since roughly the early 2000s, and since it first appeared in our blue bags some fifteen years ago, the paper lamp has become a favourite subject for chic IKEA hacks. Part of the appeal is the material itself. Rice paper takes paint, tape and glue beautifully, wraps around a wire frame that’s forgiving to work with, and diffuses light in a soft, even glow that flatters a room far more than a bare bulb ever could. Unlike a fabric shade, there’s no lining to fuss with and no stitching to unpick if you change your mind halfway through.
The idea of giving this classic paper lampshade a style update with easy-to-try tweaks that add a personal twist to your home isn’t some fringe trend either. IKEA itself has published official customising guides, suggesting things like using children’s paint, a roller and patterned ink stamps to give the shade a unique style update that still goes very easy on your wallet. If the retailer that made the thing is telling you to have a go with a roller and some cheap paint, you know it’s meant to be tinkered with, not treated preciously.
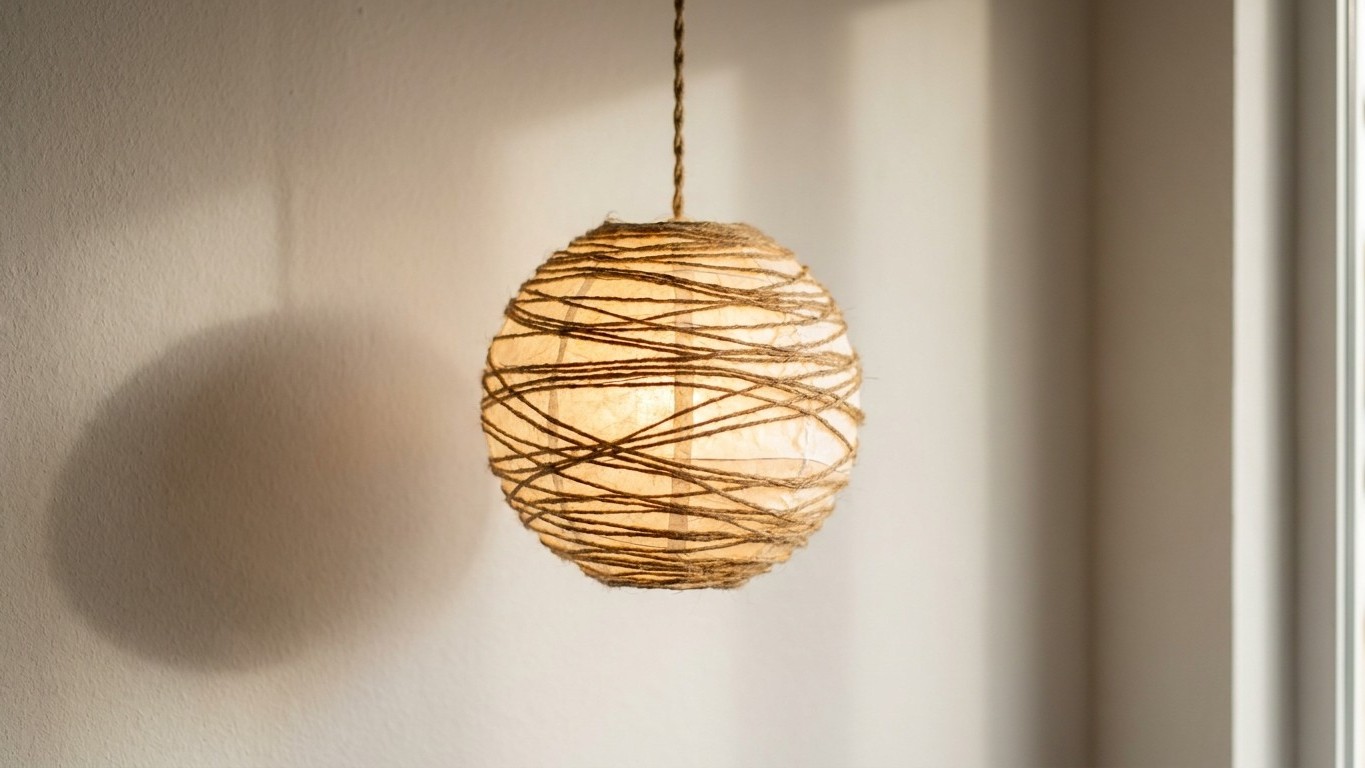
The hack that actually fooled my dinner guests
Here’s what I did, and it genuinely took less time than a load of washing. I mixed a small pot of neutral wallpaper paste, thinned to the consistency of single cream, and brushed it over the shade in patches rather than all over. While it was still tacky, I pressed on strips of natural jute twine, working from the base upwards in loose, uneven spirals, leaving small gaps of the white paper showing through. Two coats of paste sealed the twine in place and gave the whole thing a faint sheen once dry, so from a few feet away it reads as woven rattan rather than paper wrapped in garden string.
If twine feels too fiddly, plain paint is the fastest route and the most forgiving for a first attempt. Painting the lampshade is the easiest idea, whether you go ombre, add polka dots, or any other print you fancy. A watered-down emulsion in a warm terracotta or sage green, dabbed on with a natural sponge rather than a brush, gives a mottled, artisan finish that hides brushstrokes and looks deliberately imperfect, the sort of thing you’d expect on a hand-thrown ceramic lamp base costing considerably more than three pounds.
For anyone after a fuller rattan look rather than just a hint of texture, there’s a bolder route that swaps the paper shade out entirely. It’s exactly the logic behind a well-documented hack where crafters take a plain woven storage basket, snip off the handles, spray it a single flat colour, drill a small hole through the base for the flex, and hang it as a pendant. This clever hack turns the rattan basket into a designer-look lampshade with very little effort, and because baskets already have that chunky, tactile weave, the transformation from storage to statement lighting needs almost no skill at all, just a drill bit and a steady hand.
Small details that make the difference between “nice try” and “where did you buy that”
What separates a shade that looks homemade from one that looks bought is almost never the material. It’s the finishing. Trim any stray threads of twine or jute with sharp scissors rather than tugging them off, since a ragged edge is the first thing a discerning eye catches. Let paint or paste cure fully, ideally overnight, before switching the lamp on, because damp paper close to a warm bulb is asking for trouble and a slightly acrid smell will undo all your good work in seconds. And resist the urge to cover every inch of the shade. Leaving some texture through folded paper, feathers or gaps rather than bright paints or stickers gives a far more grown-up, neutral finish than a shade that’s been decorated within an inch of its life.
Choose your bulb carefully too. A warm 2700K LED does more for the finished look than any amount of decorating, since it throws an amber glow through the paper that makes even a slightly wonky paint job look intentional and cosy rather than accidental. I’d steer clear of anything daylight-toned; it turns a handsome shade back into what it started as, which is a bit of paper on a wire frame.
The bit nobody mentions is how quickly these shades can sag or discolour near a radiator or a sunny window, paper being paper, so mine lives well clear of both and has kept its shape for the better part of two years now. Worth remembering before you hang your newly smart lantern somewhere it’ll spend all summer bleaching in direct sun.
Sources : livingetc.com | ikea.com