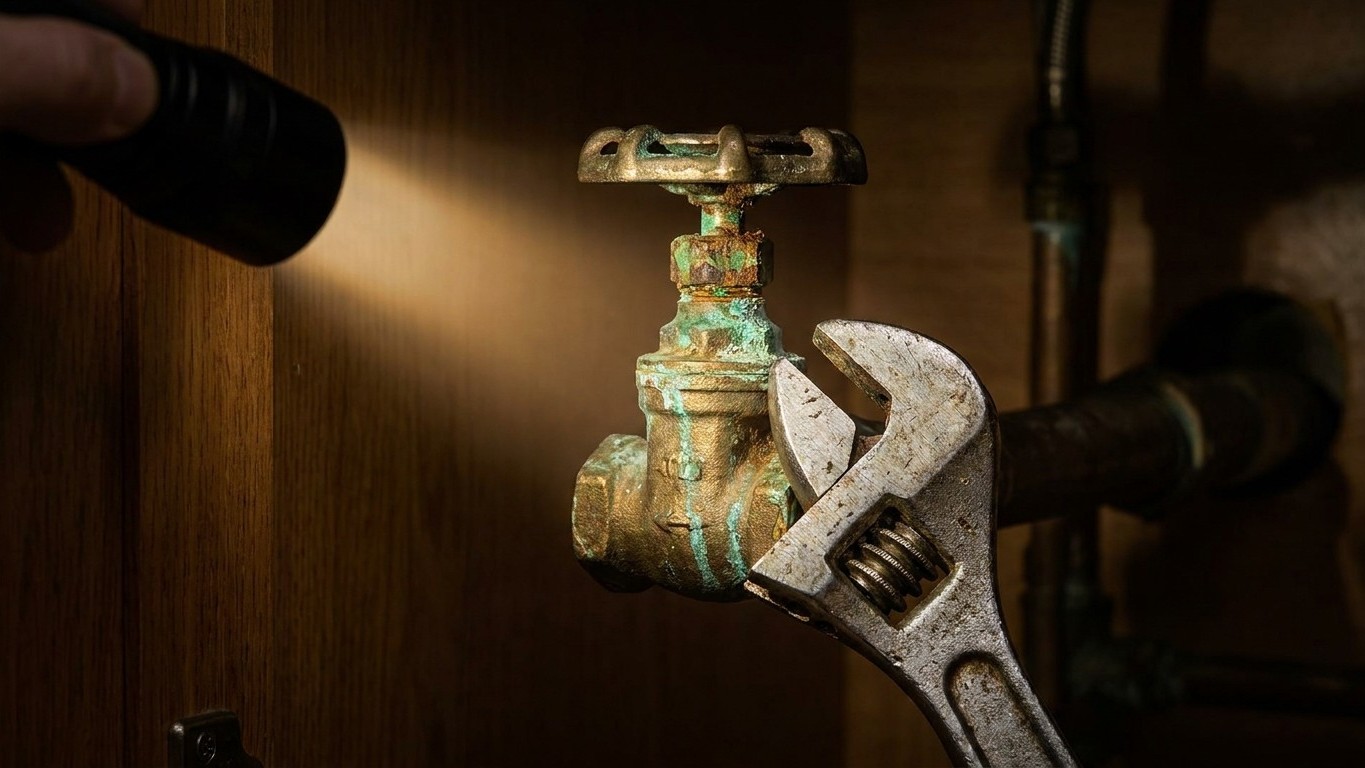
My stopcock hadn’t budged in the best part of a decade, and I only remembered it existed the night before packing for Cornwall. Standing in that cupboard under the stairs with a torch wedged under my chin, I gave the handle a firm turn. Nothing. Another turn, harder this time. Still nothing, except a horrible grinding feeling that told me something inside wasn’t turning so much as seizing. That’s when it dawned on me: this little brass valve, the one thing standing between me and a flooded kitchen while I was three counties away, had rusted itself solid.
A stopcock (some call it a stop valve, and plumbers often just say “the stop tap”) is the main shut-off for your water supply, usually found under the kitchen sink or in a cupboard near the front of the house. Its whole job is to sit there quietly for years, sometimes decades, waiting for the one day you desperately need it. Mine had been waiting since roughly 2016, as far as I could work out, and water doesn’t take kindly to being ignored that long.
Key takeaways
- What’s silently corroding inside your stopcock right now, and why hard water makes it worse
- Why a stuck stopcock turns a minor leak into a catastrophic insurance claim
- The gentle technique that freed one seized valve—and why brute force could make everything worse
What’s actually happening inside a stopcock left untouched
Here’s what I learned after a rather sweaty twenty minutes with a wrench and some choice words. Inside the valve body sits a washer, usually rubber or fibre, pressed against a metal seat by turning the handle. When water sits still against that metal for years on end, particularly in older properties with brass or even old lead fittings, limescale builds up around the spindle and the seat. In hard water areas, and large parts of the UK qualify, this scale can be substantial. The Drinking Water Inspectorate has noted that hard water regions cover much of the south and east of England, meaning millions of stopcocks are quietly furring up as we speak.
The spindle itself, the threaded rod you’re turning when you twist the handle, can also corrode where it meets the packing gland (a sort of seal that stops water weeping out around the stem). Once corrosion sets in, you get exactly what I got: a valve that either won’t move at all, or worse, moves and then won’t seal properly, dripping steadily from the gland nut. Some old stopcocks seize because the washer has perished and fused itself to the seat like old chewing gum. Either way, the valve that’s meant to save you in an emergency becomes, ironically, the emergency itself.
Why this matters more than people think
Water damage is not a minor inconvenience. According to the Association of British Insurers, escape of water is one of the most common and costly causes of home insurance claims in the UK, with average claims running into thousands of pounds once you account for flooring, plasterwork and often cabinetry. A stuck stopcock doesn’t cause a leak, but it turns a five-minute fix into a five-hour disaster, because you can’t isolate the supply while you wait for a plumber or while you fit a Replacement washer yourself.
I think of it a bit like a smoke alarm you never test. Nobody expects to need it on any given Tuesday, but the day you do, you really do. My own moment of reckoning wasn’t even a leak, just an ordinary pre-holiday check, and I was still ten minutes from giving up and just leaving the water on for the whole trip, which in hindsight was a genuinely bad idea.
Getting a stiff stopcock moving again, without breaking it
Brute force is exactly the wrong instinct here, since a snapped spindle turns a fifteen-minute job into calling out a plumber on a Sunday. What worked for me, and what several plumbing guidance sheets from UK water companies recommend, was a slower approach.
- Apply a penetrating oil (a standard household release spray works fine) around the spindle and gland nut, then leave it for at least fifteen to twenty minutes.
- Use a properly fitting wrench, not just your hand, and turn gently in short bursts rather than one hard wrench.
- Tap the body of the valve lightly with a small hammer while turning, which can help dislodge scale without cracking old brass fittings.
- If it still won’t shift, stop. A stopcock that snaps mid-repair leaves you with a permanently open valve, which is a far worse Sunday than the one you started with.
Mine came free on the third attempt, with a groan that sounded like it had been holding a grudge for years. Once it moved, I turned it fully off and on a few times just to work the mechanism, then left it in the “on” position, slightly loosened from fully tight, which several plumbing guides suggest reduces the chance of it seizing again in the same spot.
Make peace with it before you need it
The fix that actually matters isn’t the wrench, it’s the habit. Turn your stopcock off and on twice a year, ideally around the clocks changing in spring and autumn, so you always know it works and you always know where it is. If yours is buried behind cleaning products or boxes, clear the space now, because fumbling for it during an actual leak wastes precious minutes.
If yours won’t budge even after the oil and gentle persuasion, it’s worth having it replaced rather than living with an unreliable one. Modern quarter-turn isolation valves cost very little compared to the water damage they prevent, and most plumbers can swap an old stopcock in under an hour. Mine is booked in for a proper service now, oil, exercise and all, and I’ve written the date on my kitchen calendar so it never again goes a decade without a turn.