
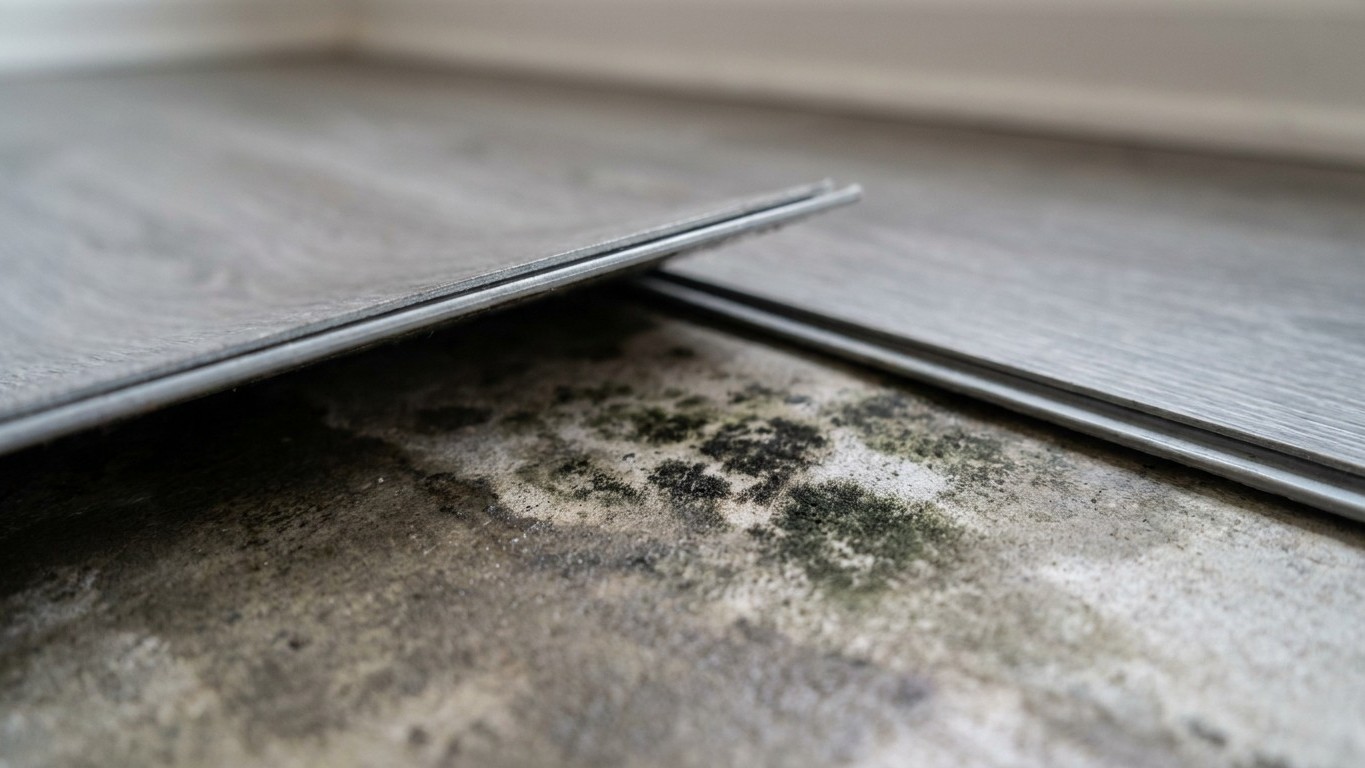
Clip-together flooring tiles are, on paper, a weekend DIY dream. No adhesive, no specialist tools, no tradesman waiting list. You snap the planks into place over your existing floor and by teatime you’re admiring your freshly transformed kitchen. The problem is that the very thing that makes these tiles so convenient, their snug, interlocking fit, can also make them a sealed lid over a moisture problem you never knew you had. Three months in, that lid lifts, and what’s living underneath can be far worse than the scruffy floor you were trying to hide.
Key takeaways
- A sealed layer of vinyl flooring can trap invisible moisture underneath, creating ideal conditions for mold to spread rapidly
- Black mold can grow visibly in as little as 3-12 days and colonize subfloors within weeks—but you won’t know it’s happening
- One simple £30 moisture test before installation could have prevented the entire problem
Why “laying over” is more complicated than it sounds
The appeal of click-lock or clip-together vinyl tiles is entirely understandable. They’re genuinely clever products, and in the right circumstances they perform beautifully. The catch is that vinyl flooring isn’t breathable, and the material acts as an impenetrable barrier that keeps moisture in place, creating the perfect breeding ground for mould growth. When you lay them directly over an existing kitchen floor, particularly older ceramic or quarry tiles, you’re adding a second layer of impervious material over a surface that may already be holding onto dampness you cannot see.
Tiles, particularly in areas like bathrooms and kitchens, can trap moisture underneath. When covered with vinyl, this moisture has nowhere to escape, potentially causing mould or mildew problems. It’s crucial to address any moisture issues before proceeding. This is especially true in British kitchens, where older concrete subfloors are common and ground-level moisture has often been quietly working its way upward for years without anyone noticing.
Timber subfloors can release humidity upward through small gaps; concrete slabs can wick groundwater up through capillary action. Cover either of those with a non-breathable layer and you’ve created the exact conditions mould needs: dark, still, and damp. A kitchen is already a room with steam, the odd splashed sink, and a dishwasher that occasionally weeps at the door seal. The conditions were practically begging for trouble.
What actually grows down there, and how fast it happens
Mould needs three things to grow: moisture, warmth, and a food source. Dust, adhesive residue, and paper-backed underlayment can all feed mould under your floor. Add trapped moisture and a warm room, and mould can start forming fast. Fast, in this case, is not an exaggeration. Within 24 to 48 hours, mould spores begin to germinate and grow when exposed to moisture. In 3 to 12 days, visible signs of mould may begin to appear, such as discoloration or a musty odour. During this time, the mould begins to spread across the subflooring. At 2 to 3 weeks, mould growth becomes extensive and may penetrate deeply in the flooring and subflooring, making it harder to remediate.
By three months, you may well be dealing with something that has colonised not just the underlayment but the original floor and even the subfloor beneath. Black mould, scientifically known as Stachybotrys chartarum, is particularly notorious. Not just common, it’s also one of the most hazardous types of mould. This mould releases mycotoxins, which are toxic substances that can cause severe health issues. As mould and mildew build up, they release spores into the air. This can lower the air quality in your home and make it harder to breathe, especially for children, seniors, or anyone with health conditions.
The early warning signs are easy to miss. If you notice a musty smell in a room with vinyl flooring, that’s a dead giveaway that there’s growth under the flooring. You might also notice vinyl planks or tiles starting to lift, curve, or push upward, a clear sign that moisture has seeped underneath. The subfloor swells as it absorbs water, causing pressure that makes the vinyl bend. A floor that felt perfectly solid in November can be subtly bouncy and malodorous by February.
How to do it properly, before a single tile goes down
The good news is that none of this is inevitable. Vinyl doesn’t cause mould, trapped moisture does. The fix is entirely in the preparation, not the product itself. Before you open a single box of click-together tiles, there are a few steps that make the difference between a lasting result and a three-month disaster.
Start with a moisture test. The best way to prevent mould is to test subfloor moisture levels before installation. A basic moisture meter, available from most hardware stockists for under £30, will give you a reading on the existing floor surface. Levels above 15% can signal a risk for mould growth. If you’re laying over a concrete subfloor or solid ground-floor construction, common in older British terraced houses, pay particular attention, because concrete slabs are always releasing some amount of moisture vapour, and on-grade installs have even more risk.
If the test comes back borderline or damp, do not skip the vapour barrier. Over concrete or any damp subfloor, a true vapour retarder is your friend. Most floating laminate and many click-together vinyl plank systems call for a 6-mil polyethylene sheet as a continuous layer. Overlap the seams, tape them tight, and bring the film up the wall behind baseboards. This single step, costing very little, blocks the slow upward migration of moisture that turns a beautiful new floor into a mould farm.
The existing floor surface also needs proper assessment. If the older tile retains moisture or shows signs of mould or mildew, you should not attempt to lay the new tile over the old. Trapped water can cause both old and new tiles to rot. You could wind up with a mould or mildew infestation That Could Cause severe health consequences for you and your family. Running your finger along grout lines and checking for any soft or discoloured patches takes ten minutes and can save you weeks of remedial work.
Expansion gaps matter too. Buckling and seam stress lets moisture creep and hold. Leave a perimeter gap around the entire room as your product requires, commonly around one quarter inch, sometimes more for long runs or humid zones. And once the tiles are down, dehumidifiers and regular room ventilation are the two most powerful ways to prevent mould under your vinyl.
If you’ve already found the problem
If you’ve lifted a corner and found the black or green patches that confirm your fears, surface cleaning will not cut it. Surface cleaning won’t fix it, the spores are in the underlay, the subfloor, or both. The honest path is to lift the affected planks, identify and stop the moisture source, replace any swollen underlay or particleboard, treat the subfloor with an antimicrobial primer once it’s fully dry, and then re-lay. The click-lock format at least makes this manageable — you’re not hacking up glued-down sheet vinyl.
In some cases, simply using a dehumidifier, improving ventilation, or even raising the temperature of the room a little might improve things. However, if mould has taken hold, it might be necessary to lift the vinyl and linoleum, allow the floor to dry out and then replace it. If you have chosen tiles or planks, this should be easier than if you have sheet or rolls of the product. For anything more than a small patch, do call in a professional, as one expert from the Society for the Protection of Ancient Buildings notes, “floors become damp where the evaporation of moisture from below is inhibited by vinyl sheet, rubber-backed carpets or other impervious coverings.” Getting a damp specialist to diagnose the underlying cause first means you’re not re-laying the same floor over the same problem in another three months.
One detail many people overlook: even after successful remediation, a kitchen dishwasher or washing machine connection deserves a close look. Small leaks from appliances, pipes, or through the roof can seep under vinyl flooring, unnoticed for a long time. A slow weep from a flexi-pipe connector, delivering perhaps a teaspoon of water a day beneath the toe kick, is quite enough to restart the whole cycle. Sort the floor, then check every appliance connection while you have the disruption anyway, it’s a detail that rarely features in the DIY guides but makes all the difference to how long your new floor actually lasts.
Sources : profloorsandblinds.com | titanfloors.ca