Butt-jointing skirting boards at internal corners looks perfectly tidy on day one. The two pieces meet flush, a little decorator’s caulk fills the hairline gap, and the room looks finished. Then comes autumn, the central heating clicks on properly for the first time, and a gap opens up that you could slide a ten-pence piece into. That gap is not a sign you did anything wrong exactly, it’s a sign you used the wrong method for the job. There is a better way, and once you’ve learned it, you’ll never go back.
Key takeaways
- A tiny gap between butt-jointed skirting boards can open to 2mm as timber dries in its first heating season
- Corners in British homes are rarely perfect 90 degrees—and butt joints have zero tolerance for this reality
- The coping (or scribing) method, unchanged for centuries, absorbs movement and stays tight indefinitely
Why timber moves and why butt joints always fail eventually
Wood is hygroscopic, meaning it constantly absorbs and releases moisture depending on the air around it. Skirting boards sold in builders’ merchants are often still adjusting to indoor conditions when you buy them. As the central heating runs through its first full season, the timber dries further and shrinks across its width. A standard 95mm pine skirting board can lose 1 to 2mm across its face during that initial drying period, modest in isolation, but devastating to a butt joint at a corner. The two pieces simply pull apart, leaving a V-shaped void that no amount of subsequent caulking will fix properly, because the movement continues with every heating season.
There’s also a subtler issue that most guides skip over. When you press two square-cut ends together in an internal corner, you’re trusting that the corner itself is a perfect 90 degrees. In almost no British house is this actually the case. Victorian and Edwardian walls are notoriously out of square, and even modern builds have corners that wander a degree or two from true. A butt joint has no tolerance for this; a scribed joint, as you’ll see, has considerable forgiveness built into its geometry.
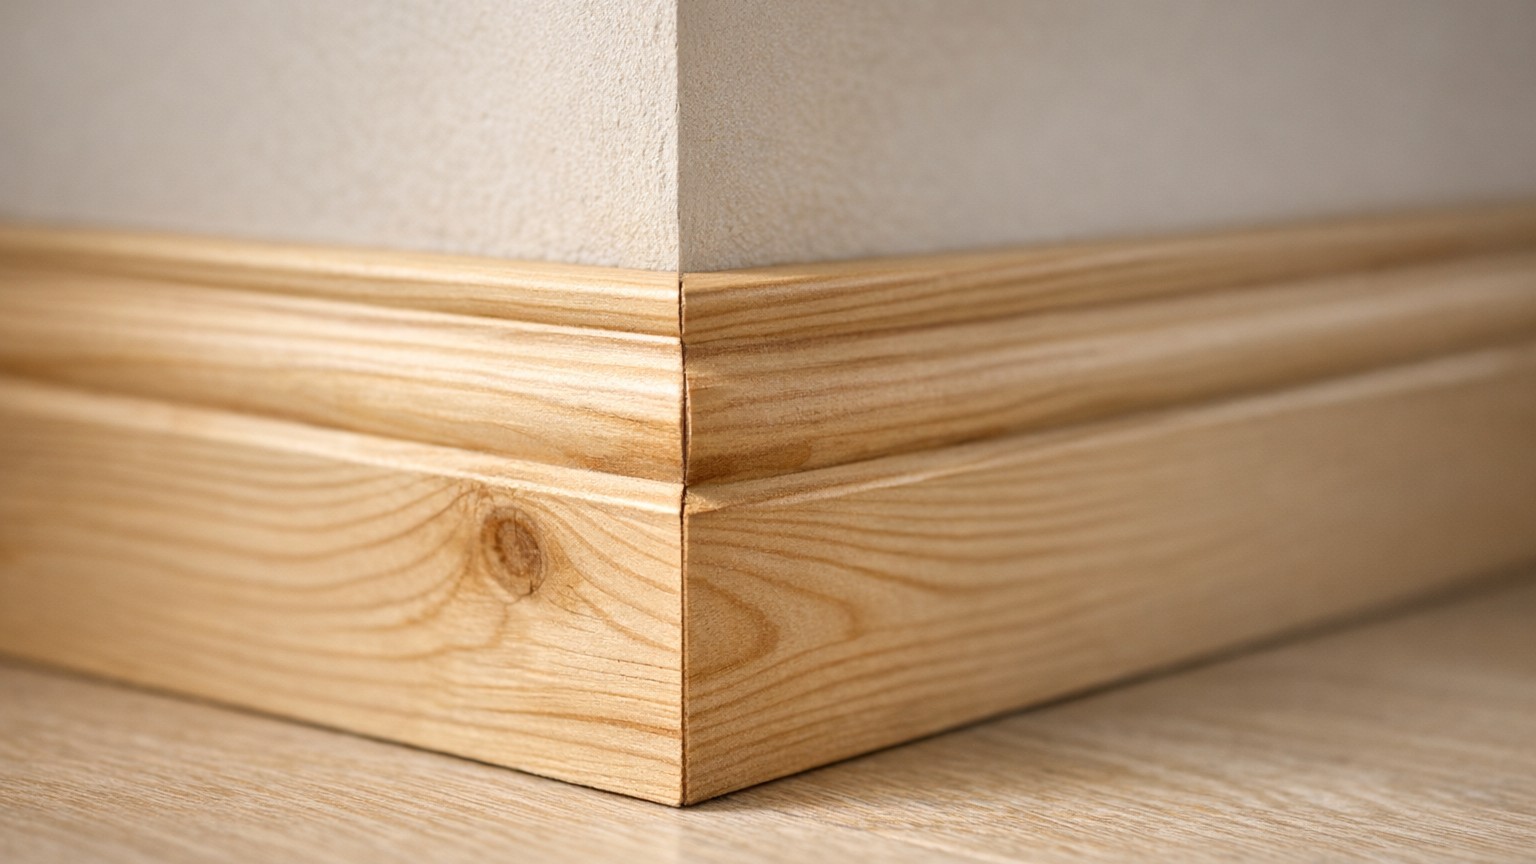
The coping (or scribing) method: what it is and how to do it
The technique is called coping, sometimes called scribing, and joiners have used it for centuries. One piece of skirting runs all the way into the corner and butts flat against the wall in the conventional way. The second piece, however, is cut to follow the profile of the first rather than meeting it end-on. When the timber shrinks, the coped piece simply slides fractionally along the face of the fixed piece, the profile remains tight and no gap appears.
The practical steps are straightforward once you’ve done it once. Start by making a 45-degree mitre cut on the end of your second piece, cutting inward as if you were making an outside mitre. This reveals the profile of the skirting’s face in cross-section, the ogee curve, the ovolo, whatever moulding you’re working with. Then take a coping saw (a small, fine-toothed bow saw costing only a few pounds at any hardware shop) and cut along that revealed profile line, angling the saw very slightly undercut, perhaps five degrees back from vertical. That undercut is what carpenters call “back relief” and it means only the front edge touches the adjacent board, giving you a consistently tight visible seam even if the cut isn’t absolutely perfect.
Test the fit against a scrap piece of the same skirting before committing. You’ll almost certainly need a few passes with a file or a sharp chisel to refine the curve. This is normal, even experienced joiners expect a little fettling. The satisfaction when the two profiles click together cleanly is very real, and the joint you’re looking at will still be tight in ten years’ time.
Choosing and preparing your timber to reduce movement in the first place
The coping method solves the joint problem, but reducing timber movement from the start is worth the small extra effort. If you’re buying prepared pine skirting in lengths, bring it indoors and stack it flat in the room where it will be fitted for at least a week before you cut anything. This acclimatisation period allows the wood to reach equilibrium with the ambient humidity of your home, so the worst of the initial shrinkage happens before the board is fixed to the wall rather than after.
MDF skirting is worth a mention here. Medium-density fibreboard is dimensionally much more stable than solid timber because its fibres run in all directions, it doesn’t have the directional grain that causes pine to shrink across its width. A coped joint in MDF will stay tighter still. The trade-off is that MDF doesn’t take physical knocks as well as wood, it’s heavier to handle, and cut edges need sealing with a primer before painting or they’ll absorb moisture and swell. In a hallway that takes a battering from pushchairs and wellies, solid pine with a coped joint is probably the wiser choice.
One thing that genuinely helps regardless of material is fixing. Skirting boards that are nailed or screwed firmly at regular intervals (roughly every 600mm, with fixings close to each end) are physically restrained and move less than boards that are merely glued or only loosely pinned. Use cut floor brads or oval nails rather than round wire nails, they’re less likely to split the timber and they grip better in older plaster walls.
A final detail that often goes unmentioned: the gap between the bottom of the skirting and the floor is just as prone to movement as the corner joints. Running a thin bead of flexible decorator’s caulk along that bottom edge, rather than attempting to fill it with a solid filler, allows the board to move seasonally without cracking the finish. The same flexible caulk at the top edge, between the skirting and the plaster, will stay intact through years of heating cycles where a rigid filler would fail in the first winter. Flexibility, in timber work as in much else, tends to outlast rigidity.