A 45-degree cut on a silicone cartridge nozzle is one of those small things that separates a tidy finish from a frustrating one. For years, I snipped mine straight across, convinced it made no real difference. Then a tiler came to redo our bathroom, and within about thirty seconds of watching him work, I realised I’d been making every single bead of sealant harder than it needed to be.
Key takeaways
- A five-second detail most DIYers never consider completely changes how sealant flows and sits
- The angle difference means your hand position and control become almost effortless
- Even perfect technique can’t salvage what the wrong nozzle cut sets up to fail
Why the angle actually matters
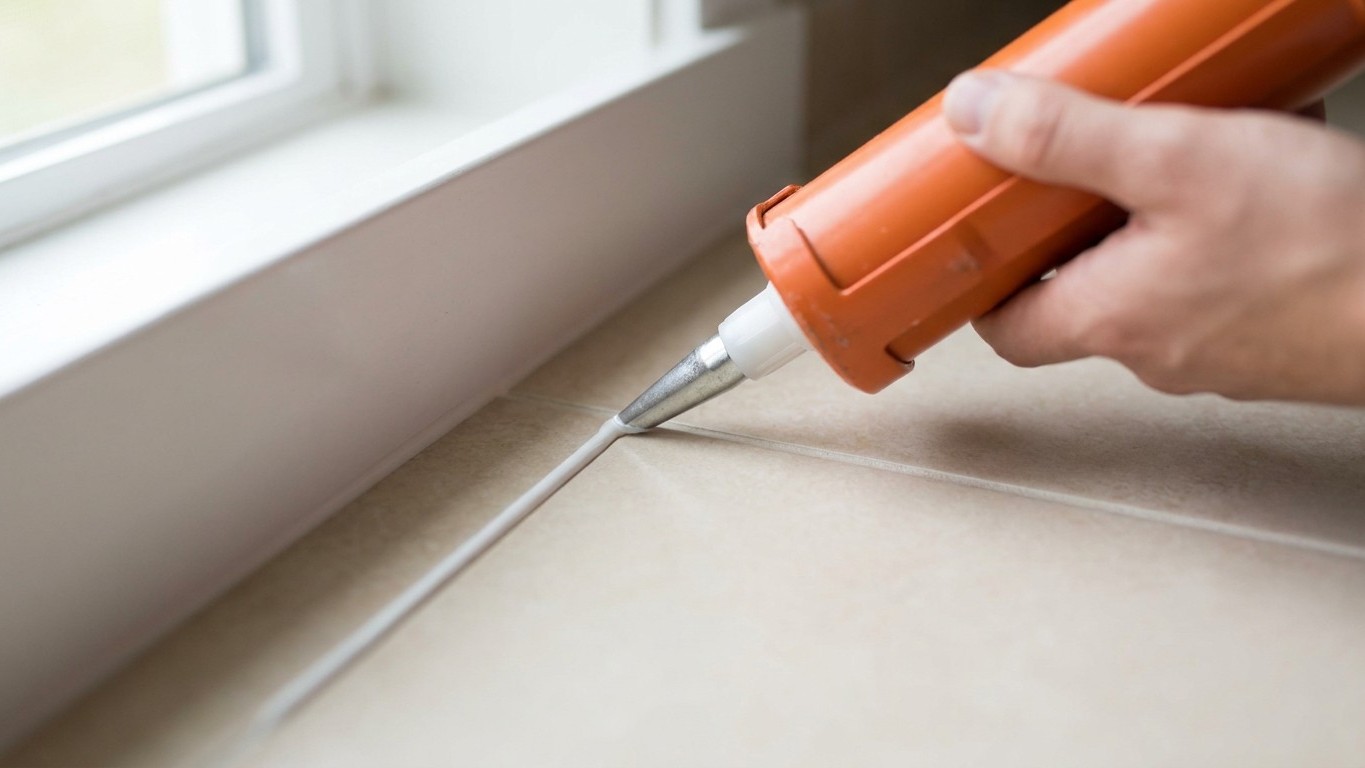
When you cut a nozzle straight across, the opening faces directly forward. The silicone exits the gun head-on, which means you have to press the nozzle flat against the surface just to get it into the joint at all. The result is a bead that sits on top of the gap rather than being pushed into it. You end up dragging sealant along the surface rather than filling the void underneath, which is precisely why those joints look lumpy, uneven, or lift away from the edge within a few months.
A 45-degree angle changes the geometry completely. The cut creates an oval opening that sits naturally against the corner or joint as you draw the gun along. The silicone is directed downward and forward simultaneously, feeding into the gap with each pass rather than pooling on top of it. The tiler who showed me this described it as “letting the nozzle do the talking”, the angle guides both the flow of the material and the position of your hand without you having to think about either.
There’s a practical bonus too. An angled nozzle gives you much finer control over bead width. Tilt the gun slightly and you expose more of the opening; straighten up and you reduce it. With a straight-cut nozzle, you have no such control, what comes out is what you get, every single time.
How to cut the nozzle properly (and the mistake most of us make)
The cut itself takes about five seconds, but there are a couple of things worth getting right. First, the size of the opening. Most bathroom and kitchen sealant joints are between 5mm and 8mm wide. Cut too far down the nozzle and your opening becomes enormous; cut too near the tip and barely anything will flow. A good starting point is to measure your joint with a finger or a matchstick and cut to match, you can always trim a fraction more if needed, but you can’t put nozzle back on.
For the angle, hold the nozzle at roughly 45 degrees and make a clean, single cut with a sharp pair of scissors or a Stanley knife. Blunt scissors are the enemy here, they crush the nozzle slightly as they cut, leaving a ragged edge that drags against the surface and interrupts the flow. A craft knife drawn across in one firm stroke gives the cleanest result. The cut should go from roughly the 10 o’clock position to the 4 o’clock position when you’re looking at the nozzle end-on, creating a proper oval rather than a near-circle.
One thing the tiler mentioned that I’d never considered: which side faces up when you work. The longer lip of the angled opening should face the surface you’re drawing along, so it acts almost like a tiny spatula pressing the silicone in as you move. Flip it upside down and you lose that benefit entirely.
Getting a clean finish once you’re rolling
The cut is only half the story. Even with a perfectly angled nozzle, silicone rewards a consistent hand. Pull the gun toward you rather than pushing it away, this keeps the nozzle ahead of the bead you’re laying, so you never drag fresh silicone back over itself. Aim for one continuous pass per joint. Stopping and starting mid-run leaves a visible bump where the two sections meet, which no amount of smoothing will completely disguise.
Smoothing itself is a small ceremony worth doing properly. A wetted finger works perfectly well : I keep a small bowl of warm water with a single drop of washing-up liquid nearby, because plain water tends to drag rather than glide. Some decorators swear by a plastic spoon dipped in the same mix, which gives a consistently curved profile. Whatever you use, one smooth pass is always better than several fussy ones. Silicone begins to skin over within minutes (faster in a warm room), so dawdling is genuinely counterproductive.
Masking tape on both sides of the joint is worth the extra three minutes it takes to apply. Run two strips of low-tack tape parallel to the joint, leaving only the gap exposed, and your margin for error becomes almost irrelevant. Peel the tape off while the sealant is still wet, before it skins, and you’ll get a line so clean it looks professional even if your hand wobbled slightly.
A note on cartridge storage that most people ignore
Once you’ve made your cut, the leftover sealant in the cartridge needs sealing before you store it. Silicone cures on contact with moisture in the air, so an open nozzle will block within a day or two at room temperature. The old-fashioned fix is to push a nail or cocktail stick into the opening and leave it there; this forms a small plug you can pull out before the next use. Some people wrap the end in cling film secured with a rubber band, which works equally well. A cartridge stored this way in a cool, dry cupboard can stay usable for several weeks, saving you from the particular frustration of opening a new tube because the old one set solid in the drawer.
Sealant cartridges also have a shelf life printed on the base, usually around twelve months from manufacture, and that date matters more than most people realise. Silicone past its best becomes stringy and difficult to tool smoothly no matter how well you cut the nozzle, so if a cartridge has been sitting in the shed since before last winter, it’s genuinely worth checking the date before you start a job you want to look good.