A shade sail looks so simple from the garden centre aisle. Four corners, a few bolts, a summer of dappled shade. So when my neighbour Phil grabbed his drill and sank four expanding bolts straight into the exterior brickwork of his Victorian semi, he felt rather pleased with himself. It took a local builder, arriving to quote for a different job entirely, roughly thirty seconds to spot the problem. The bolts were set into the outer leaf of a cavity wall, bearing a load they were never designed to hold, and the whole arrangement was quietly working against the structural logic of the building.
Key takeaways
- A homeowner’s straightforward shade sail installation was already causing hidden structural damage before anyone noticed
- Shade sails generate surprisingly high tension forces that standard wall fixings are never designed to withstand
- The outer leaf of a cavity wall is only a weather shield—fixings must reach the inner structural layer or avoid the wall entirely
The hidden physics of a shade sail
Most people look at a shade sail and see fabric. A professional looks at it and sees a tension structure, and that distinction matters enormously when it comes to where you drill. Shade sails are dynamic tension structures, which means wind loads are transferred directly into the fabric, hardware, fixing points, and supporting structure. On a still summer afternoon, that tension is already surprisingly high. With a force of just over 200 kg on a calm day with no wind, it becomes clear why the recommended steel sizes for shade sail fixings are higher than most homeowners expect. Add a breezy British afternoon to that equation and the figures climb considerably.
When wind hits a shade sail, it creates two forces: a direct pressure pushing against the fabric and an uplift force as air accelerates over the curved surface. These combined forces are transferred through the fabric to the corner attachment points, through the hardware, and into the mounting structures. A plug-and-screw fixing in a standard exterior brick wall was designed to hold a hanging basket or a number plate. It was not designed to absorb the dynamic loads of a large tensioned sail across a windy British garden.
Wall anchor pull-out is a well-documented failure mode: mounting brackets tear from the wall because they were attached to non-structural members. The prevention is always to through-bolt into structural framing, studs, headers, or rim joists, and never to rely on lag screws into siding, fascia, or trim boards. In a cavity wall, the outer leaf of brick is essentially a weather shield. Its job is to tie together with the structural inner skin, and if that connection is compromised, both skins can become independent of each other.
What “drilling straight in” actually means for your wall
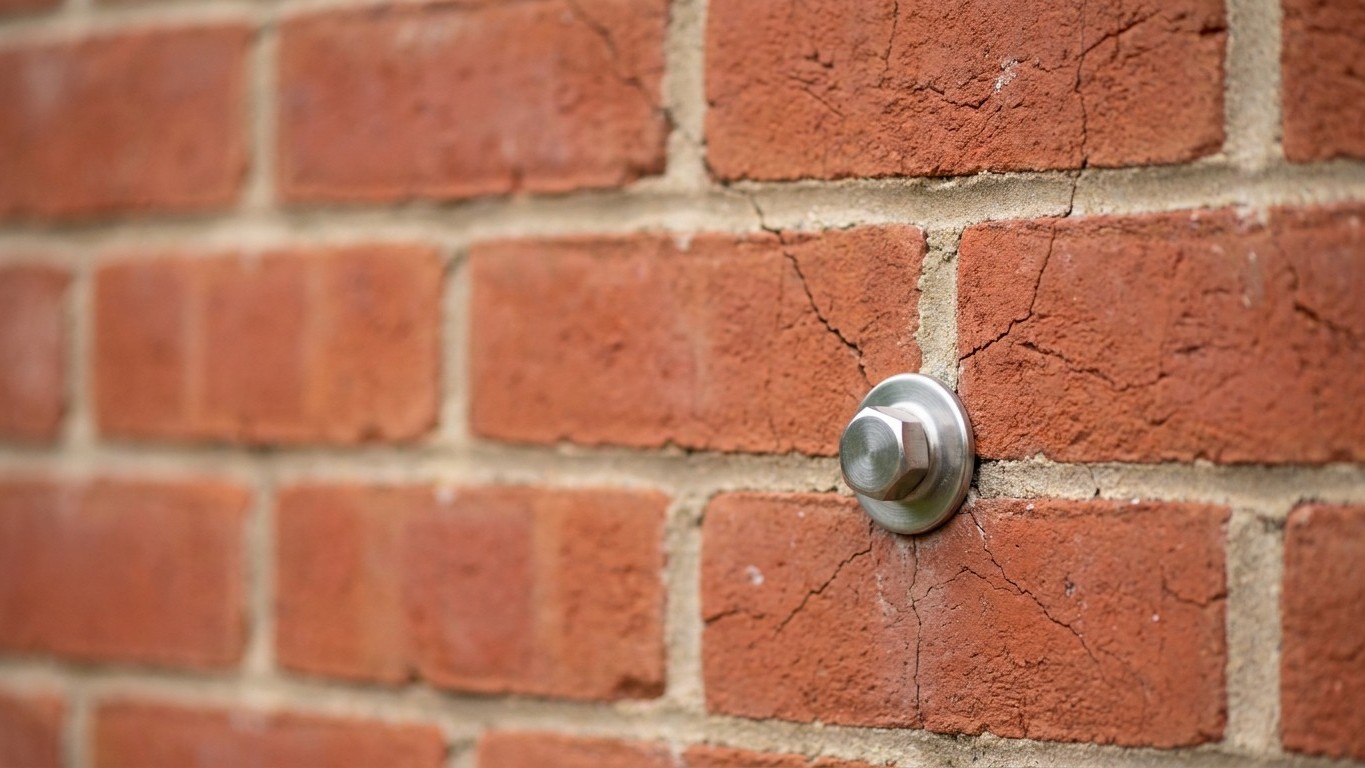
The trouble with a standard masonry bolt sunk into the outer leaf of a cavity wall is not just the load rating. It is what happens over time, especially on a building that flexes with the seasons. Brick is strong, but more brittle than most people expect. Timber is fibrous and flexible, but if too much force is applied in the wrong place on brickwork, the surface can chip, split, or crack. Under sustained tension from a shade sail, even a fixing that initially feels solid can begin to work loose, especially if placed too close to a mortar joint. Mortar joints can look tempting because they are softer and easier to drill into, but this is actually where the structure is weakest, as mortar is far weaker than brick itself.
There is also the question of what your drill actually found when it went in. A fixing point can look substantial but still be unsuitable because the member behind it is weak, the anchor location is too close to an edge, the post footing is undersized, or the point is out of alignment with the other corners. A perfectly neat hole with a well-set bolt can still be in entirely the wrong place. Do not stop at the visible surface. You need to know whether you are attaching to solid structural material, not cladding, trim, or a decorative surface that was never designed for sustained tension.
The builder who spotted Phil’s error was not being alarmist. Shade sails generate significant forces, particularly during windy conditions, and mounting to weak structures, undersized posts, or walls without proper reinforcement is a recipe for disaster. An outer brick leaf under constant inward pull is a recipe for gradual brick face separation, cracked mortar, and, eventually, a fixing that pulls clean out of the wall mid-gust. The sail does not warn you before it goes.
How to do it properly
The correct approach begins before the drill ever comes out. Look first at what can safely support load. Concrete walls, steel, and structural timber posts often work well. For a house wall, you need to know whether you are dealing with a cavity or solid construction. Most homes built in the UK after around 1920 have cavity walls, with an outer leaf, a gap (sometimes filled with insulation), and a structural inner leaf. Cavity walls split the traditional nine-inch solid wall into two four-and-a-half-inch layers: the outer wall acts as a weather shield, while the inner wall supports the structure. Any fixing intended to bear sustained load should reach through to that inner leaf, or better yet, bypass the wall entirely using a freestanding post.
The right hardware is just as important as the location. Substandard accessories, such as cheap tensioning devices or weak anchors, can compromise the integrity of the installation. Stainless steel turnbuckles, eye bolts, and pad eyes are recommended for maximum durability. The fixings need to be rated for the job. Wall-mounted brackets and pad eyes transfer the sail’s load into the structural wall or post. Use 316 stainless steel or hot-dip galvanised brackets rated for significant loads, and ensure brackets are through-bolted into structural members, not lag-screwed into thin panels.
The angle matters too, and this is where many DIY installations fall flat even when the fixings are sound. The ideal installation angle creates a slope of at least 20 to 30 degrees from the highest to the lowest point. This angle promotes water runoff, creates visual interest, and helps the sail maintain proper tension. A flat or nearly flat installation invites water pooling, sagging, and eventual damage. A sail sagging under collected rainwater places a sudden and substantial shock load on every fixing point simultaneously. Water pooling is a major reason shade sails fail prematurely, as water is heavy and the fabric is not designed to hold standing water.
When to step back and call someone
If you have any doubts about the strength of an existing structure, consult a local building inspector, contractor, or structural engineer before proceeding. That is not overly cautious, it is simply the correct sequence of events for a job involving sustained structural loads on your home. A brief visit from a builder costs far less than repairing pulled brickwork or, worse, replacing a sail that took out a section of wall when a September storm arrived.
While installing a shade sail may appear straightforward, it requires precision and technical expertise. Many homeowners attempt a DIY installation without fully understanding the correct techniques, which can lead to structural instability. That is not a reason to feel discouraged. A freestanding post system, with posts properly set in concrete footings, removes the house wall from the equation entirely and gives you full control over height, alignment, and span. Sometimes the cheapest-looking layout becomes the most expensive if the available fixing points create poor shade coverage, no height variation, or awkward tension lines. New posts give you more control over span, height, and alignment.
Phil, for his part, did end up with a beautifully installed shade sail, after the builder re-did the fixings using threaded rods that passed through the full depth of the wall and were backplated on the inner leaf. The original holes, now patched with matching mortar, are barely visible. What is worth knowing is that the outer brick face had already begun to show the faintest hairline cracks around two of the four original fixings. Months of low-level tension had started separating the brick face from the wall body, the kind of damage that looks minor until a surveyor uses it to reduce your property valuation. The shade sail itself was completely fine.
Sources : brisbaneshadesails.com.au | homebuilding.co.uk