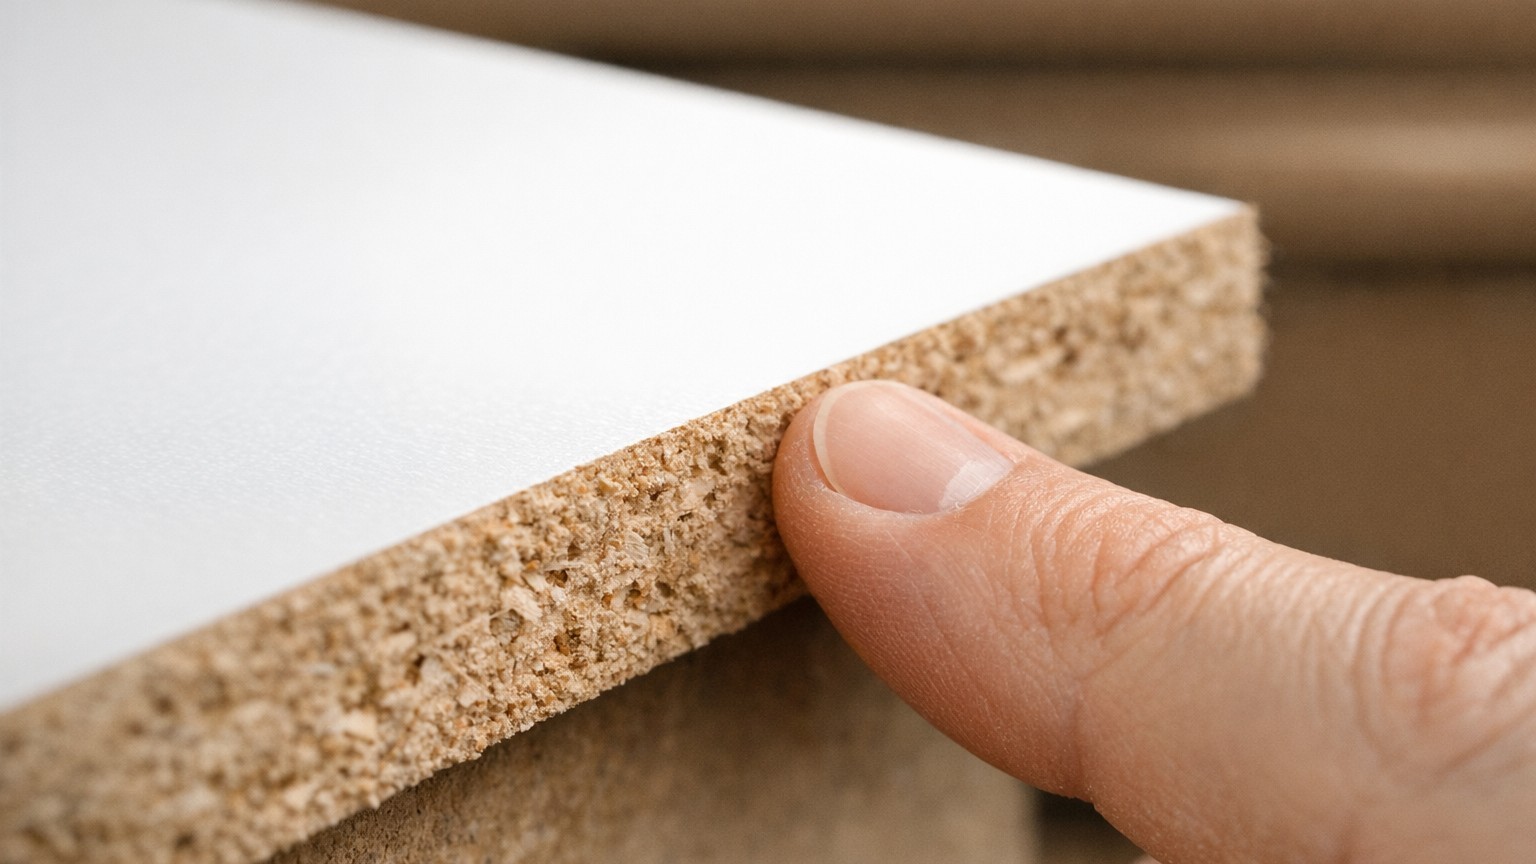
MDF edges are a trap that catches almost everyone the first time. The flat faces of the board behave beautifully with paint, drinking it in evenly and drying to a respectable finish, so it feels perfectly natural to treat the cut edges the same way. Run your brush straight across them, let it dry, and you’ve committed one of the most common decorating mistakes in the DIY book. Those edges will stay rough, slightly fuzzy, and stubbornly absorbent no matter how many topcoats you pile on.
The reason lies in what MDF actually is. Medium-density fibreboard is made by breaking down wood into fine fibres, mixing them with resin and wax binders, then pressing the whole lot together under enormous heat and pressure. The flat faces end up with a relatively sealed, compressed surface. The cut edges, on the other hand, expose the raw inner structure of the board: thousands of tiny wood fibres standing on end like the bristles of a brush, hungry for moisture and almost impossible to fill with a single coat of ordinary paint. Your paintbrush essentially disappears into them.
Key takeaways
- MDF cut edges expose raw fibre bundles that absorb paint unevenly, unlike the sealed flat surface
- Shellac-based primer stops the thirst, but there are cheaper alternatives using PVA glue or solvent-based primers
- The sanding step between coats is where most DIYers fail—and it’s the difference between professional and amateur results
Why the edges drink paint so differently
Wood fibres are naturally porous, and when they’re sliced through cleanly and left exposed, they act like a bundle of drinking straws. Any water-based paint or primer you apply gets pulled straight in, raising those fibres slightly as the moisture swells them. The paint film that forms on top is thin and uneven because the liquid has been sucked away before it had a chance to level out. Sand it back and the same thing happens again. This is why, years ago, cabinet makers would always apply a dedicated edge sealer or use shellac-based products on MDF edges before touching them with anything else.
Shellac-based primer is still one of the best options available, and it’s worth knowing why. Shellac dries almost instantly (ten to fifteen minutes between coats in a warm room), it doesn’t raise the fibres the way water-based products do, and it creates a genuine barrier that stops subsequent paint from soaking through. A single coat of shellac-based primer followed by a light sand with 240-grit paper can transform what was a woolly, porous edge into something almost as smooth as the flat face. It costs more than standard primer, but you use very little of it.
The methods that actually work
If shellac isn’t to hand or feels like overkill for a small job, there are two budget-friendly alternatives that work well enough for most domestic projects. The first is watered-down PVA glue. Mix one part PVA with roughly two parts water, brush it liberally onto the cut edges, and allow it to dry completely, which usually takes an hour or so. It soaks in, bonds the fibres together, and leaves a slightly harder surface for your primer to sit on. One coat often isn’t enough: two thin applications, each fully dried, will give you a noticeably better result. The second option is to use a solvent-based primer as your first coat rather than a water-based one. The solvents penetrate deeply without swelling the fibres, and the resulting film is tougher and less absorbent.
Whatever sealing method you choose, the sanding step between coats is not optional. After your first application dries, you will almost certainly feel some roughness, a slight furriness under your fingertip. That’s the fibres that absorbed moisture and swelled. A gentle pass with 240-grit or 320-grit paper knocks them flat without removing the seal you’ve built up. This is the stage most people skip when they’re in a hurry, and it’s exactly why their finished edges never quite look right.
A note on filling versus sealing
Some decorators reach for fine surface filler on MDF edges, spreading it across the whole edge and sanding back once dry. This can work, but it’s slower than sealing and can introduce its own problems: filler shrinks slightly as it dries, and if the application isn’t perfectly even you can end up with small depressions that show under paint. For straight, machine-cut edges with a clean profile, sealing and sanding is generally faster and tidier. Filler makes more sense when the edge itself has been damaged, chipped, or when you’re trying to hide a join between two boards.
Getting a genuinely smooth finish on painted MDF
Once the edges are sealed and sanded flat, the rest of the process is straightforward but worth doing carefully. Apply your first coat of topcoat paint thinly, resisting the urge to load the brush. MDF, even sealed MDF, rewards patience over speed. Let each coat dry fully rather than waiting until it merely feels dry to the touch: water-based paints in particular can feel dry on the surface while still being slightly soft underneath. Two or three thin topcoats, with a very light sand between each, will give you a result that’s hard to distinguish from a factory finish.
One detail that often surprises people: the junction between the flat face and the cut edge benefits from a tiny bit of extra attention. Because the two surfaces behave differently (even after sealing), paint can pull slightly thicker on the flat face and slightly thinner on the edge, creating a visible line under raking light. Running the tip of your brush along that junction as a final pass, almost dry-brushing it, feathers the paint across smoothly and eliminates that tell-tale edge shadow.
There’s a small practical footnote worth keeping in mind for anyone planning to use MDF in kitchens or bathrooms. Even sealed and painted edges remain more vulnerable to moisture over time than the flat faces, because no paint film is completely impermeable forever. Moisture-resistant MDF, which contains a higher proportion of water-resistant resin, is available in most builders’ merchants and the cut edges, while still needing the same preparation treatment, hold up considerably better in damp environments. The boards are usually a distinctive green or blue colour inside, making them easy to identify on the shelf.