Replacing a damaged window sill sounds like the sort of job that needs a specialist, a van parked outside for half a day, and a bill that makes you sit down rather sharply. But last autumn, when the painted softwood sill beneath my kitchen window finally gave up after years of wet winters and condensation, I decided to have a go myself. The Technique that saved me was embarrassingly straightforward, and I’m still a little cross that nobody had mentioned it before.
Key takeaways
- The tool that makes window sill removal ridiculously easy (hint: it’s not what you’d expect)
- Why cutting the old sill into pieces instead of prying it out whole is the game-changer nobody mentions
- The complete material list and finishing techniques that make DIY results look professionally installed
Sizing up the damage (and being honest with yourself)
Before anything else, you need to understand what you’re actually dealing with. Window sills fail in two quite different ways. Surface rot, the kind where the paint has bubbled and the top layer crumbles when you press it with a screwdriver, can often be treated in place with a wood hardener and filler. But when the rot has gone deep, when your screwdriver sinks more than a centimetre without resistance, or when the sill has pulled away from the wall at the edges, you’re looking at a full replacement. There’s no point pouring filler into a sponge.
The interior sill and the exterior sill are separate pieces, and most people only need to tackle one at a time. Interior sills (the flat board you might rest a plant pot on) are generally much simpler to swap out than exterior ones, which sit exposed to the elements and are usually bedded into the masonry on either side. My own project involved an interior softwood sill, and that’s what this method addresses beautifully.
The one technique that changes everything
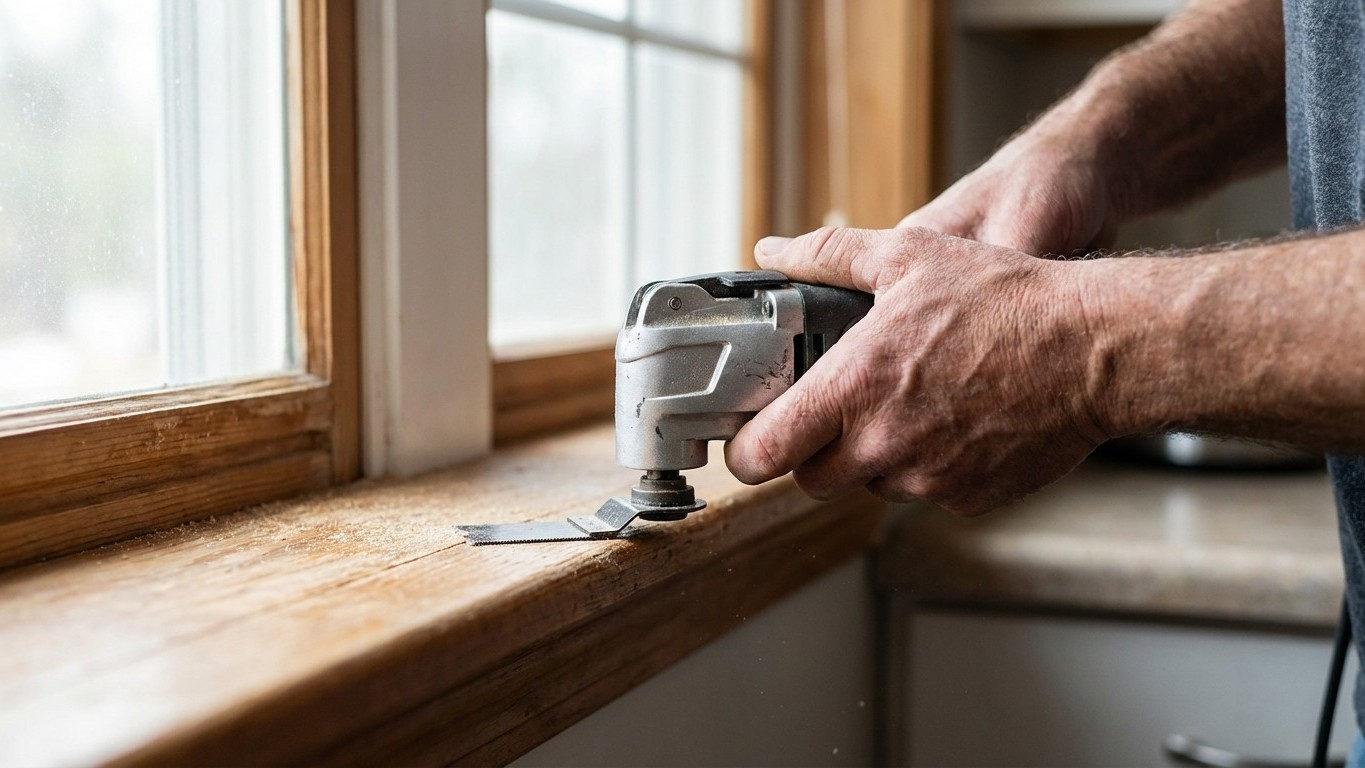
Here’s what nobody tells you in the standard DIY guides: you don’t have to prise the old sill out in one piece. Trying to lever out an intact sill often damages the plaster, the window frame, or your patience in roughly equal measure. The technique I stumbled upon, after watching a retired joiner work on a neighbour’s house, is to cut the sill into sections first using an oscillating multi-tool.
An oscillating multi-tool (sometimes called a multi-cutter) is a relatively affordable piece of kit that vibrates a blade at high speed rather than spinning it. This matters enormously near a window frame. You can run the blade right along the back edge of the sill, flush against the frame, without the blade pulling, snagging, or wandering into the plaster. Make two cuts dividing the sill into thirds, then remove the middle section first. Once that’s out, the two end pieces simply pivot inward and lift free. No crowbar gymnastics. No cracked plaster. It took me about twelve minutes from first cut to empty reveal.
Before you start cutting, do run the blade carefully along the join between the sill’s back edge and the window frame to sever any old paintwork or caulk. Skipping this step is how people end up pulling strips of paint off their frames.
Cutting and fitting the new sill
Measure the opening twice, then measure again with a cup of tea in hand, because a sill that’s even a few millimetres too wide will not drop into place no matter how firmly you believe in yourself. You want the new sill to fit snugly into the reveal, with a small overhang of roughly 25 to 30mm at the front edge to allow rainwater (on exterior sills) or condensation (on interior ones) to drip clear of the wall below.
For an interior replacement, MDF window board is the most popular choice in British homes today and it’s easy to understand why. It’s stable, takes paint beautifully, and is available from any builders’ merchant or large DIY retailer cut to common widths. Hardwood or solid pine gives a more traditional finish, and if you’re in an older property with deep window reveals, you may need a wider board than standard MDF stock provides, in which case a timber merchant will often rip a piece to your exact specification for a modest charge.
Once your new sill is cut to length, dry-fit it before applying any adhesive. Check it sits level using a spirit level, and tap small wooden wedges underneath if the reveal isn’t perfectly flat, which in most British houses it absolutely won’t be. A bead of grab adhesive applied in a zigzag pattern along the underside, combined with a thin line of decorator’s caulk at the back edge where the sill meets the frame, is all you need to hold it firmly in place. No screws necessary for an interior sill of standard width.
The finishing details that make it look professional
This is where most first-timers lose their nerve and rush, and it shows. Give the adhesive a full 24 hours before you do anything else. Then sand any rough edges on the new sill, prime it (two coats if it’s MDF, which drinks primer like it’s thirsty), and apply your topcoat. A satin or eggshell finish in white holds up far better to the damp, steamy conditions near a kitchen or bathroom window than a flat emulsion ever will.
Fill the gap between the sill and the wall below with a flexible decorator’s caulk, not a rigid filler. Walls in older homes move very slightly with temperature and humidity, and a rigid joint will crack within a season. Smooth the caulk with a damp finger, let it skin over, then paint over it. From three feet away, the result is indistinguishable from professional work.
The whole job cost me less than a takeaway for two, and I’ve been insufferably pleased with it ever since. What strikes me now is how many small repairs around the house we quietly surrender to professionals simply because the first step, removing the broken thing cleanly, seems too daunting. Once you find a gentler way through that first step, the rest usually turns out to be rather ordinary. Makes you wonder what else might yield to a slightly different approach.