That hairline crack above the bedroom window had become almost a tradition in our house. Every October, out came the filler, the fine sandpaper, and my optimism. Every March, the crack was back, wearing its familiar thin smile across the ceiling. Three years of this, and I’d started to suspect the problem was structural. Then a decorator came in to quote for repainting the hallway, cast one glance upward, and asked with genuine puzzlement: “You’re not using a flexible filler for that, are you?” Reader, I was not.
Key takeaways
- Most people fill ceiling cracks with rigid filler, which cracks again within months because it can’t flex with seasonal house movement
- A decorator’s one-sentence observation changed everything—but the fix requires knowing exactly which tube to reach for at the hardware shop
- The real secret isn’t about application skill; it’s understanding why walls and ceilings move differently and what that means for your repair choice
Why ordinary filler fails on ceilings (and most people never find out)
The crack I’d been battling is what builders call a movement crack. Houses breathe. Timber joists expand in summer heat and contract in the cold, the whole structure shifting a fraction of a millimetre with each temperature swing. Ceilings, suspended below those joists, absorb that movement constantly. A rigid filler, the kind sold in small tubs for filling nail holes and minor wall imperfections, simply cannot cope with that flex. It cures hard, bonds tightly to the plaster on both sides, and when the ceiling moves even slightly, the filler cracks clean through again. You haven’t done anything wrong. You’ve just been using the right product for the wrong job.
The gap between wall and ceiling is the most common culprit. That junction, where two surfaces meet at slightly different rates of movement, opens and closes seasonally like a slow-motion breath. Skimming over it with standard filler is essentially asking a rigid material to stretch, which it cannot do. The British Standard guidance on interior plasterwork acknowledges this movement issue, which is why the building trade has long distinguished between rigid and flexible interior finishes.
The tube that changed everything: flexible decorators’ caulk
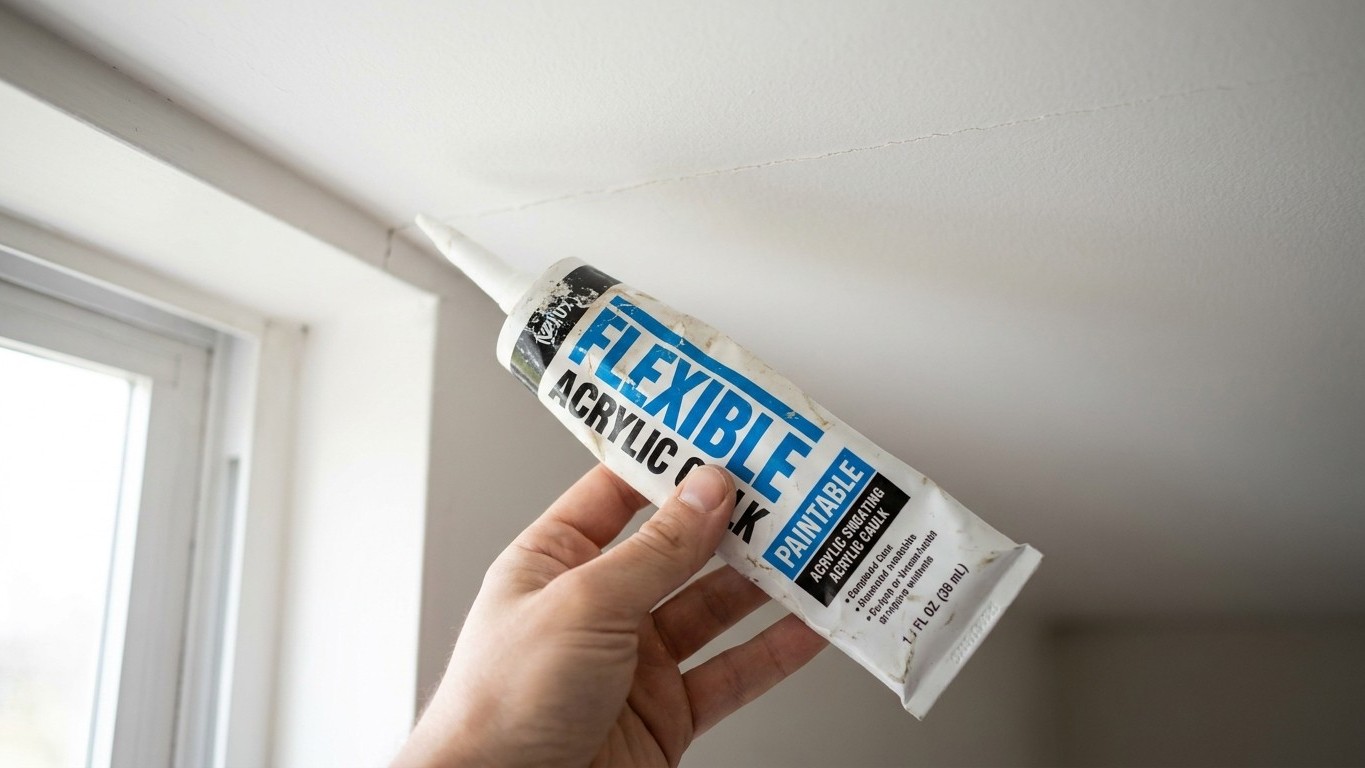
What the decorator pointed at, in my hand, was a tube of flexible decorators’ caulk, sometimes labelled as flexible acrylic sealant or painters’ caulk. It looks almost identical to standard sealant, but it remains slightly pliable once cured. The key word on the packaging is “flexible” or “paintable flexible.” This matters more than the brand name. The formula is designed to bond to plaster and move with it rather than against it.
Application is satisfyingly straightforward. Cut the nozzle to a fine point, ideally no wider than 3mm for hairline cracks, and run a steady bead along the crack. Wet your finger, or use a small plastic smoother, and press the caulk firmly into the gap with a single smooth stroke. The temptation is to apply too much and then attempt to sand it level later. Resist this entirely. Flexible caulk does not sand well once dry; it tends to smear and pill. The finish comes from applying less and smoothing it accurately in one pass, leaving it just fractionally proud of the surface. Once fully cured, typically 24 hours though check your specific product, it will accept emulsion paint without complaint.
One practical note that took me an embarrassing amount of time to learn: if the crack is wider than about 5mm, push a thin strip of the caulk in first, allow it to skin over for an hour, then apply a finishing layer. This prevents it sinking as it dries and leaving a concave channel where you expected a flat surface.
Choosing the right product at the hardware shop
The shelves can be genuinely confusing, with silicone sealants, acrylic sealants, flexible fillers, and decorators’ caulk all sitting in a row looking nearly identical. Silicone is the one to avoid here. It cures Completely airtight and waterproof, which makes it ideal for bathrooms and kitchens, but it repels paint and has no place near interior ceiling cracks. Whatever you buy for internal movement cracks should be water-based (acrylic), flexible when cured, and explicitly labelled as paintable.
Cost-wise, a decent tube runs from roughly £3 to £7, depending on the size and where you shop. A 300ml cartridge, which requires a caulk gun, covers a surprising amount of work and tends to be better value than the squeeze tubes if you have more than one room to tackle. Hardware chains, builders’ merchants, and most large DIY shops stock these reliably.
For very deep or wide gaps, a foam backer rod pushed into the crack before caulking gives the sealant something to bond against and prevents it sinking. These are sold in rolls by the metre and cost very little. They’re worth knowing about if you have older properties with more pronounced movement gaps at the coving or ceiling rose surrounds.
A word on the ceiling itself before you begin
Before reaching for any product, run your hand along the cracked area and press gently. If the plaster feels solid and doesn’t flex or crumble, the surface is sound and caulk alone will solve the problem. If sections feel hollow, or if fragments of the old finish come away, there’s a more significant bonding failure underneath. In those cases, the loose area needs to be cut back to firm plaster and replastered properly before any surface treatment will hold long-term.
There’s also a distinction worth knowing between a hairline crack running along the centre of a plasterboard join, which typically indicates the tape beneath has failed, and a crack at the wall-ceiling junction, which is almost always a movement issue. The first may need the join retaped with jointing tape and compound before decorating. They look similar from across the room but require different remedies entirely, and confusing the two is precisely why some cracks return faithfully every single year, sometimes for a decade or more, without anyone stopping to ask which tube they’re actually reaching for.