Resealing a bath is one of those jobs that feels satisfying the moment you smooth down that fresh bead of silicone, only to watch it go mouldy, crack, or peel away again within three or four months. If that cycle sounds familiar, the culprit almost certainly isn’t the sealant itself, it’s whatever was left underneath before you applied it.
A plumber friend of mine put it plainly during a visit to my bathroom a few years back. He watched me proudly point to my freshly sealed bath edge and said, without a hint of cruelty: “Did you take off the old layer entirely first, or just apply on top?” I’d done the latter, of course. Most of us do. And that single omission is why the job keeps failing.
Key takeaways
- Most people apply new sealant directly over old layers, creating a bond that’s destined to fail
- An invisible barrier of soap scum and residue prevents fresh silicone from gripping the surface
- The removal process takes patience and the right tools—but skipping it guarantees the cycle will repeat
Why old silicone is the real problem
Silicone is wonderfully flexible and waterproof on its own, but it will not bond properly to itself. Apply fresh sealant over an existing layer, even one that looks clean and smooth, and you’re essentially asking the new silicone to grip a surface it chemically refuses to stick to. The two layers may hold together for a short while, but bath movement (and baths move more than people realise, flexing slightly every time you get in and out) will eventually pull them apart. Water sneaks into that tiny gap, mould takes hold from behind, and within a season you’re back where you started.
There’s also the question of soap scum, body oils, and general bathroom residue that build up on old silicone over time. Even if you’ve cleaned the surface thoroughly with a bathroom spray, those substances penetrate porous or degraded silicone and create an invisible barrier that prevents adhesion. A fresh sealant line applied over that contamination is fighting a losing battle from day one.
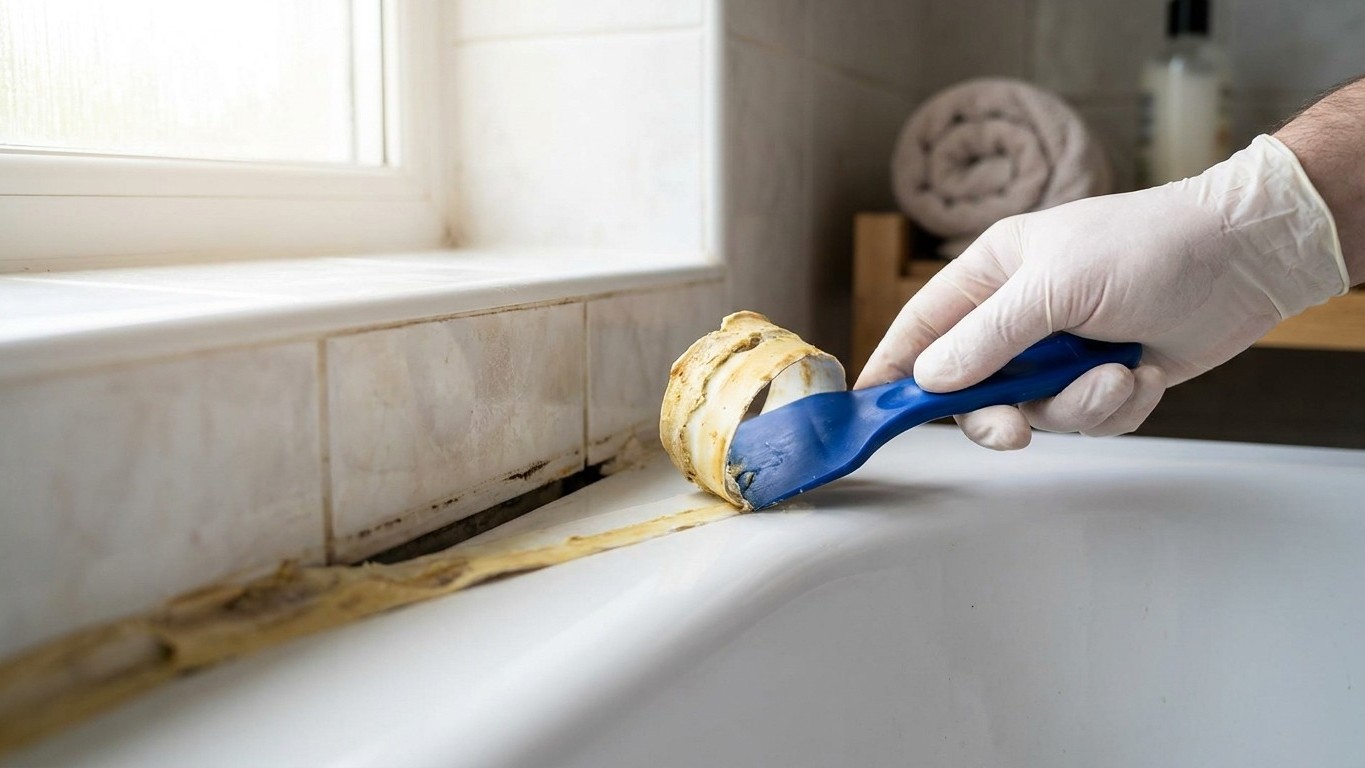
How to remove silicone properly, the step that most tutorials rush past
Removal takes patience. That’s the honest truth. Set aside at least an hour, and don’t try to rush it with a knife alone. Start by softening the old silicone: a proper silicone remover gel, applied generously and left for the time stated on the packaging (usually around twenty to thirty minutes), will make the bead far easier to lift without scratching your bath surface. You can find these at most hardware shops and they cost only a few pounds.
Once softened, use a plastic scraper rather than a metal blade wherever possible. Metal will scratch acrylic baths and can chip enamel. Work slowly along the bead, peeling it away in as long strips as you can manage, this is oddly satisfying when it goes well. For the stubborn bits left behind, a cotton wool pad soaked in methylated spirits or white spirit will lift residue without damaging the surrounding surface. Wipe Everything down afterwards with a clean cloth dampened in clean water and leave the area to dry completely — and that means completely, not just surface-dry to the touch.
Here’s something that surprises many people: the gap between the bath and the wall may look dry within an hour, but moisture trapped in a badly ventilated bathroom can linger in corners and crevices for much longer. Running your extractor fan, leaving a window ajar, or even using a hairdryer on a cool setting along the joint before you apply new sealant makes a real difference to how well it sets and holds.
Choosing the right sealant and applying it well
Bathroom-grade silicone sealant always contains a fungicide to resist mould growth, and this distinction genuinely matters in a damp environment. General-purpose sealants may look identical in the tube but lack that protection and will show black mould patches far sooner. Always check the label before buying.
Before you apply a single millimetre of new sealant, fill the bath with water and leave it full. This is a trick that professional tilers and plumbers use routinely. A filled bath sits lower due to the weight, opening the gap between the tub and the wall to its maximum width. Seal it in this position and the sealant will flex correctly when the water is drained away and the bath rises back. Seal an empty bath and the joint will be under tension from the moment someone has a soak, and that tension will crack or pull the sealant loose very quickly.
Applying the sealant itself is easier with a little preparation. Run two strips of painter’s tape along either side of the joint, leaving just the gap exposed, and you’ll achieve clean, straight edges without the sticky mess. Cut the nozzle at a slight angle, squeeze steadily and smoothly along the joint in one continuous movement if you can manage it, then tool the bead with a wet finger or a purpose-made smoother. Remove the tape immediately, before the silicone skins over, and you’ll find the finish genuinely looks professional.
Leave the sealant to cure for the full time stated, usually twenty-four hours minimum, before running any water near it. Resist the temptation to check it’s dry by pressing it. It needs to be left entirely alone.
One final thing worth knowing
White silicone is the most popular choice for bathroom use, but it shows mould more visibly than darker shades as it ages. Clear silicone, by contrast, hides discolouration better and suits most bathroom colour schemes without clashing. A small detail, but one worth thinking about before you buy, because if you’ve done the preparation properly this time, you want the result to look as good in two years as it does today.