Silicone sealant around a bathtub should last for years. If yours keeps cracking or pulling away from the wall within months of application, the problem almost certainly has nothing to do with the brand of silicone you used or how carefully you smoothed it with a wet finger. The culprit is something far simpler, and far more fixable: the tub was empty when you applied it.
Key takeaways
- Most people seal their bathtubs empty—and that’s why the silicone cracks within months
- A filled bathtub weighs over 300kg and flexes more than you’d think, destroying improperly applied sealant
- Apply silicone to a full tub, then drain it after curing for a seal that works with the movement instead of against it
Why a full bathtub is a heavier bathtub than you’d think
A standard UK bathtub holds somewhere between 150 and 230 litres of water when filled to a comfortable soaking depth. Water weighs one kilogram per litre, so you’re adding anywhere from 150 to 230 kilograms to the tub before you even climb in. Add an average adult and you’re looking at well over 300 kilograms of combined load pressing down on the bath. Cast iron baths, those gorgeous heavy ones you find in older houses, flex very little, but acrylic and pressed steel baths, which is what most of us have these days, move more than you’d expect under that kind of weight.
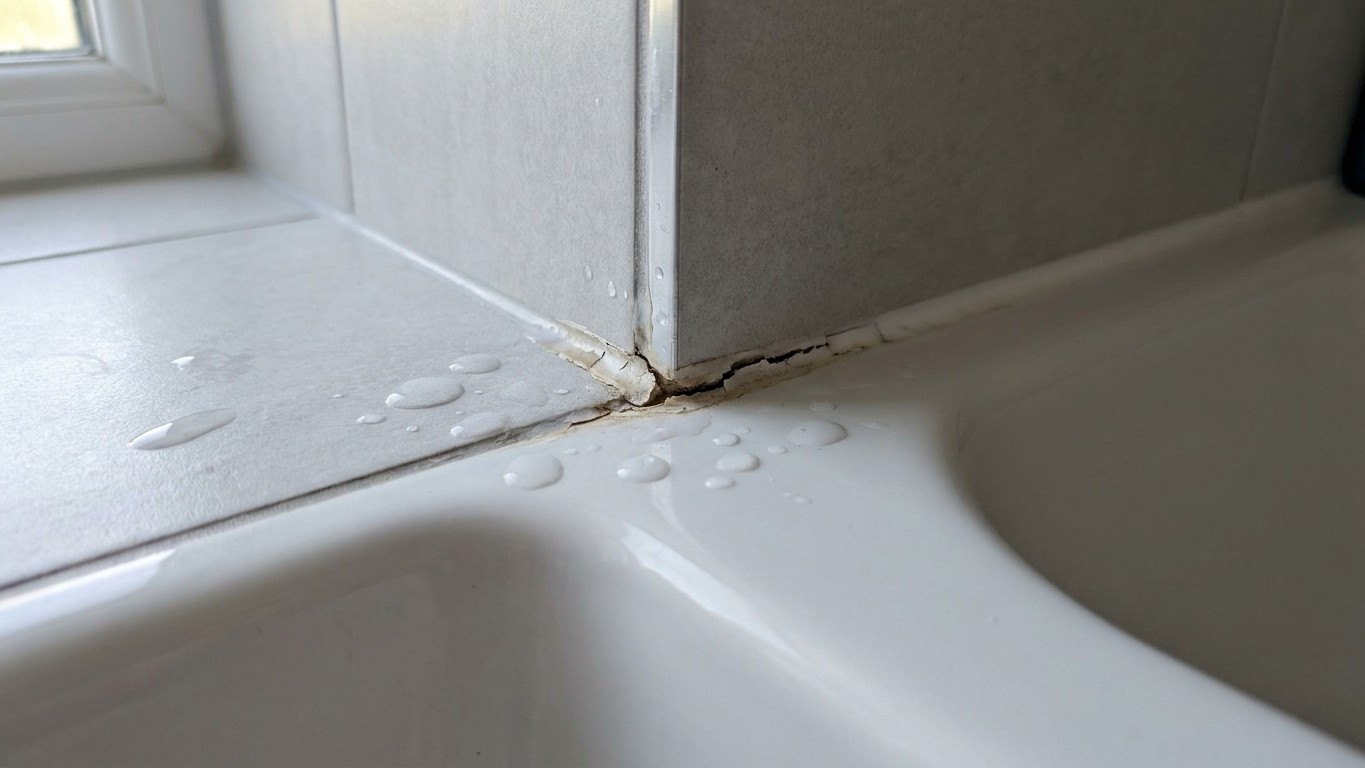
That downward flex, even if it’s only a millimetre or two, is enough to stretch the seal between the tub rim and the wall tiles. Silicone applied to an empty tub sits in a neutral, relaxed position. The moment water goes in, the bath drops slightly, pulling the joint open. The silicone, already cured and inflexible in its original shape, can’t accommodate the movement. A small split forms, water creeps in behind the tiles, and within a season or two you’ve got mould, damp patches, and the whole sorry business of stripping it out and starting again.
The correct method, step by step
The fix is almost embarrassingly straightforward. Before you apply a single drop of silicone, fill the bathtub to its normal bathing level with warm water. Let it sit for ten minutes so the structure settles fully under the load. Only then do you strip out the old sealant, prepare the surfaces, and apply the fresh silicone.
Surface preparation matters enormously here. Old silicone must be removed completely, there are dedicated silicone remover gels available at any DIY shop that soften the residue so you can lift it cleanly. Once the joint is bare, wipe the surface down with isopropyl alcohol or a methylated spirits-dampened cloth to remove every trace of soap scum, grease, and moisture. Silicone will not bond reliably to a contaminated surface, and all the correct filling technique in the world won’t save a poorly prepared joint.
Apply the silicone in a single, steady bead along the joint while the tub is still full. Smooth it immediately with a wet finger or a silicone finishing tool dipped in a solution of washing-up liquid and water, this stops the tool dragging or sticking. Then leave it alone. Most bathroom silicones specify a curing time of 24 hours before water exposure, though some low-odour formulations can take up to 48 hours to cure fully in a poorly ventilated room. Only once it’s completely cured should you drain the tub.
That draining step is where the real engineering happens. As the water empties, the bath rises back toward its unloaded position, and the silicone compresses very slightly into the joint. You now have a seal that was formed under maximum stress and relaxes under minimum load, precisely the opposite of the old approach. Every time you fill the bath, the joint is working within its design tolerances rather than fighting against them.
A few things that trip people up
Overfilling the bath makes no practical difference and risks water on your freshly prepared surfaces, so fill it to your normal bathing depth and leave it there. Some people worry about the weight of the water making the tub unstable while they’re working around it, a sensible concern. Keep your weight off the bath rim entirely, reach in from outside, and take your time with the smoothing step.
The type of silicone you choose does matter, though perhaps less than the packaging suggests. A fungicidal or anti-mould formulation is worth the slight premium for a bathroom environment, since the joint will be wet and warm for years. Avoid general-purpose silicone, which is designed for dryer conditions and tends to discolour faster in a steamy bathroom. Sanitary-grade silicone is sold in most large DIY shops and supermarkets, and white will suit the vast majority of UK bathrooms with no fuss.
One thing many guides skip over: the joint width makes a difference to longevity. A joint that is too narrow, under 3mm, doesn’t give the silicone enough bulk to flex without tearing. If the gap between your tub rim and the wall tiles is very thin, it may be worth checking whether the tiles can be re-grouted slightly further back to open it up. A 5 to 8mm bead of silicone has considerably more give than a hairline strip squeezed into a tight channel.
What to do when the damage is already done
If your existing sealant has already split, the only real option is to remove it entirely and start fresh with the water-filled method. Patching over cracked silicone with a second layer never holds for long; the new silicone bonds to the old rather than to the bath and tile surfaces, and you end up with the same problem doubled. Strip it back to bare substrate, take your time with the cleaning step, and resist the temptation to rush the curing phase by running a hot shower nearby.
A small additional note worth keeping in mind: silicone sealant has a shelf life, and a half-used tube left in the back of a cupboard for eighteen months may no longer cure properly even if the cap was sealed. If your new bead stays tacky after 48 hours in a ventilated room, the product itself may be the issue rather than your technique.