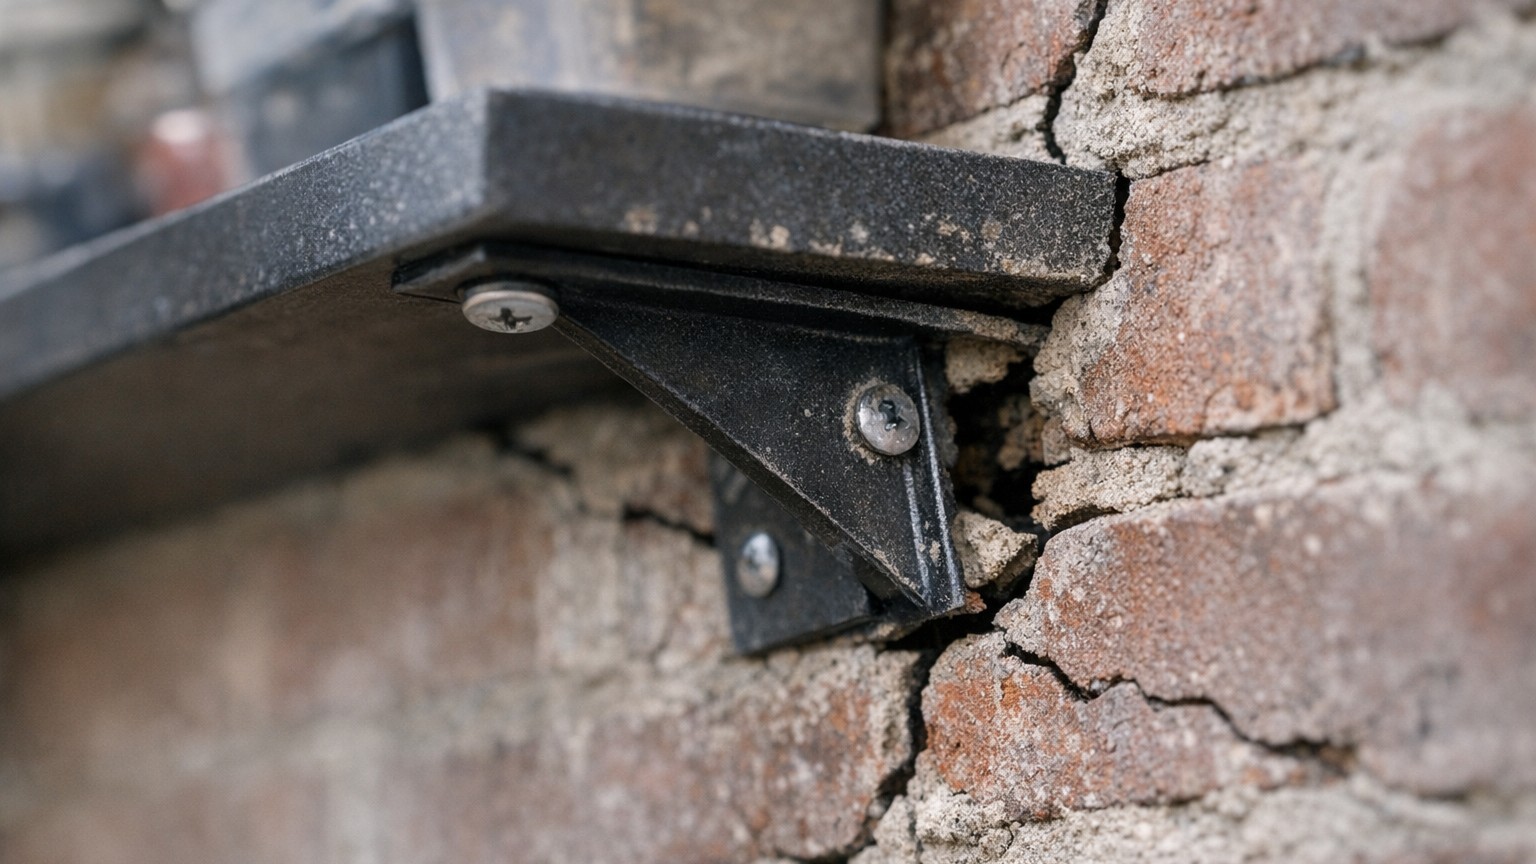
Drilling into the soft, crumbly mortar line between bricks feels like the path of least resistance, and many of us have done exactly that. The drill glides through, no alarming crunching sound, no dust flying at your face. Easy. The problem is that a wall plug sitting in mortar rather than in solid brick is about as secure as a tent peg hammered into wet sand, and the consequences can range from an embarrassing sag to a genuinely dangerous collapse.
Key takeaways
- Why mortar is deliberately soft and why that’s a trap for wall plugs
- What happens inside a plug when it’s forced to grip crumbling mortar
- The simple trick to identify which brick you should actually be drilling into
Why the mortar joint is a trap dressed as a favour
Mortar in a traditional British brick wall is deliberately softer than the bricks it joins. That’s by design, not by accident. Builders have used relatively weak mortar for centuries because it acts as a sacrificial layer, absorbing movement, freeze-thaw cycles, and minor settlement without cracking the bricks themselves. The mortar is meant to be the weakest link. Which is precisely Why You Should Never ask it to hold a shelf full of books.
A standard plastic wall plug works by expanding outward against the surrounding material when you drive the screw home. In solid brick or dense blockwork, those fins dig into a hard, stable surface and create genuine friction. In mortar, the same plug expands into a material that crumbles slightly with every turn of the screw, gradually destroying the very thing it’s trying to grip. The joint is also typically only 10mm wide, so the plug has very little depth of firm material on either side before it starts chewing into air or the brick edge.
The joint width matters more than people realise. Standard mortar joints in UK brickwork run between 8mm and 12mm wide. A typical 8mm or 10mm plug, once expanded, is pressing against a material that can flake away under sustained load, particularly if there’s any vibration, damp ingress, or the bracket is ever knocked sideways. A shelf holding books, a bathroom cabinet above a basin, a mirror with a heavy frame: these are long-term loads on a fixing that was never designed for permanence.
Where the drill bit should actually go
The brick itself is your target. A standard house brick in the UK measures roughly 65mm tall, so between any two mortar joints you have a solid expanse of ceramic that will grip a plug properly. The technique is straightforward once you know what you’re looking for: use a spirit level to mark your fixing point, then nudge the mark up or down by a centimetre or two until it sits clearly in the middle of a brick, away from the joint lines above and below.
Use a proper masonry bit with a tungsten carbide tip, not a general-purpose bit, and if you have access to a hammer drill, use the hammer function. It makes the job considerably easier and reduces the risk of the drill wandering sideways into the mortar out of sheer frustration. Drill to the depth of your plug, no deeper, and blow or vacuum the dust from the hole before inserting the plug. Loose dust in the bottom of the hole prevents the plug from sitting at full depth, which reduces the fixing strength.
For heavier loads, the principle doesn’t change but the hardware does. A double-expansion anchor plug, sometimes called a frame anchor or a heavy-duty plug, is worth the small extra cost when hanging anything that genuinely weighs something. These are widely available at any builders’ merchant or DIY retailer and cost very little relative to the peace of mind they provide.
The exception: when you genuinely have no choice
Occasionally the geometry of a project forces you into a mortar joint, perhaps a tiled bathroom wall where drilling through a tile joint is the only option, or a very old wall where the bricks are so irregular that avoiding joints is nearly impossible. In these situations, a chemical fixing (sometimes sold as resin anchor or injectable mortar) transforms the equation entirely. You inject a two-part resin into the drilled hole, insert a threaded rod, and wait for the compound to cure around it. The resin fills every gap and irregularity, bonding to whatever material surrounds it rather than relying on mechanical expansion. The result in soft mortar is dramatically stronger than any plastic plug.
Chemical fixings do require the hole to be scrupulously clean and dry before use, and the cure time varies by product and temperature, so read the instructions carefully. They’re more expensive than standard plugs, but a small tube goes a long way and keeps on a shelf for future projects.
A word about cavity walls and modern blockwork
Much of post-war British housing uses lightweight aerated concrete blocks (often called thermalite or aircrete) rather than traditional dense brick as the inner leaf of a cavity wall. These blocks are quite different from brick: softer, more porous, and genuinely less capable of holding a standard expanding plug under load. If you tap your internal wall and it sounds hollow in a different way from a cavity, or if the drill glides through with very little resistance, you may be in aerated block territory. Here, specialist cavity fixings or hollow-wall anchors designed specifically for lightweight block are the right choice. Using a standard plug in aircrete and expecting it to hold a heavy wall-mounted television is wishful thinking.
One small thing worth keeping in mind: even a perfectly placed plug in solid brick can fail if the screw used is too short. The plug needs the screw to reach its full length to expand properly. A screw that bottoms out before the plug is fully engaged leaves the outer end of the plug loose and ungripped. Match the screw length to the plug length every time, and check that the screw gauge matches the plug size printed on the packet.