Over-tightening cam-lock bolts with a power drill is one of the most common mistakes people make when assembling flat-pack furniture, and the damage it causes tends to be invisible until the whole piece starts to fail. The panel doesn’t crack immediately. The cam doesn’t visibly shatter. What happens is quieter and more insidious: the wooden housing surrounding the cam fitting gets crushed, and what was once a snug mechanical grip slowly becomes a loose wobble that no amount of re-tightening will fix.
Key takeaways
- A cordless drill delivers 4-6 Newton-metres of torque where cam fittings need only 0.5-1.5
- The damage happens inside the panel where you can’t see it until the shelf fails
- Two different failure modes can occur depending on which parts you over-torque
What cam-lock fittings actually do (and why they’re cleverer than they look)
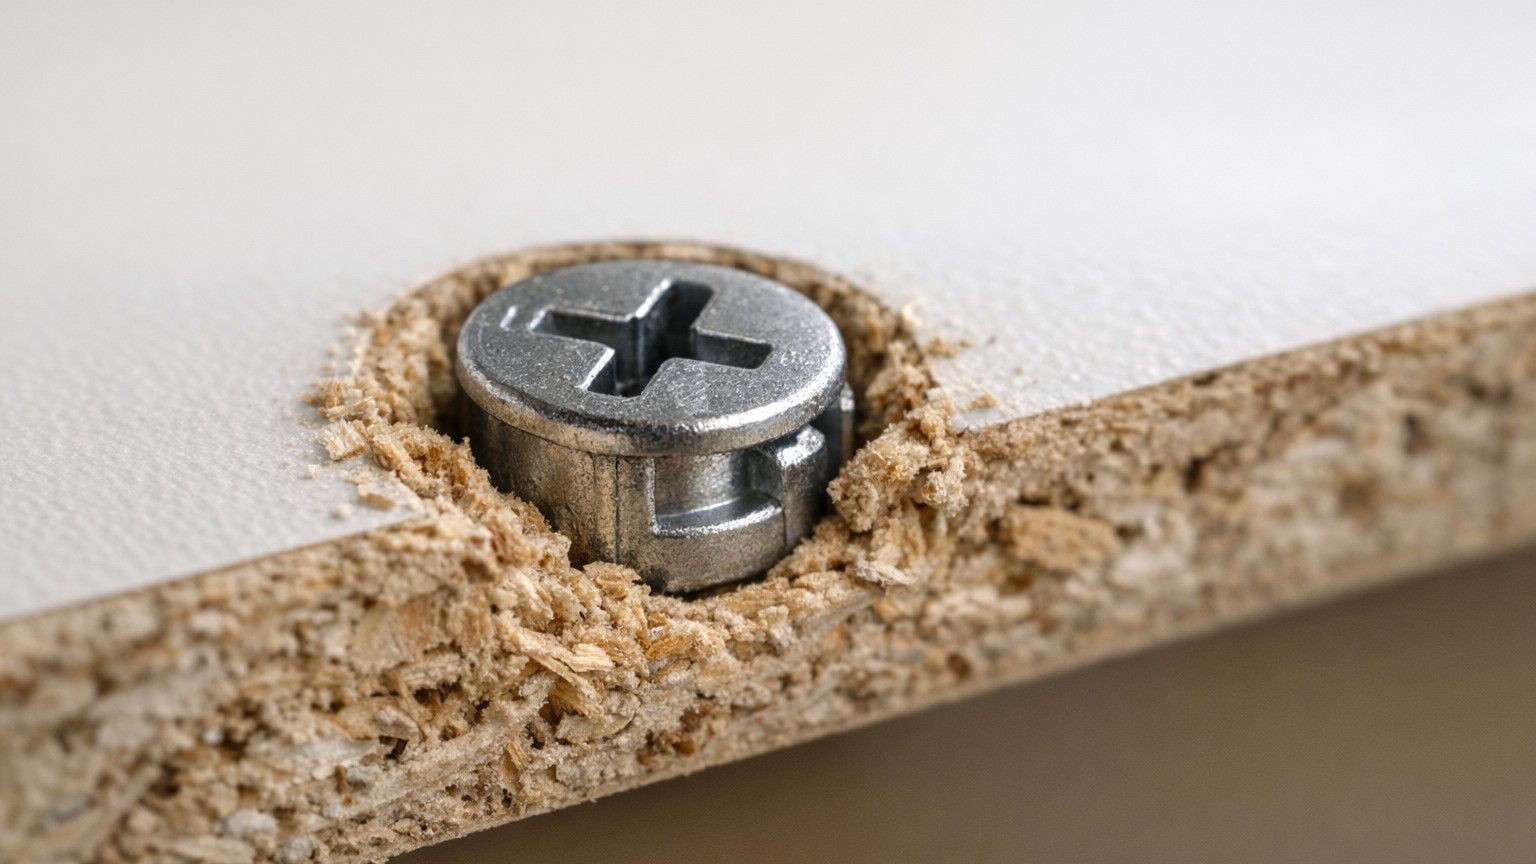
Those small barrel-shaped metal inserts pressed into your shelf panels are called cam locks, or sometimes Minifix fittings. They work as a two-part system: a cylindrical bolt screws into one panel, and its rounded head slots into the cam housing in the adjacent panel. When you turn the cam a quarter-turn with a flat or cross-head screwdriver, an eccentric lobe inside the cam rotates and catches the bolt’s neck, pulling the two panels tight together. The design is genuinely elegant, and under normal hand-tightening, it’s strong enough to hold a bookshelf together for decades.
The catch is that the cam housing sits inside a circular recess drilled into particleboard or MDF, materials that are essentially compressed wood fibres bonded with resin. They can bear reasonable compressive loads across a wide surface, but they have very little resistance to point pressure or to being crushed at the rim of a small hole. When you use a power drill to spin that cam beyond its quarter-turn stop, you’re applying rotational torque that the surrounding material was never designed to absorb.
The invisible damage a power drill creates
Here’s what actually happens inside the panel when you over-torque a cam fitting. The cam rotates past its locking point, and instead of holding firm, it begins to grind against the walls of the recess. The particleboard at the rim compresses and crumbles slightly, creating tiny voids. Those voids mean the cam can now shift fractionally during normal use, rocking back and forth with every load placed on the shelf. A week later, or sometimes two, the shelf panel starts to lean. The joint has not failed completely, but it has lost its precision, and particleboard doesn’t recover once it’s been crushed. It simply stays deformed.
There’s also a second failure mode that tends to surprise people. If the bolt on the opposite panel was also driven in with a power drill, the thread can strip the pre-drilled hole in the chipboard. Cam-lock bolts have a coarse, deep thread designed to be driven in by hand or with a very low-torque screwdriver. A drill, even on a low clutch setting, often delivers several times more torque than the wood fibres can grip. Once those fibres are stripped, the bolt spins freely, and no cam in the world can lock onto something that won’t stay still.
A rough idea of scale: flat-pack cam fittings are typically designed to be tightened to somewhere between 0.5 and 1.5 Newton-metres of torque. The average cordless drill, even on its lowest clutch setting, often delivers four to six Newton-metres. That’s three to ten times too much, applied in a fraction of a second.
Can the damage be repaired, or is the panel lost?
The honest answer is: sometimes, but not always. If the cam housing itself has only slightly compressed its recess, you may get a temporary improvement by removing the cam entirely, filling the recess with a small amount of two-part wood filler or even PVA mixed with fine sawdust, letting it cure fully for 24 hours, then re-seating the cam and tightening it by hand. This works better than you’d expect on minor damage, because you’re essentially rebuilding the compressive surface the cam relies on.
Stripped bolt holes are trickier. The classic repair is to pack the hole with wooden cocktail sticks and a little PVA glue, trim them flush once dry, and re-drive the bolt by hand into the newly consolidated wood. It sounds improvised, but it works on particleboard surprisingly well, because the sticks add new fibres for the thread to bite into. Some people use match-sticks to the same effect. What you must not do is try to re-drive the bolt immediately with a drill, because you’ll strip the fresh repair just as quickly as the original hole.
For panels where the recess has crumbled badly enough that the cam housing rocks visibly, replacement is the more reliable route. Flat-pack panel sections can often be ordered directly from the manufacturer’s spare parts service, usually for a few pounds, and many manufacturers hold parts for their ranges for several years after discontinuation.
Assembling flat-pack the right way from the start
All cam fittings should be tightened with a hand screwdriver, full stop. The instructions in flat-pack furniture leaflets are not being overly cautious when they show a manual screwdriver; they’re reflecting the actual mechanical limits of the joint. Drive the cam-lock bolt in by hand until it is snug, not rigid. Turn the cam a quarter-turn with a flat-head screwdriver until you feel it click or resist. That resistance is the locking lobe engaging the bolt neck. Stop there.
If the cam won’t tighten adequately by hand, the problem is almost always misalignment between the cam housing and the bolt, not insufficient torque. Loosen everything, reposition the panels, and try again. Brute force simply doesn’t solve alignment problems; it masks them briefly and then creates new ones.
One detail the assembly instructions rarely mention: if you’re building on a hard floor, the slight flex of the panels as you work can shift the bolt positions by a millimetre or two. Assembling on carpet or a folded blanket gives the panels enough cushioning to stay flat, which makes alignment considerably easier and reduces the temptation to force fittings that aren’t quite meeting properly.