A squeaky floorboard is one of those domestic annoyances that starts politely and ends up driving you quietly mad. Mine had been creaking under the landing carpet for the better part of two winters, and I kept putting off the repair because every solution I’d read about seemed to involve rolling back the carpet, pulling up boards, and generally spending a Saturday doing something I hadn’t planned. Then I tried the drill-through-the-carpet method, and what I found twisted around the bit when I withdrew it told me something I hadn’t expected about the floor beneath.
Key takeaways
- A simple technique lets you screw floorboards down without removing carpet—but it requires finding the joist first
- What emerged from the first pilot hole revealed a hidden problem that had nothing to do with the squeak
- Fixing the underlying issue took just twenty minutes once the real culprit was identified
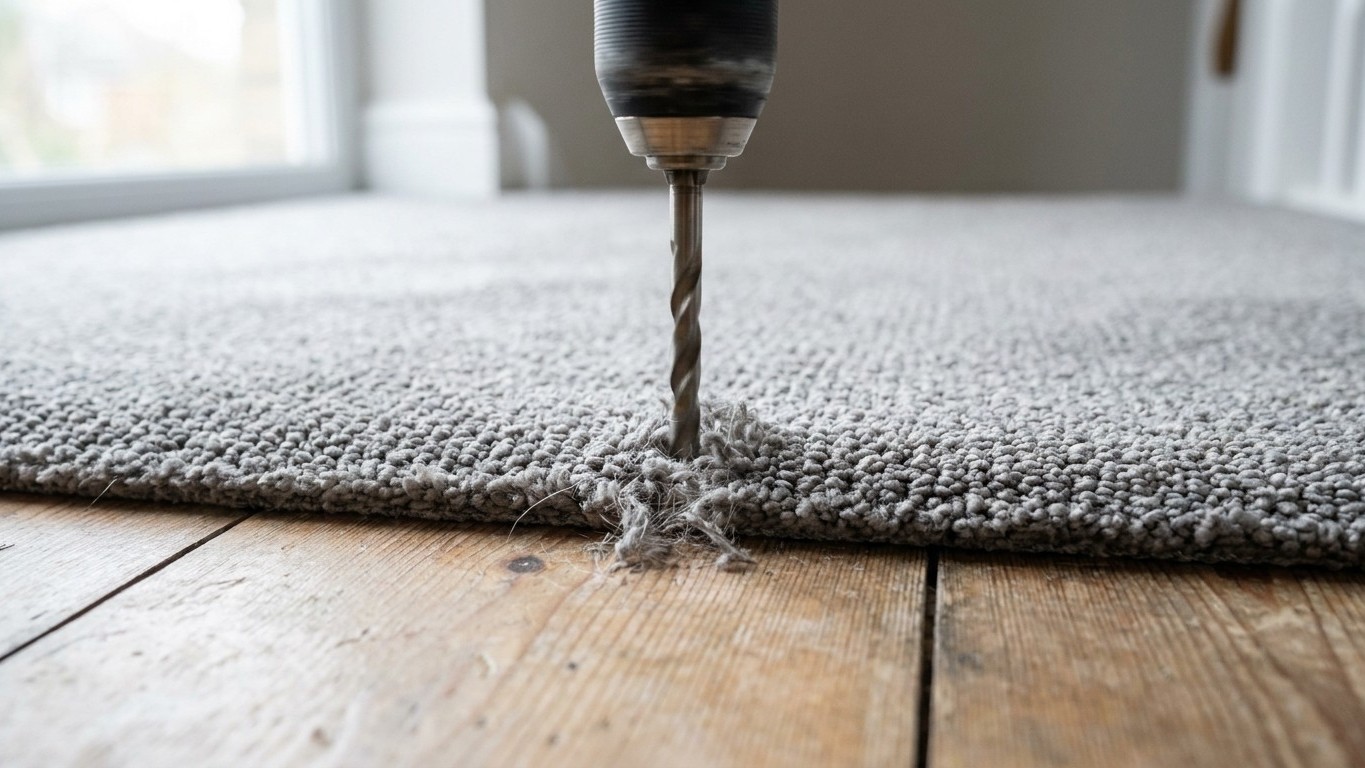
How the drill-through method actually works
The squeak in a floorboard almost always comes from the same culprit: the board has lifted fractionally from the joist beneath it, and every footstep lets it flex and rub against a nail or a neighbouring board. The traditional fix is to screw the board back down tightly to its joist, which stops the movement entirely. The clever part of doing this through carpet is that a fine-threaded screw, driven slowly and carefully, will part the carpet fibres rather than sever them, and when you withdraw the bit, those fibres spring back well enough that the repair is largely invisible.
You need a few specific things to do this properly. A dedicated tool called the Squeeeeek No More kit is sold for exactly this purpose and is available from most large DIY retailers, though the underlying principle can be replicated with a slim pilot hole and a 38mm countersink screw if you’re working on a tight budget. The kit’s screw is designed with a snap-off head, so the shaft sits fractionally below the surface and the carpet closes over it. Without the kit, you’ll need to countersink carefully enough that the screw head doesn’t create a lump underfoot.
The joist is the critical target. Drive a screw into timber and you’ll stop the squeak. Drive it into the void between joists and you’ll achieve nothing, and possibly split the board on the way down. Joists in most British homes built before 1970 are spaced at roughly 16 inches (about 40cm) on centre, though Victorian properties can be more irregular. A simple stud finder run over the carpet before you start will save you a wasted hole.
What the drill bit brought up with it
When I withdrew the bit after my first pilot hole, there was a short coil of pale fluff wrapped around it, almost like a tiny spring. My first thought was carpet fibre, which would have been unremarkable. But the colour was wrong. The carpet is a mid-grey; this was almost cream, slightly compressed, and unmistakably fibrous in a different way. It was the padding, the crumb-rubber and polyester underlay that had been laid beneath the carpet at some point, either with the carpet or before it.
This explained something that had been quietly puzzling me. There was a low ridge running across the landing, about half an inch high, that I’d never managed to flatten by pressing the carpet down. I’d assumed it was a proud board edge. What the extracted fluff revealed was that the underlay had bunched or folded at that point, creating a permanent raised line that no amount of smoothing would fix without lifting the carpet. The squeaky board and the ridge turned out to be entirely separate problems sharing the same square foot of floor.
Underlay bunching is surprisingly common in high-traffic areas, particularly at the top of stairs where foot traffic consistently pushes the material in one direction over years. A good quality underlay is stapled or glued at the edges to prevent this, but older installations, or any underlay simply laid loose, will migrate. The only real fix for the ridge is to lift the carpet at the nearest tack strip, reposition the underlay, and re-staple it. Not glamorous work, but it takes about twenty minutes with a carpet tucker and a staple gun.
Finishing the job cleanly
Back to the squeak. Once you’ve confirmed your joist location and made your pilot hole, the screw goes in slowly, with gentle pressure, letting the thread do the work rather than forcing it. The aim is to pull the board down to the joist firmly without cracking it. If you feel significant resistance partway down, stop: you may have hit a knot in the timber, or the board may be thicker than expected. Back the screw out, move an inch along the joist line, and try again.
The snap-off head on the proprietary tool is snapped off by placing a screwdriver flat against the carpet and levering sideways. The shaft shears at a pre-scored point, and the carpet recovers over it within a day or two as the fibres relax. If you’ve used a standard screw, press the carpet pile back over the head with your thumb in a circular motion, working from the outside in, and give it a gentle brush with a stiff-bristled clothes brush. Under normal lighting, the repair is undetectable.
One thing worth keeping in mind: if your floorboard has been squeaking for a long time, the original nail may have worked itself almost entirely free of the joist. In that case, a single screw directly alongside the old nail position gives the board two points of contact with the timber, which is considerably more stable than one. I did this on the worst of my three squeaky spots, and that board now feels noticeably more solid underfoot, with none of the slight give it had before.
Carpet fibres, as a general rule, tolerate a surprising amount of abuse before they show permanent damage. Wool-mix carpets are the most resilient for this kind of intervention; pure synthetic loop-pile carpets can occasionally snag if the drill speed is too high, so keep the speed low and the pressure light. A cordless drill set to its lowest speed setting does the job without the risk of spinning a loop free from its backing.