Patio awnings are brilliant things, when you can afford them. A professionally installed retractable model in the UK costs, on average, £1,500 to £3,000, and that’s before you add electric operation, which alone can run to an extra £600 or more. Electric operation adds around £600 to the price, with installation costs on top of that ranging from £600 to £1,200 depending on the product and installer. No wonder so many of us spend summer after summer squinting into the sun or dragging a parasol around the garden like a reluctant flag bearer. The good news? A very ordinary item found in any hardware shop, the humble eye bolt (or pad eye plate, its flat-faced cousin), is the unsung hero behind a genuinely clever, genuinely cheap alternative: the DIY shade sail setup.
Key takeaways
- A tiny £8 piece of hardware is revolutionising how people shade their patios—and it’s nothing like traditional awnings
- Professional installers charge £600–£1,200 for labour alone, but this DIY method requires only basic tools and a spirit level
- The breathable fabric keeps gardens cooler than fixed awnings, handles 20–50 mph winds, and needs no moving parts or annual servicing
The real cost of “proper” awnings
The cost of awnings typically ranges from £2,000 to £9,000 for a good quality patio awning professionally installed in the UK. More basic models start around £150, while bespoke versions can exceed £10,000. The average price sits between £2,000 and £5,000. Those budget-end figures, the ones that look tempting in online listings, rarely include fitting. Labour for fitting a standard retractable awning runs to around £350–£600, rising to £700–£800 for a bespoke model.
And here’s what the brochures don’t tell you: most awnings are water-resistant rather than Completely waterproof, providing shelter from light rain but not designed for heavy downpours. So you’re spending the price of a decent holiday for something that still needs to come in during a British summer storm. The alternative, which thousands of DIYers are now putting up in an afternoon for well under £100 total, involves an eye bolt costing roughly £3 to £8 per fixing point, and a shade sail stretched cleanly overhead.
What the eye bolt actually does (and why it changes everything)
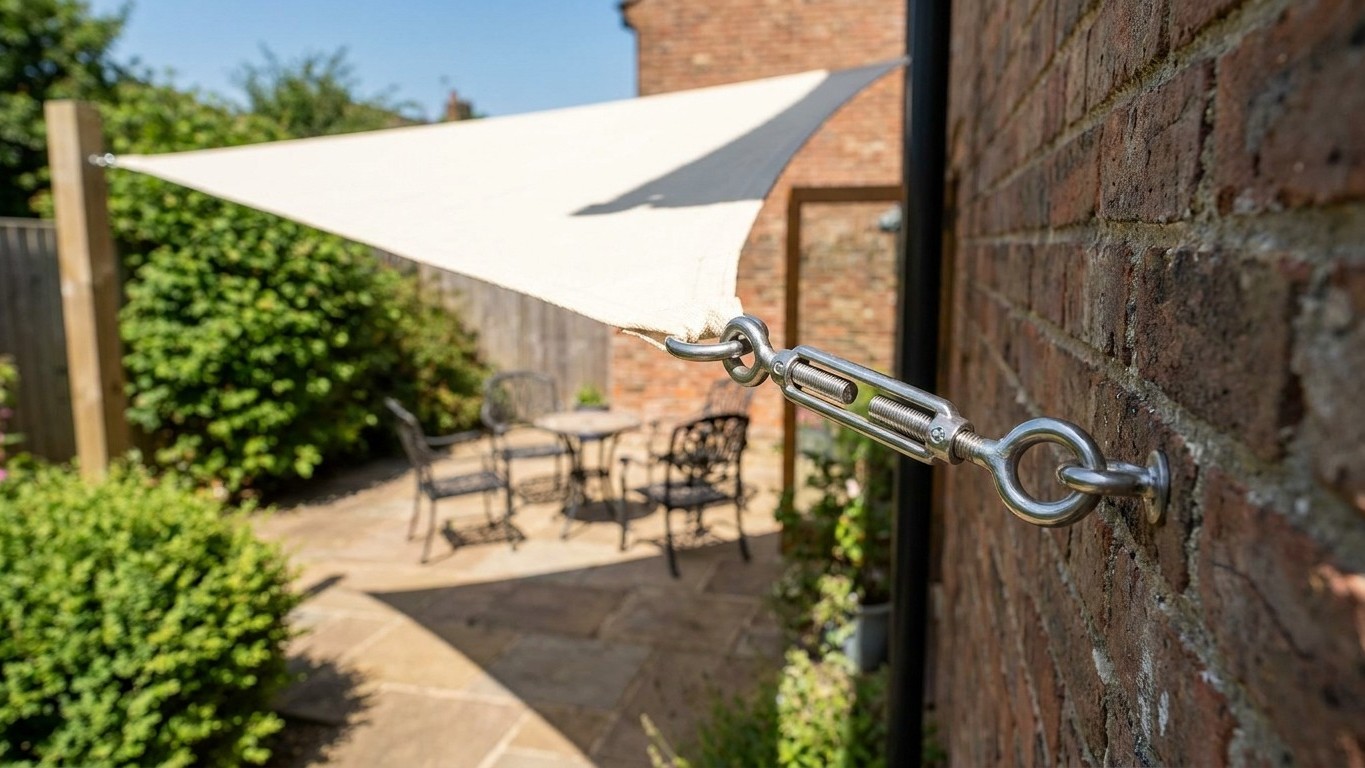
Shade sails are triangular or rectangular pieces of fabric stretched tightly between anchor points, ideal for covering large areas and angled to block the sun at different times of day. The sail itself is the visible part; the eye bolt is the invisible backbone. Screwed into a solid wall, fence post, or beam, it provides the anchor point to which the sail’s corner attaches, typically via a snap hook, a carabiner, or a turnbuckle for tension adjustment.
Local hardware stores in the UK stock a variety of fixings, including wall plates, eye bolts, turnbuckles, and tensioning devices, to help customers install their shade sails. The turnbuckle deserves a special mention. A turnbuckle consists of two eye-bolts with opposite thread inside a centre body that’s free to spin. Due to the opposite thread directions, rotating the body one way brings the bolts together, tightening the sail, and the other direction releases tension, allowing for adjustment at each corner. That ability to fine-tune the tension is what prevents the dreaded mid-summer sag.
As for what to anchor into: the system is suitable for mounting on solid structures, including concrete, brickwork, fascias, and timber beams. For a typical British garden, house wall on one side, fence posts or a pergola beam on the other — a triangle sail needs just three fixing points. A rectangle needs four. Triangular sails are often easier to fit into smaller or awkwardly shaped areas, and simpler to install because they only require three fixing points. That’s three eye bolts, costing perhaps £20–£25 total in hardware. Add a decent sail, and you’re still miles from that £600 awning price tag.
Choosing and fitting your shade sail: the practical bit
The sail fabric itself matters more than most people realise. High-quality shade sail fabrics have shading factors ranging from 90% to 98%, blocking that percentage of incoming sunlight and creating a shaded area with reduced UV radiation. For a UK garden, look for HDPE (high-density polyethylene) knitted fabric, it’s breathable, which means hot air rises through it rather than cooking underneath. Shade fabric is knit to be breathable, allowing hot air to pass through as it rises and keeping the area underneath noticeably cooler.
One tip that’s easy to overlook: the sail must be installed on a slant. Install with seams facing down and allow a 20–30 degree angle between at least two corners, ensuring rainwater doesn’t pool in the middle and stretch the material unnecessarily. In practice, that means one eye bolt set a little higher than its opposite corner, simple enough with a spirit level and a bit of planning before you drill. The sail should be drum-tight with no wrinkles, as a loose sail wears out faster because it flaps and stresses in the wind.
The hardware kit itself, typically including turnbuckles, pad eyes, snap hooks, and screws — is what you’ll find at any good hardware shop or builders’ merchant. A standard kit includes components such as turnbuckles, pad eyes, snap hooks, and screws, with turnbuckles adjustable to create proper tension and stability. Three or four of these corner kits, plus wall plugs and rawl bolts for masonry, is the full shopping list. One important caution: do not attach shade sails solely to fascia boards, as fascia is often merely decorative trim and will rip off under wind load. Anchor into solid brick, block, or structural timber.
For anyone nervous about drilling into a house wall, there are softer options. Smaller sails can be easily put up and taken down by simply tying to existing structures or trees using the rope provided, perfect for creating temporary shade. This suits rented gardens perfectly, no permanent fixings, no disputes with landlords, and the whole thing packs away into a bag come autumn.
Wind, weather, and a few things worth knowing
The most common concern about shade sails, especially for those of us in the blustery Midlands or along the coast — is whether they hold up in wind. Shade sails designed with flexible canopies can better withstand gusts without detaching, and using stainless steel D-rings and hardware kits with turnbuckles and snap hooks improves tension adjustment and secure attachment. That breathable, knitted fabric is actually an advantage in wind: air passes through rather than acting as a full sail, reducing the strain on fixings considerably. Standard residential sails are rated for 20–30 mph winds, and high-end commercial versions can handle 50 mph or more, though it’s wise to take any sail down before a storm, it only takes five minutes and protects your investment.
Maintenance is minimal. These products require only periodic cleaning; hose them down with water occasionally to retain their appearance. And unlike a fixed awning with its mechanical arms, cassette housing, and motor (should anything go wrong), a shade sail has no moving parts to seize up. The eye bolts stay in the wall all year; the sail comes down in October and hangs over the garage door until May.
One genuinely Surprising fact worth knowing: shade sails can provide protection against both UVA and UVB rays, with high-quality fabrics specifically designed to offer broad-spectrum protection. For families with children or anyone who enjoys long afternoons outside, that’s rather more useful than a motorised canopy that simply keeps off the drizzle. The eye bolt, for all its quiet simplicity, turns out to be doing rather important work.
Sources : amazon.com | shadednation.com