Three shoe racks in five years, each one wobbling after a few months, each one destined for the tip before its time. When I finally measured up the narrow hallway in my cottage and realised that no shop-bought unit was ever going to fit properly, I turned to the simplest material in any DIY store: plain softwood battens. What I built that Saturday afternoon has held firm ever since, costs a fraction of the price, and fits the space as if it grew there.
Key takeaways
- Commercial shoe racks fail because they’re designed for imaginary standard hallways—not real Victorian corridors and awkward alcoves
- A simple angled batten system stores fourteen pairs of shoes in the space where a shop-bought rack manages eight
- This straightforward fix has survived two house moves and a decade of use without a single wobble or failure
Why battens beat the flat-pack every time
Most shop-bought shoe racks rely on thin pressed board or flimsy metal rails, and they’re designed for an imaginary standard hallway that bears little resemblance to the narrow Victorian corridors, awkward under-stair nooks, and irregular alcoves most of us actually live with. Battens, by contrast, are what builders call “honest” materials. A length of 38mm by 19mm planed softwood costs very little per metre, takes a coat of paint or varnish beautifully, and can be cut to any dimension you need with nothing more ambitious than a handsaw and a mitre box.
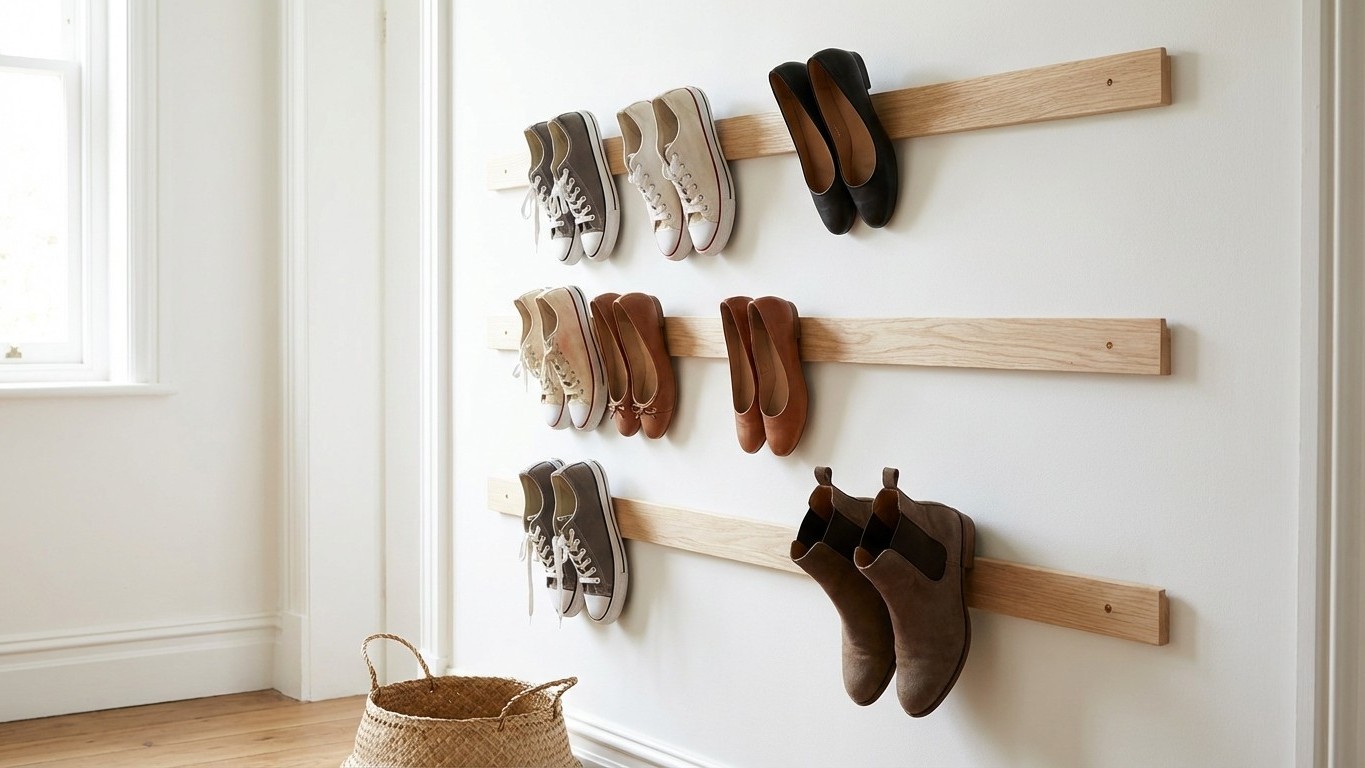
The principle is wonderfully simple. Two or three horizontal rails, fixed to the wall at a slight upward angle (about 15 degrees does the job nicely), act as cradles for the toes of your shoes. The heels hang free, the shoe stays put, and because the footwear is tilted rather than flat, a pair of adult trainers takes up roughly half the wall space it would sitting sole-down on a shelf. I fitted four rails across a 90cm stretch of wall and found I could store fourteen pairs of shoes. A commercial rack the same width rarely manages more than eight.
Getting the measurements right before you pick up a single screw
This is where so many home projects go wrong, and I say that from experience (I once fixed an entire row of hooks before noticing I’d measured from the wrong wall). Spend ten Minutes with a tape measure and a pencil before anything else. The vertical spacing between rails depends on the heel height of the shoes you’re storing: 150mm between rails suits flat shoes and children’s footwear, while 200mm gives boots and heeled shoes room to breathe. The angle matters too. Fix a batten perfectly horizontal and shoes slide straight off. The slight upward tilt is what creates the natural cradle, so use a small angle block or a digital level app on your phone to get it consistent across all your rails.
Wall fixing needs a moment’s thought. If you’re working with a solid brick or blockwork wall (common in older British homes), a 5mm masonry bit and appropriate plugs will do the job reliably. Stud walls are perfectly fine as long as you locate the studs first, which a cheap stud finder handles in seconds. For plasterboard between studs, use hollow-wall anchors rated for the weight involved. Shoes aren’t especially heavy, but ten pairs of winter boots add up faster than you’d think.
A word on finishing
Raw softwood picks up scuffs and moisture from wet shoes fairly quickly, so a couple of coats of eggshell paint or a clear floor varnish (floor varnish, mind you, not ordinary woodwork varnish, because it’s formulated for exactly this kind of wear) will extend the life of your rails considerably. Sand lightly between coats with 180-grit paper. The result looks genuinely considered rather than cobbled together, which matters when the hallway is the first thing guests see.
Variations that make the idea work harder
Once you’ve fixed your first row of rails and seen how satisfying it looks, the same logic starts suggesting itself all over the house. A single batten at skirting-board height in a utility room keeps wellies upright without taking any floor space. In a child’s bedroom, a low row of angled rails turns a chaotic heap of trainers into something a child can actually manage themselves (the “I can’t find my other shoe” problem, in my experience, vanishes almost immediately). Wider battens, say 70mm by 20mm, can double as a small display ledge with a lip just deep enough to hold a pair of folded trainers at the front.
Some people add a second, thinner batten about 80mm above the main rail to act as a toe-stop for flatter shoes. This is worth doing if you’re storing pumps or ballet flats, which tend to slip more than trainers. The two-batten system looks a little like a miniature ladder laid against the wall, and it can be stained in contrasting colours if you’re feeling decorative.
There’s also a near-zero-cost version for anyone who wants to try the idea before committing. Offcuts from timber yards are often sold cheaply or given away; Pallets (food-grade ones, which are marked HT for heat-treated) can be dismantled for decent usable lengths of wood. Neither source gives you quite the precision of planed batten from a DIY store, but for a utility room or garage the rougher aesthetic is absolutely fine.
What strikes me most, looking back at all those wobbling shop-bought racks, is how the simplest solutions tend to outlast the complicated ones. A strip of wood fixed firmly to a wall doesn’t have hinges to snap, plastic joints to crack, or a weight limit printed in optimistic font on the box. My batten rails have now survived two house moves, a period in Storage, and a teenager who treats the hallway as a personal obstacle course. That’s rather more than I ever got from a flat-pack. Perhaps the real question is what other parts of the house might benefit from the same straightforward thinking.