A month after laying a new timber deck over an old concrete patio, one lifted board revealed the truth: a thriving colony of black mould creeping across the underside of the wood, slugs tucked into the corners, and joists already beginning to soften. None of it was visible from above. The surface looked perfectly fine. This is one of the most common, and most preventable, disasters in British garden DIY, and understanding exactly why it happens is the first step to making sure it never happens to you.
Key takeaways
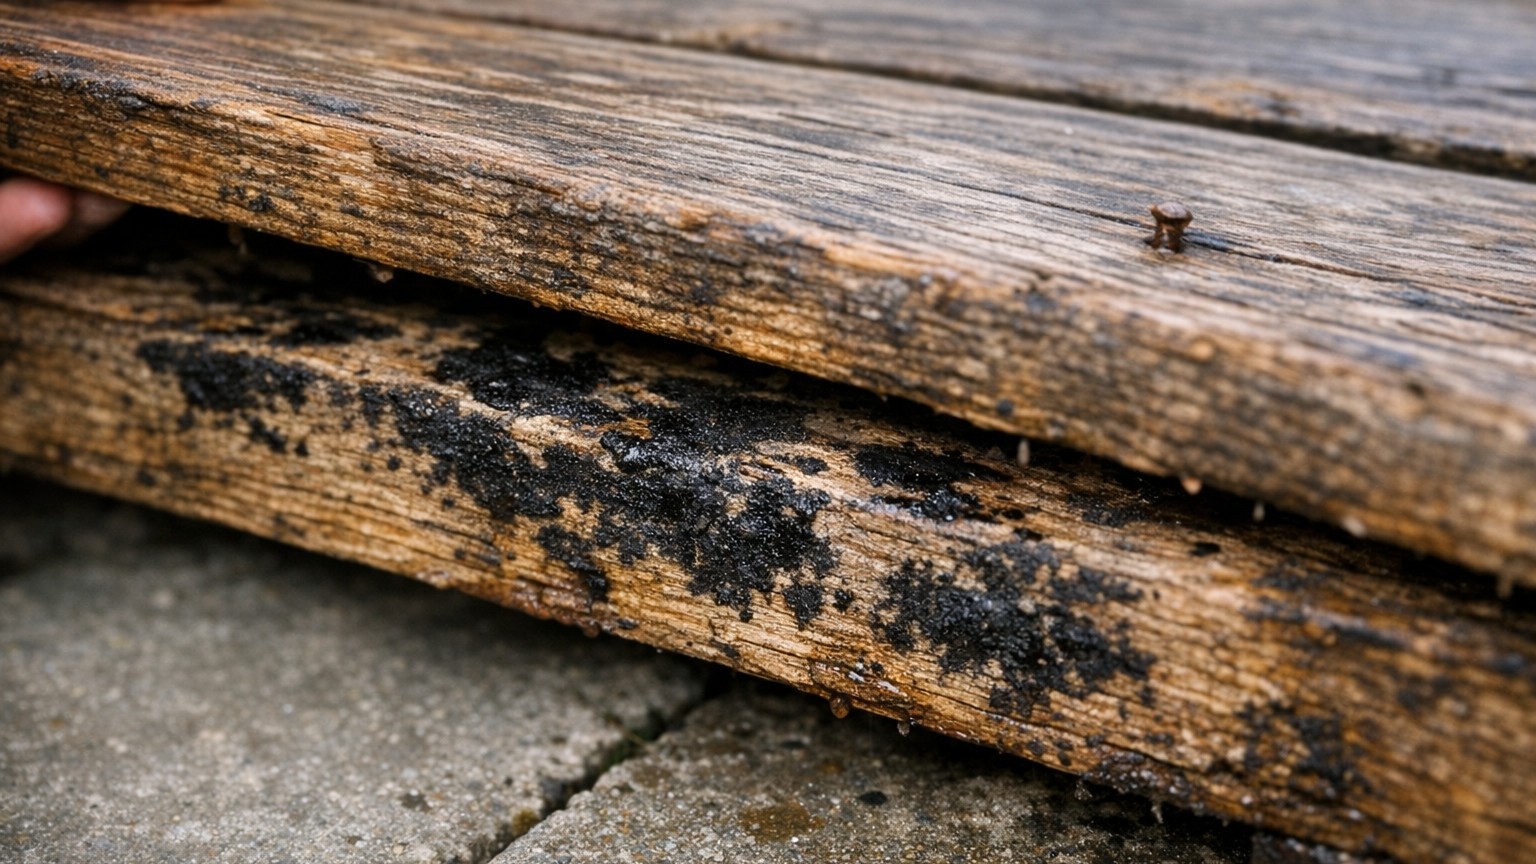
- A thriving mould colony and rotting wood can form under your deck in just one month—completely hidden from view
- Concrete patios act like moisture traps that accelerate timber decay by up to 50%—and slugs and rats follow the damp
- Professionals use one simple fix that DIYers almost never know about, plus a critical building regulation many miss entirely
Why the space beneath your decking becomes a mould factory
The culprit is almost always the same: trapped moisture with nowhere to go. Trapped moisture can result in the formation of mould and mildew, damaging the decking material. Also, the frame underneath, and without proper ventilation, any moisture present, whether from rain, humidity, or temperature changes, remains stagnant, accelerating the deterioration process. In our famously damp British climate, this process happens faster than most people expect. A month is genuinely all it takes.
The concrete patio underneath compounds the problem rather than solving it. Putting wood decking directly on top of concrete can hasten rot, deterioration, or the formation of mould, drastically reducing its lifespan, sometimes by as much as half. The slab acts like a cold, impermeable lid trapping any condensation that forms when warm air meets its cool surface. The most common installation failure is when standard timber joists are laid directly on a concrete or paving slab base — trapped moisture between the timber and the slab will cause the wood to rot incredibly quickly.
Wood, the most commonly used material for joists, absorbs moisture, and without sufficient ventilation, it won’t release its water content properly, which can lead to rotting, warping, insect damage, and fungal growth. Mould follows reliably in wood’s wake. Black mould is the most common type you’ll find beneath boards; though called black mould, it may also be a dark green or other colours, especially during early stages. White mould, less well known but equally destructive, tends to appear first, white mould thrives on wood and moisture, and the most common early sign is any discolouration that looks like white spots or blotches.
The uninvited wildlife that follows the mould is another matter entirely. The spaces under decks provide ideal habitats for slugs because they are dark, damp and cool. Slugs are largely harmless to the structure itself, but they signal that conditions are also ideal for rats, which are a different matter. Discovering rats under your decking is a serious issue due to the health risks and potential for damage they pose. A poorly ventilated deck over a solid patio is, in short, an open invitation.
What the professionals actually do differently
You should never install composite or timber decking directly on top of concrete, as the decking needs space for air to flow to ensure good ventilation. The professional approach centres on creating a deliberate air gap between the deck frame and whatever surface sits beneath it. Adjustable pedestals raise the entire frame off the ground, creating an air gap for ventilation that allows the wood to dry out and prevents rot. These plastic or metal feet, available from most builder’s merchants, allow you to set a consistent height, usually at least 40–50mm, across the whole frame. They also let you compensate for any slight unevenness in the old patio slabs without mixing a single bag of mortar.
Before the frame goes down, the concrete itself deserves attention. You need to ensure there is no pooling on the surface, pour a bucket of water onto the patio and check whether it drains away from your house effectively. If water pools anywhere, you will need to use adjustable pedestals to create a proper gradient regardless of which joist material you choose. A gentle fall of 1:100 away from the house is the standard professionals aim for, and building the frame with that gradient from the start is far easier than correcting it later.
Once the frame is in place, the boards themselves need proper spacing. Consistent spacers between boards maintain a 5 to 8mm drainage gap that allows rainwater to pass through and air to circulate. Many a homemade deck has been ruined by boards butted tight together, boards that look wonderful on day one and become a sealed moisture trap by autumn. The joists also benefit from protection before a single board is laid: applying joist tape to the top of joists, beams, and rim joists before laying deck boards protects the wood from moisture damage. Self-sealing butyl tape, pressed firmly along the top edge of each joist, stops water from sitting in the grain where the screws go in.
There is one more thing professionals always check that DIYers frequently overlook. It is surprisingly common to build decking over an old patio and discover a drain cover buried under the slabs, the sensible solution is to remove the slabs over it and install a removable section of decking for access. Sealing a drain cover under a fixed deck is a gift to your future self only in the very worst sense.
The building regulation detail most people miss
There is a dimension that rarely comes up in YouTube tutorials but matters enormously if your deck sits close to the house wall. Building Regulations for England and Wales, Part C, Section 5.5, require the damp proof course to be at least 150mm above ground level. Adding a deck frame, joists, and boards to an existing patio can eat into that gap surprisingly fast. The damp proof course of a dwelling should never be compromised or bridged, which is why you often see advice to install decks well below DPC level, particularly where DIY installation is involved.
In practice, paving or any raised surface should always sit at least 75mm below the DPC, and that is already the relaxed, pragmatic minimum for private domestic situations. Raising the finished deck surface too close to the DPC line risks pushing moisture into your external walls, a problem that announces itself months later as rising damp inside the house. Worth measuring before you buy a single length of timber.
Rescuing a deck that’s already down
Over 60% of rot and warping cases in the UK trace directly to poor drainage and inadequate ventilation beneath the deck. If your boards are already fixed and you’re reading this with a slight sinking feeling, all is not necessarily lost, but you do need to act before the joists soften beyond recovery.
Lift every board and inspect the frame thoroughly. An easy way to check the level of rot and decay is to push into several wooden boards with a screwdriver, if there are many areas where the wood is soft and pushes in easily, it will most likely need to be replaced. If the joists are still sound, raise them onto pedestals, treat the concrete below with a proprietary sealant to reduce condensation, lay a weed-suppressing membrane over the slab surface, and refix the boards with the correct 5–8mm gaps. Installing a moisture barrier underneath is one of the simplest and most effective ways to control moisture, as it acts as a shield preventing water from coming into direct contact with the wood.
For boards that are already showing surface mould but are structurally intact, a good scrub with a diluted deck cleaner on a dry day, followed by a quality preservative treatment applied to all six faces of the timber, can buy you several more seasons. Making deck care part of your seasonal home maintenance routine matters: a deep clean and inspection each spring, and monitoring for mould during humid summer conditions, will catch problems before they become expensive ones. The decking that lasts twenty years in a British garden is never the most expensive, it’s the one that gets a look-over twice a year and a fresh coat of oil before the autumn rains arrive.
Sources : quora.com | lhcrva.com