A pressure washer is one of the most satisfying tools in any gardener’s arsenal. That blast of water cutting through grime, moss and dirt, there’s something deeply pleasing about watching a grimy patio transform before your eyes. But aim it directly into the joints between your paving slabs, and you may find yourself undoing years of careful groundwork in a single afternoon. That’s exactly what happened to me last spring, and the consequences took about a fortnight to fully reveal themselves.
Key takeaways
- Paving joints contain structural material that locks slabs in place and prevents weed germination—it’s not just cosmetic filler
- A direct pressure washer jet can hollow out joints in minutes, creating channels where water pools and freezes, causing edge damage
- Simple technique adjustments—angle, distance, and nozzle type—let you clean paving without destroying the jointing
What’s actually sitting between your paving slabs
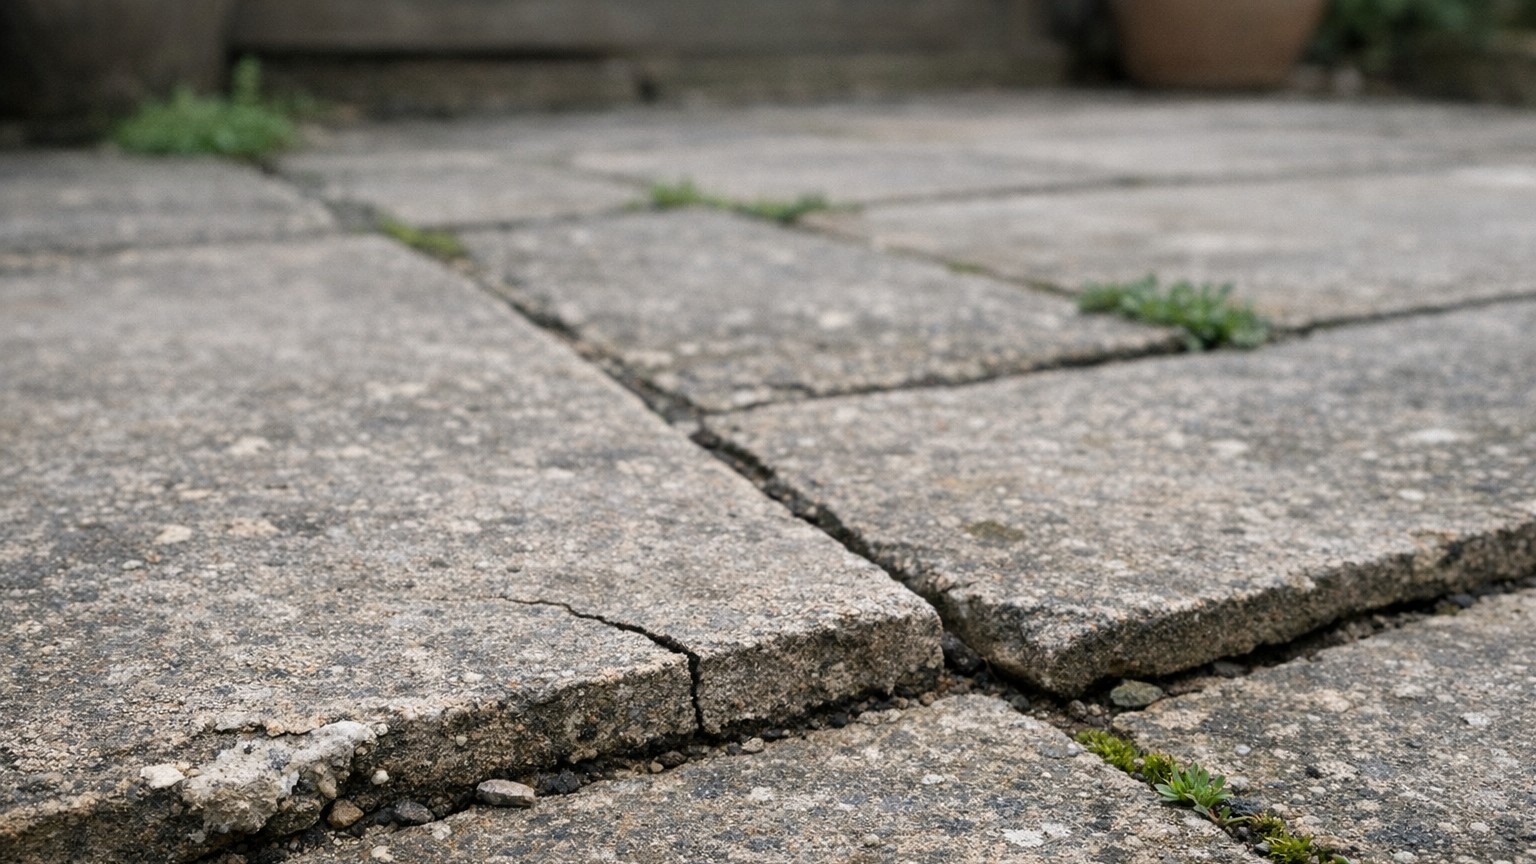
Most people assume the material in paving joints is just filler, a cosmetic detail keeping slabs from rattling. The reality is rather more structural. Traditional paving joints are filled with either sand, a dry mortar mix, or a specialised polymeric sand that binds together when it gets wet. This material serves three purposes: it locks the slabs in place laterally, it allows a small degree of water drainage, and it stops the edges of individual slabs from crumbling under foot traffic and frost.
Polymeric sand, which became the standard recommendation for block paving and natural stone over the past couple of decades, contains fine sand bonded with a polymer binder. Once activated by water, it sets almost like a soft mortar. It grips the edges of each slab and, crucially, it resists weed germination far better than plain sand does because there’s little loose material for seeds to take hold in. A well-jointed path can stay weed-free for five or even seven years with minimal attention.
Plain kiln-dried sand, the older and cheaper option, does the same structural job but is more vulnerable. Weeds colonise it readily, ants excavate it enthusiastically, and heavy rain gradually washes it lower over time. Both types of jointing material, though, share one fatal vulnerability: a direct, concentrated jet of water at close range.
The problem with pointing a pressure washer straight down
A standard domestic pressure washer operating at around 100 to 130 bar with a narrow or zero-degree nozzle can blast jointing sand out of a paved surface in minutes. The jet doesn’t just remove the visible weeds, it excavates the material beneath them, often scouring the joint down to the sub-base below the slabs. You end up with channels where there was once compacted fill, and those channels do something very specific: they collect water.
Water pooling in empty joints puts enormous pressure on the slab edges during frost. When water freezes, it expands by roughly nine percent in volume. That expansion pushes outward against the sides of your paving stones, and over several freeze-thaw cycles, it causes what’s known as edge spalling, tiny fragments breaking away from the corners and sides of slabs. On cheaper concrete blocks this happens quickly; on natural sandstone or limestone it can be genuinely heartbreaking.
Two weeks after I’d given my back path its thoroughly satisfying power wash, the weeds had not returned. But I noticed the slabs had begun to rock slightly underfoot in two places, and fine cracks had appeared at the corner of one slab where the joint beside it was now essentially hollow. A brief conversation with a local paving contractor confirmed my suspicion: I’d stripped the jointing almost entirely in several sections without realising it, because the sand had washed away gradually as I worked rather than disappearing in dramatic clumps.
How to clean paving without destroying the joints
The good news is that you don’t have to abandon your pressure washer, or spend every summer on your knees with a hand-weeder. The technique simply needs adjusting. The key is angle and distance. Holding the lance at roughly 45 degrees to the surface, and keeping the nozzle at least 30 centimetres from the paving, allows you to shift surface grime and moss without driving a concentrated jet directly into the joints. A rotary or fan nozzle distributes the pressure across a wider area and reduces the excavating effect considerably.
For established weeds in joints, a flat-head screwdriver or a proper paving knife is still the most reliable first step. Get the bulk of the weed out by hand, root and all where possible, before you go near the pressure washer. Then clean the surface with the angled, wider spray. This approach takes longer, admittedly, but it leaves the jointing material largely intact.
After cleaning, joints that look depleted or hollow need topping up before the next frost. Brush kiln-dried sand into them dry, working it in with a stiff brush, then compact it gently. For a longer-lasting result, polymeric sand is worth considering, it’s sold in most builders’ merchants and garden centres in 20kg bags. You apply it dry, brush it in, then mist the surface gently with a garden hose (not a pressure washer) to activate the binder. Leave it to cure for 24 hours without foot traffic.
Preventing weeds without waging war on your jointing
Weeds in paving joints are almost always wind-blown seeds landing on a surface that’s slightly damp and has a little loose material to anchor in. Keep the joints topped up and compacted, and most weed seeds simply blow away or fail to germinate. A light brushing of the surface after rain helps dislodge seeds before they establish. Some gardeners apply a path weedkiller to joints in early spring as a preventive measure, which can significantly reduce the summer workload.
One thing worth knowing: moss and algae, the green slippery film that forms on shaded paving, are often better treated with a proprietary patio cleaner applied with a stiff brush rather than blasted off with high pressure. The high-pressure approach tends to open the pores of natural stone, which actually makes it more susceptible to moss returning faster than before. A slower chemical approach is kinder to the surface and the joints alike. Patience, as ever with the garden, turns out to be the more effective strategy.