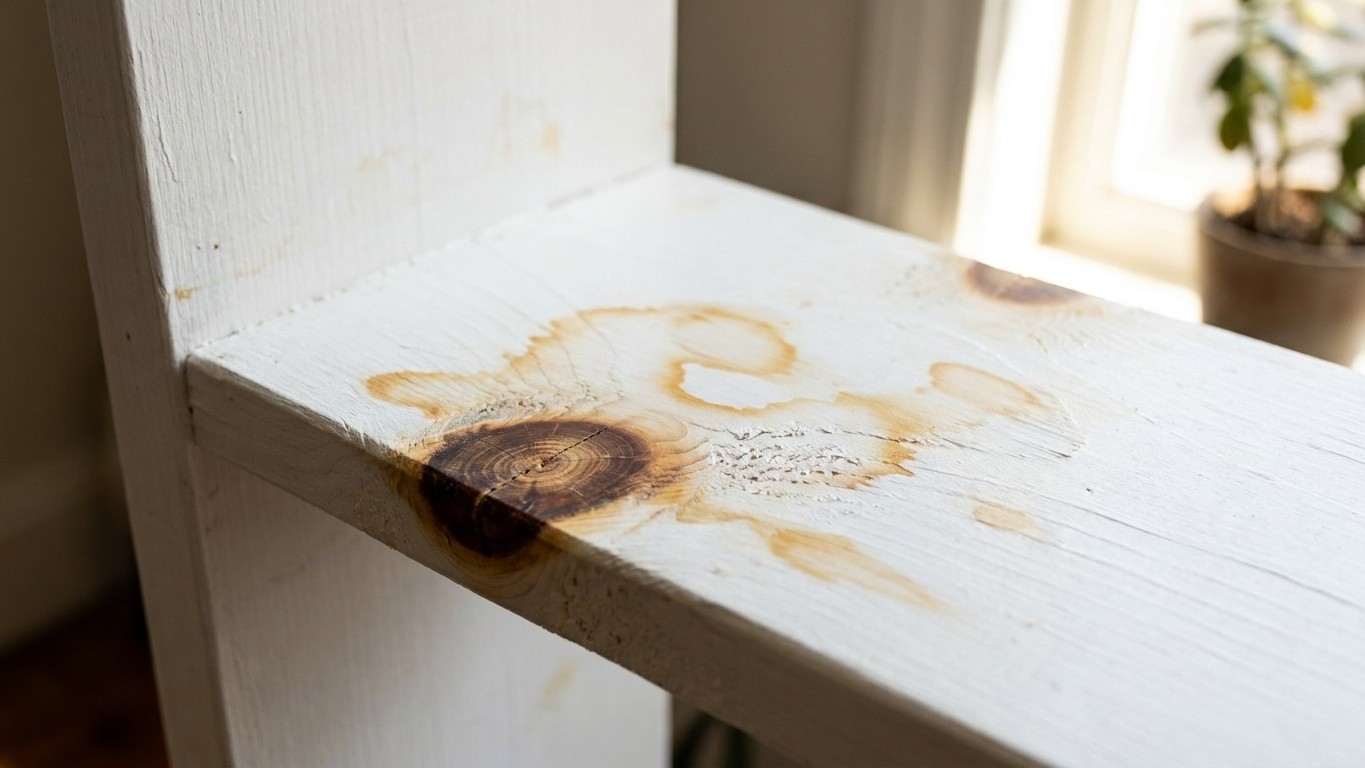
Pine has a way of making fools of us all. You sand it down, run your hand across it, feel how smooth it is, and think: right, that’ll do nicely. A coat of white paint and it’ll look like something from a proper interiors magazine. But those dark swirls and amber-coloured knots sitting quietly in the grain? They are not finished with you. Within weeks, sometimes days, they bleed straight through the paint like a bruise coming up through skin, leaving orange-brown halos that no second coat of white will ever fully cover.
This is one of the most common and most maddening DIY mistakes in British homes, and it happens because pine resin never truly stops moving. The knots in pine are areas of concentrated resin, and when you apply paint directly over them, especially a water-based emulsion or satinwood, the heat from a warm room or direct sunlight causes that resin to soften and push through the paint film. The result is a yellowish or brownish stain that sits on top of your fresh white paint, and it will Keep Coming Back no matter how many times you repaint over it without addressing the root cause.
Key takeaways
- A simple mistake with pine shelves causes staining that reappears no matter how many coats you apply
- The culprit is resin in the wood, which heat and sunlight activate to push through paint
- One specific product has sealed this problem for over a century—and it’s not expensive
Why bare pine is a particularly awkward surface to paint
Softwoods like pine have a much higher resin content than hardwoods, and this resin is distributed unevenly throughout the timber. The knots are the worst offenders, but even the surrounding grain can be resinous enough to cause problems. On top of that, new pine often has a slightly greasy surface, which means standard primers struggle to bond properly and the whole paint job can feel tacky or start peeling within a year.
There is also the matter of porosity. Pine absorbs paint at wildly different rates across the same plank: the soft, pale grain drinks it in eagerly, while the denser darker areas resist it. This means your finish ends up uneven in both colour and sheen, even after two or three coats. Sanding between coats helps, but it does not solve the underlying chemistry of a wood that is still, in a very real sense, alive with its own oils.
The one product that genuinely fixes the problem
Shellac-based primer is the answer. This is not a modern invention or a marketing gimmick, shellac has been used as a wood sealer for over a century, and it works because it dries almost instantly into a hard, impermeable barrier that locks resin in place. You will sometimes see it sold under the general term stain-blocking primer, and the key thing to look for on the tin is that it specifically states it contains shellac or is solvent-based and suitable for blocking resin bleed on pine knots.
Water-based stain blockers have improved considerably in recent years, and some do perform reasonably well on lightly resinous wood, but for heavy knots on bare pine, the shellac-based versions remain more reliable. The trade-off is the smell, it is strong, and you will want proper ventilation and ideally a respirator mask, not just an open window. Apply it with an old brush or a cheap foam roller you are happy to throw away afterwards, because getting shellac out of a brush requires methylated spirits and a good deal of patience.
The application itself is straightforward. Clean the bare pine with a slightly damp cloth and allow it to dry fully, at least a couple of hours in a warm room. Apply your shellac primer in a thin, even coat directly over the knots and any amber-streaked areas, and let it dry for thirty minutes to an hour. Sand lightly with 120-grit paper, wipe away the dust, then apply a coat of your chosen oil-based or water-based undercoat over the whole shelf. From there, your topcoat will go on smoothly and stay white.
What to do if you have already painted and the bleed has started
All is not lost. Sand back the affected areas until you reach the point where the staining stops, which may mean going right back to bare wood in the worst spots. Then apply your shellac primer over those areas specifically, feathering out slightly beyond the edge of the stain. Once dry and lightly sanded, you can repaint. The shellac will seal in any residual resin that the original paint has already absorbed, and provided you use a good undercoat before your topcoat, the repair can be virtually invisible.
If the staining is very widespread and the whole shelf is blotchy, honestly, the kindest thing is to strip it back and start again properly. It takes a Sunday afternoon, but it is considerably less frustrating than applying coat after coat of white paint and watching the knots win every time.
One final thing worth knowing: even after the shellac primer and a beautiful topcoat, pine shelves in very sunny spots or near a radiator can occasionally show faint resin bleed over many years, because extreme heat can eventually push resin through almost any barrier. A good oil-based topcoat is more resistant to this than emulsion, and some decorators recommend a slight yellowish tint in your white paint rather than a stark brilliant white, because any future bleed shows far less against a warmer tone. It is a small thing, but after everything you have been through with those shelves, every small advantage counts.