A dripping tap is one of those household problems that seems to demand a total Replacement, at least, that’s what I thought until my neighbour knocked on my door holding nothing but a 50p washer and a knowing smile. The truth is, most leaking taps don’t need replacing at all. The fault almost always lies with a tiny internal component that costs a fraction of what a plumber charges just to walk through your front door.
Key takeaways
- A mysterious internal component is hiding inside your leaking tap—and it’s probably not what you think
- One neighbour’s casual observation exposed a £200 mistake that could have cost just a few pounds
- The repair takes minutes once you know which tiny part to replace—and where to find it
The part nobody tells you about
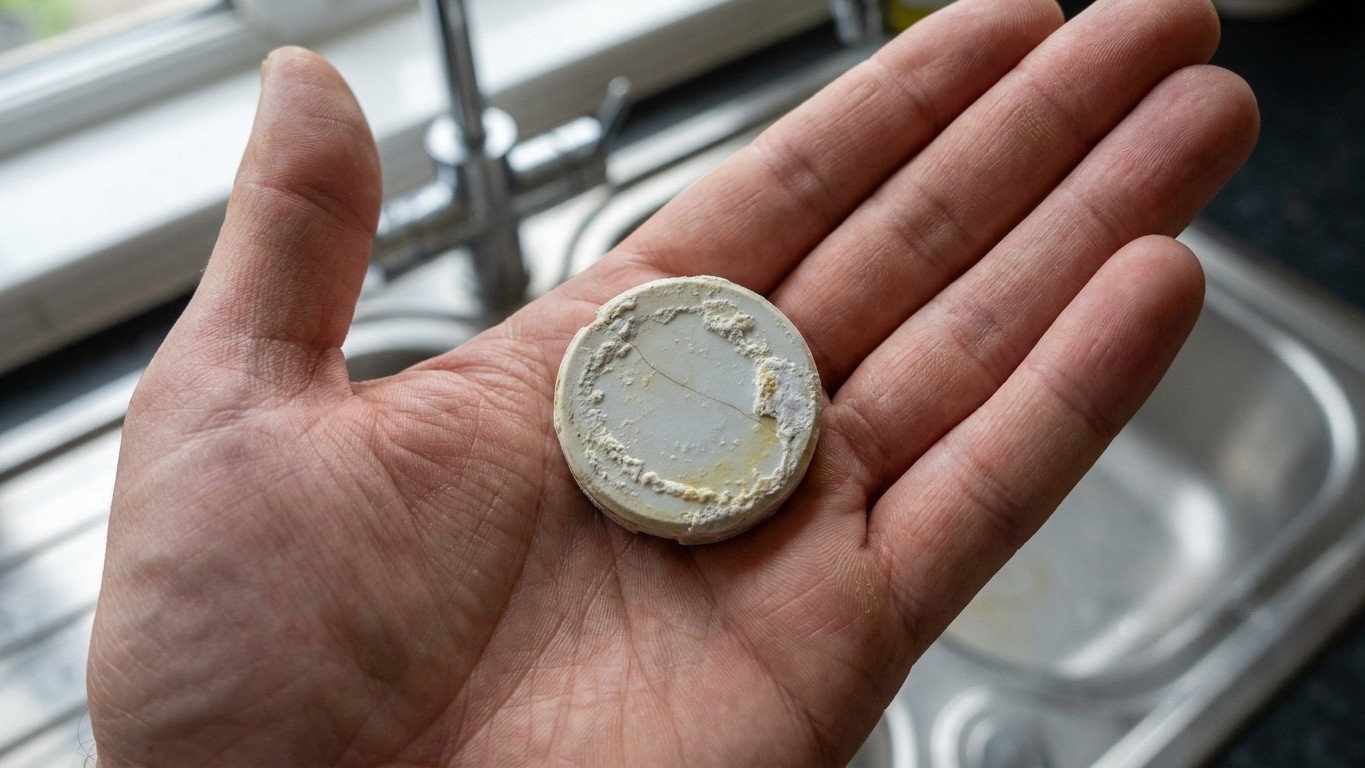
Traditional taps use rubber washers that compress against a valve seat to stop the flow of water. Over time, these washers wear down, harden, or crack, and a drip begins. But many modern taps, and quite a few older ones, use a different mechanism entirely: a ceramic disc cartridge. Two small discs of extremely hard ceramic sit inside the tap body, one fixed and one rotating. When you turn the handle, the rotating disc aligns or misaligns its holes with those in the fixed disc, controlling the flow. It’s an elegant system that, in theory, lasts for decades.
The problem is that “in theory” does a lot of heavy lifting there. Hard water deposits, limescale, in plain terms, can build up between the discs and prevent them from sealing properly. A grain of grit gets in. A disc develops a hairline crack. Suddenly your tap drips constantly, and because the mechanism looks nothing like the rubber washers most of us grew up watching our fathers replace, the temptation is to assume the whole tap is beyond saving.
What the repair actually involves
Replacing or cleaning a ceramic cartridge is genuinely straightforward work, even if you’ve never done it before. Start by turning off the water supply, either at the isolator valve directly under the sink (a small slotted screw you turn 90 degrees with a flathead screwdriver) or at the main stopcock, usually found under the kitchen sink or beneath the stairs. Turn the tap on briefly to release any residual pressure in the pipe.
From there, the tap handle needs to come off. On most modern taps, there’s a small decorative cap on top of the handle, prise it off gently with a flat-bladed screwdriver or even a fingernail, and you’ll find a screw underneath. Remove it, and the handle lifts away. Beneath that sits a retaining nut (sometimes called a gland nut or packing nut), which unscrews with a spanner. Once that’s off, the ceramic cartridge slides straight out.
Take it to your local plumbers’ merchant or hardware shop, not a DIY superstore, where staff turnover means you’ll often get a blank stare, but an independent merchants’ counter where someone has actually fixed a tap before. They can match the cartridge almost always on sight. Replacement ceramic cartridges typically cost between £3 and £15 depending on the tap brand and cartridge size. Even the postman charges more than that to deliver them.
If the cartridge looks intact but limescale-coated, try soaking it overnight in a mug of white vinegar before buying a replacement. The acid dissolves the mineral deposits without harming the ceramic, and a surprising number of “broken” cartridges come back to life after a good soak. White vinegar costs pennies per use and is, in my firm opinion, one of the most underrated things in a kitchen cupboard.
When the tap genuinely does need replacing
Honesty matters here, so let’s be clear: there are times when replacement is the right call. If the tap body itself is cracked, if the spout wobbles on its base due to metal fatigue, or if the valve seat (the brass surface the cartridge presses against) has been damaged by years of gritty water, then no cartridge swap will fix things permanently. You can buy a valve seat grinder, a small tool that re-cuts the seating surface smooth, but these are specialist enough that most people reasonably decide to move on at that point.
Mixer taps with ceramic cartridges that control both temperature and flow in a single lever (sometimes called monobloc mixer taps) are slightly more involved, as the cartridge is larger and the alignment matters when refitting. The principle is identical, though, and most cartridge manufacturers print fitting instructions on the packaging. If anything, a single-lever monobloc tap is often easier to work on than a traditional pillar tap, because there are fewer separate components to keep track of.
One thing worth knowing: if your water pressure drops noticeably after fitting a new ceramic cartridge, the flow restrictor, a small plastic disc sometimes built into the cartridge itself — may need adjustment or removal. Some cartridges come with a restrictor fitted as standard to comply with water-saving guidelines, which is admirable in principle but occasionally maddening in practice when you’re trying to fill a large pan quickly.
The £120 lesson, learned properly
The tap I replaced unnecessarily cost £120, plus another £80 for a plumber to fit it, because I assumed complexity where there was none. Had I simply unscrewed the handle and looked inside, I’d have seen a cartridge with a chip on one disc, a two-minute diagnosis and a £6 fix. My neighbour, a retired heating engineer, has replaced precisely zero taps in twenty years of homeownership. He’s replaced dozens of cartridges.
There’s a practical footnote worth adding here: keep a record of your tap’s brand and model number before you need to do any repairs. Some manufacturers stamp this on the tap body near the base; others include it only on the original packaging. A photograph taken at the point of purchase, stored in a simple phone folder labelled “house stuff,” can save a great deal of frustration when you’re standing in a plumbers’ merchant with a dripping tap at home and no idea what you’re looking for.