Boxing in pipes is one of those jobs that looks deceptively simple, a bit of timber, some plasterboard, a tin of paint, and you’re done. Except, when it goes wrong, it goes spectacularly wrong. The whole structure pulls away from the wall, the screws have stripped, the plasterboard has cracked, and you’re left wondering what on earth happened. Nine times out of ten, the culprit is the same hidden mistake: failing to fix the framework properly into something solid before a single sheet of plasterboard goes on.
Key takeaways
- Most people screw boxing frames into plasterboard instead of the solid wall behind it—a decision that guarantees eventual failure
- Hot water pipes expand and contract with temperature changes, creating forces that systematically work loose improperly-anchored frames
- The difference between a boxing that lasts years and one that fails in months comes down to spacing, noggins, and respecting how materials actually move
Why the frame is everything
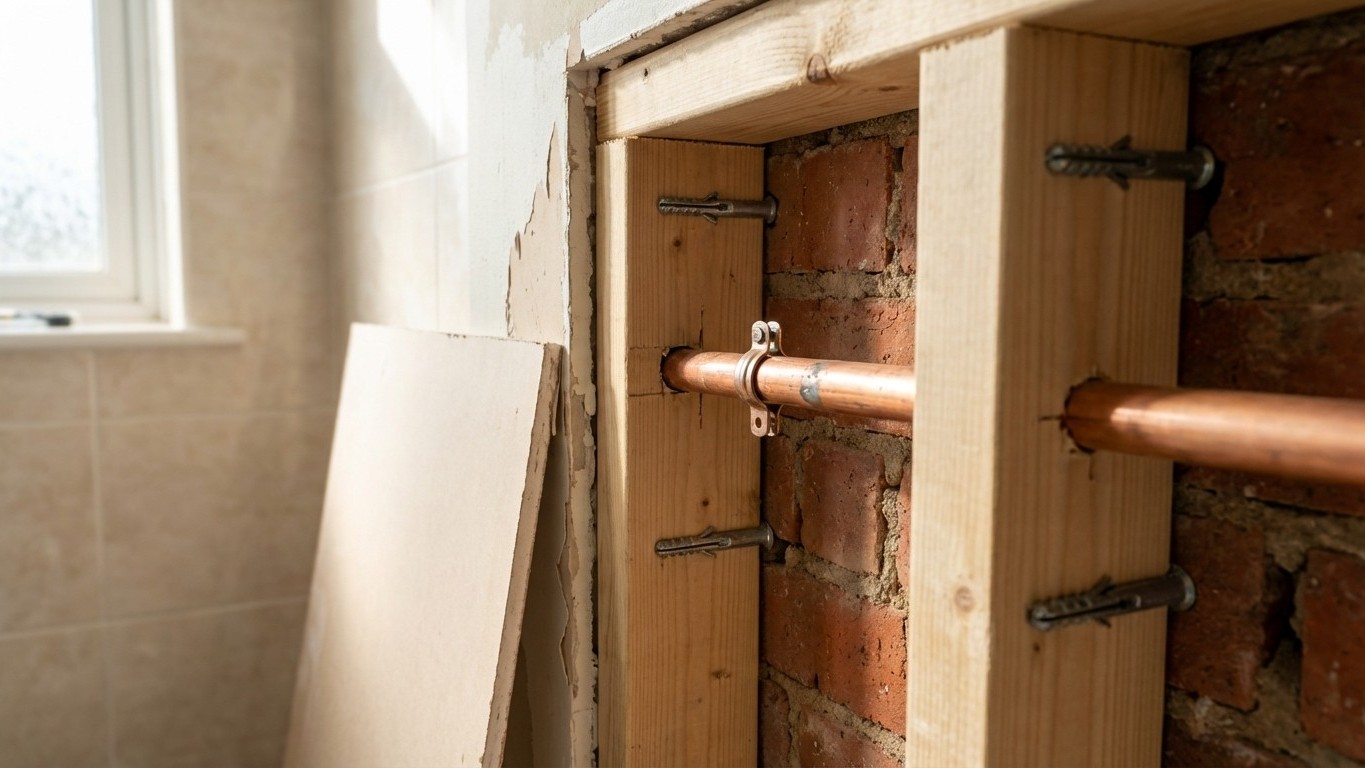
A pipe boxing enclosure is really just a small stud wall, and like any wall, it’s only as strong as its foundation. The timber frame, usually lengths of 50mm x 25mm or 50mm x 50mm PAR (planed all round) softwood — needs to be anchored firmly to the floor, ceiling, and the existing wall. This sounds obvious enough, but the mistake most people make is assuming that a few screws driven into plasterboard or a dab of adhesive is sufficient. It is not. Plasterboard alone has almost no structural holding power. When the timber shifts even slightly due to temperature changes (and pipes carrying hot water cause quite dramatic expansion and contraction), the whole frame works loose, taking your neat boxing with it.
The correct approach is to locate the masonry or solid timber behind the existing wall and fix directly into that. On a brick or block wall, this means using appropriate wall plugs and screws, typically 50mm or 60mm screws once the plug is seated, drilled into the masonry itself. On a timber-framed partition wall, you need to find the studs, which usually sit 400mm or 600mm apart. A simple stud finder, or the old trick of knocking along the wall and listening for the change in sound, will do the job. Fixing into plasterboard alone, with those little plastic butterfly fixings, might hold a picture frame, but it will not hold a boxing structure that vibrates slightly every time a tap is turned on.
The expansion problem nobody talks about
Hot water pipes move. Not dramatically, not visibly, but they expand along their length when hot water runs through them, then contract again when it stops. Copper pipe expands roughly 1.7mm per metre for every 10°C rise in temperature. A standard 22mm copper pipe running a metre and a half from a boiler to a radiator could be shifting by 3mm or 4mm across a heating cycle. That movement needs somewhere to go.
If the boxing is screwed too rigidly around the pipe itself, or if pipe clips inside the boxing are fixed too tightly, that expansion force transmits directly into the frame. Over weeks and months, it works the fixings loose from the inside. This is why plumbers always recommend using pipe clips that allow slight longitudinal movement (saddle clips are good for this), and Why You Should Never pack foam or filler tightly around a pipe before closing the boxing. A little breathing room, even just a few millimetres, makes an enormous difference to how long the whole structure stays put.
Getting the noggins right
Once the vertical and horizontal members of your frame are properly fixed to solid surfaces, you need noggins: short horizontal pieces of timber braced between the uprights to add rigidity. A boxing run of more than about 600mm without noggins will flex noticeably when you press it, and that flex is the beginning of the end. Noggins should sit mid-height on any boxing over 300mm tall, and they give you something solid to screw the face panel into, rather than relying solely on the edges of the frame.
The plasterboard or MDF face panel itself should be fixed with appropriate screws at no more than 200mm intervals along each timber member it crosses. Coarse-thread drywall screws grip better in softwood than standard wood screws for this application, and countersinking slightly means the head sits flush without cracking the board. Many DIYers go too sparse with fixings here, using perhaps three or four screws across a whole panel. The panel then bows slightly in the middle, the joints open up, and what looked like a professional finish starts looking shabby within a single season.
Before you close it up, think about access
There is one final thing that catches people out, and it’s less structural but worth thinking about before the boxing is sealed: access. Pipes need to be occasionally inspected, and if you have a stopcock, isolation valve, or a compression joint hidden behind your boxing, you need a way to reach it without taking the whole thing apart. A small removable access panel, just a square of MDF fixed with cup-and-screw fasteners rather than adhesive or permanent screws — can save you an enormous amount of grief if anything ever needs attention.
Skipping the access panel is the kind of decision that seems fine on the day and deeply regrettable two years later when a joint starts weeping and a plumber has to chisel through your carefully painted boxing to reach it. A decent access panel takes perhaps twenty minutes to plan and fit. It costs almost nothing. Future-you will be very grateful.
There’s something quietly satisfying about a well-built pipe boxing, smooth, solid, painted to match, completely invisible. But that satisfaction only lasts if the structure underneath deserves it. Get the frame into solid material, respect the pipe’s need to move, space your fixings properly, and you’ll have something that stays true for years. Rush the foundations, and the whole thing tells on you eventually. Woodwork, like most things worth doing, rewards a little patience at the start.