Wooden floors are one of those things that reward patience and a gentle hand. Clean them well, and they glow with warmth for decades. Clean them carelessly, with the wrong product or too much water, and you can dull a varnished surface, strip a waxed finish, or swell the wood fibres of an oiled floor in a matter of minutes. The good news is that clean wooden floors naturally is entirely achievable, cost-effective, and actually safer for the wood itself, once you know which recipe suits which finish.
Why natural cleaning matters for wooden floors
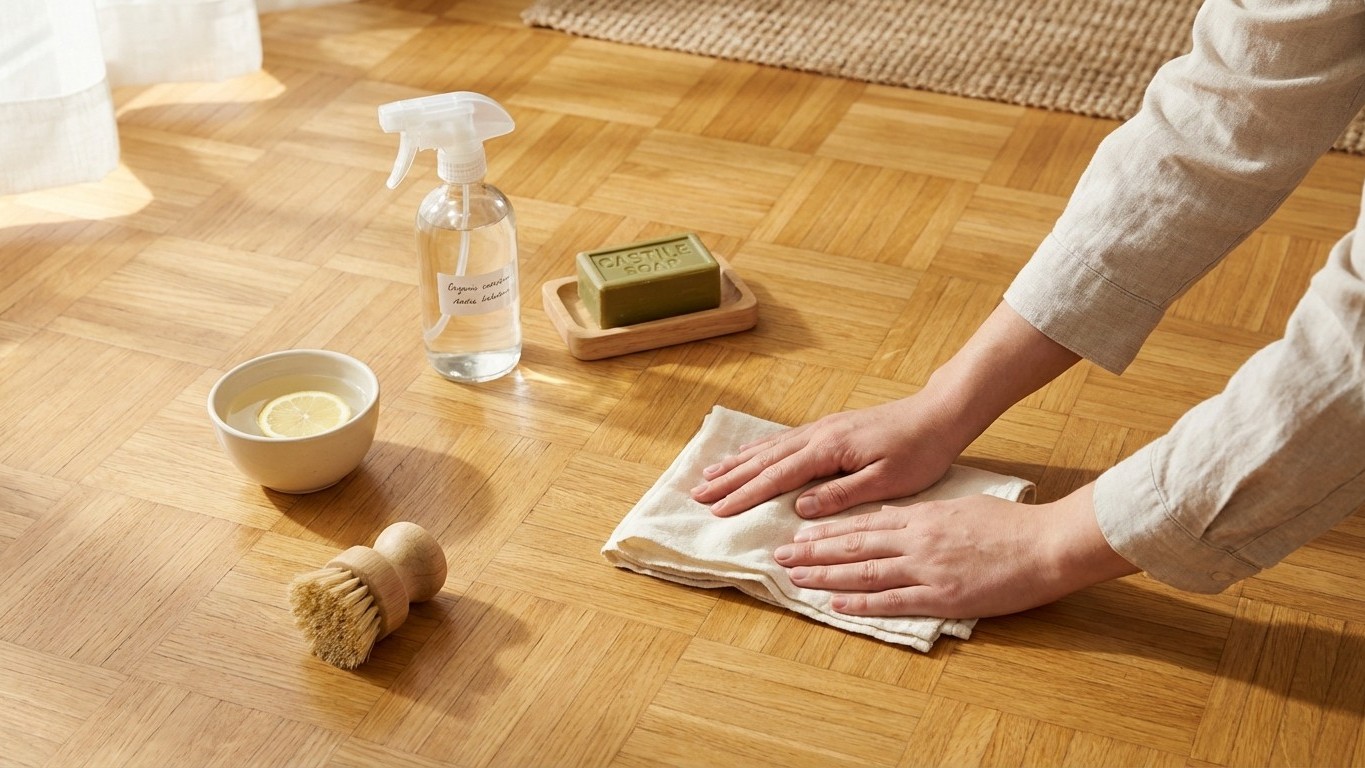
Many commercial floor cleaners contain solvents, synthetic fragrances, and residue-forming agents that build up on wood over time. On a varnished floor, this can cause a greasy haze that no amount of buffing shifts. On an oiled or waxed floor, the wrong detergent strips away the very protection that keeps moisture out of the grain. There is also the question of cost: a bottle of specialist parquet cleaner can run to several pounds, while the ingredients in a good homemade recipe, liquid castile soap, warm water, a touch of white vinegar used very selectively, cost pennies per clean.
From an environmental angle, floors are rinsed with considerable quantities of water and product, all of which eventually enter the drainage system. Choosing plant-based, biodegradable ingredients is a small but genuinely worthwhile choice, particularly in households with young children or pets who spend time close to floor level. If you are already building a broader eco-friendly cleaning routine, you will find wonderful support in our collection of natural cleaning hacks, which covers virtually every surface in the home.
Identifying your floor’s finish before you clean a single centimetre
This step is non-negotiable. Applying the wrong recipe to the wrong finish is the single most common cause of wood floor damage, and it happens in well-meaning households every day. Here is the simplest identification method, no specialist knowledge required.
Run your fingernail lightly across an inconspicuous section of the floor. If the surface feels hard and smooth, like glass, and your nail leaves no mark, you almost certainly have a varnished floor with a polyurethane or lacquer seal sitting on top of the wood. If the surface feels slightly softer and your nail leaves a faint white line that disappears when you rub it, that is likely a waxed floor. A slightly matt appearance with a faint scent of linseed or tung oil when the floor warms up in sunlight suggests an oiled finish. Raw, unfinished wood is rare in domestic settings but does exist in period properties; it tends to look pale, slightly rough, and absorbs water immediately.
You can also try the drop test: place a tiny drop of water on the floor. On varnished wood, it beads and sits on the surface. On oiled or waxed wood, it slowly absorbs, leaving a darker patch. On bare wood, it soaks in almost instantly. Knowing which category you are dealing with changes everything about the recipe you choose.
Essential precautions that apply to every wooden floor, regardless of finish
Water is wood’s greatest enemy, and yet most of us instinctively reach for a wet mop. The rule is simple: your mop or cloth should be wrung out to the point of being nearly dry to the touch, what the French call l’essuie-glace technique, squeezed until it barely damps. Never allow water to pool, and always work in small sections that dry within seconds of application.
Always sweep or vacuum before any wet cleaning. Grit and dust act like sandpaper under a damp cloth, creating micro-scratches that dull the surface over time. A soft-bristled brush attachment on the hoover, or a dry microfibre flat mop, does the job perfectly. Also test any new recipe in a hidden corner, behind a door or under a piece of furniture, and wait ten minutes before proceeding across the whole floor.
Natural recipes tailored to each type of finish
Varnished floors: gentle cleaning without stripping the seal
Varnished wood is the most forgiving of the four types, because the seal acts as a buffer between the cleaning product and the actual wood. That said, it has its own sensitivities. Acidic products, and that means white vinegar, are a genuine risk here. The acidity degrades polyurethane varnish with repeated use, causing it to cloud and eventually peel. I know vinegar appears in many a household tip, and it has its place elsewhere, but please keep it well away from varnished parquet.
The recipe I find most reliable is straightforward: dissolve half a teaspoon of castile soap (the liquid kind, unscented if possible) in one litre of warm, not hot, water. Dip your microfibre cloth or flat mop, wring thoroughly, and clean in the direction of the grain. No rinsing is required if you have used the correct quantity of soap, as castile soap is low-foaming at this dilution. For a light fresh scent, add three drops of tea tree oil, which also has mild antibacterial properties. Dry buffing with a clean cloth immediately afterwards brings up a lovely sheen.
Oiled floors: nourishing as you clean
Oiled floors need moisture the least and nourishment the most. The oil finish penetrates the wood rather than sitting on top, which means any cleaning product that strips oil will leave the wood dry and vulnerable. Avoid any soap in significant quantities, and never use vinegar.
A good routine clean uses nothing more than warm water and a flat microfibre mop, wrung almost entirely dry. For a deeper monthly clean, add a tiny amount of liquid castile soap, no more than a quarter of a teaspoon per litre, and follow immediately with a dry buff. Every three to six months, depending on foot traffic, the floor will benefit from a very thin application of the appropriate oil (linseed, tung, or a proprietary natural floor oil), buffed into the grain with a cloth. This is maintenance as much as cleaning, and it keeps the wood looking rich and protected without a single synthetic ingredient.
Waxed floors: protecting the patina
Wax finishes are beautiful and develop a character over years that no factory finish can replicate. They are also relatively easy to maintain naturally, provided you respect a few rules. Water and wax are not friends; even a slightly damp mop can cause white watermarks. The standard routine clean for a waxed floor is a dry or very lightly damp microfibre mop, with no product at all.
For stain removal on a waxed floor, a small amount of white spirit on a cloth (applied only to the stain, not the whole floor) dissolves grease and marks without damaging the wax layer. Once dry, buff gently with a clean cloth. For refreshing the wax itself, solid beeswax, available from hardware shops and some zero-waste stores, applied with a soft cloth and buffed vigorously after fifteen minutes, restores both protection and the warm, honey-like glow that makes waxed floors so appealing.
Raw and unfinished wood: the most delicate case
If you have bare, unfinished wood, which is unusual but not unheard of in older properties, the priority is to clean with as little moisture as possible and to consider applying a protective finish sooner rather than later. A damp cloth wrung almost completely dry, used to spot-clean marks, is the limit of what the wood can tolerate. For day-to-day maintenance, dry sweeping and a diluted castile soap solution applied extremely sparingly and dried immediately is the safest approach. Honestly, bare wood floors in a lived-in home are fighting an uphill battle; a coat of natural oil or wax will make them far easier to care for.
Tackling common problems: stains, odours, and light scratches
Grease marks on varnished floors respond well to a paste of bicarbonate of soda and a few drops of castile soap, applied with a soft cloth, left for two minutes, and wiped away gently. The bicarb lifts the grease while the soap emulsifies it. Our guide on remove carpet stains naturally baking soda explains the chemistry behind this reaction in useful detail, and much of the same principle applies to wood.
Pet odours absorbed into wood respond to a light misting of diluted white vinegar (one part vinegar to four parts water) on varnished surfaces only, left for thirty seconds and wiped dry. The acid neutralises the ammonia compounds responsible for the smell. For oiled or waxed floors, a paste of bicarbonate of soda left for fifteen minutes before sweeping away achieves a similar deodorising effect without moisture risk.
Light surface scratches on varnished floors can be minimised with a walnut kernel, yes, an ordinary walnut from the fruit bowl. Rub the cut side gently over the scratch; the natural oils in the nut temporarily fill and darken the mark. It is a folk remedy that genuinely works for superficial scuffs, though deeper gouges need a proper repair product.
A practical cleaning routine and the tools that make a difference
Daily or near-daily dry sweeping or vacuuming prevents the build-up of grit that causes most floor damage. A damp clean with your appropriate recipe once a week is sufficient for a family home; once a fortnight works well for rooms with lighter traffic. Deep cleaning or re-oiling and re-waxing is a seasonal job, twice a year in most climates.
The right tools matter as much as the recipe. A flat microfibre mop (rather than a string mop, which holds far too much water) is the single best investment for any wooden floor. Microfibre cloths for spot-cleaning and a soft-bristle brush for the hoover complete the toolkit. None of these need to be expensive; standard supermarket microfibre products work perfectly well.
If you are extending your natural cleaning approach to other surfaces in the home, the principles that protect wooden floors, minimal water, gentle plant-based ingredients, and finish-specific care, translate beautifully elsewhere. Our guides on natural carpet cleaning hacks and natural carpet cleaning hacks for routine care and quick drying complete the picture for households where different floor types sit side by side.
Frequently asked questions: the mistakes worth avoiding
The question about white vinegar comes up repeatedly, and rightly so. Vinegar is safe on ceramic tiles and some other hard surfaces, but it is acidic enough to cause cumulative damage to polyurethane varnish and will strip wax finishes. The short answer is: reserve vinegar for odour neutralising on varnished floors only, heavily diluted, and never use it on oiled or waxed wood at all.
Steam mops are another source of confusion. They seem like an ideal natural option because they use only water, but the combination of heat and moisture is among the most damaging things you can expose a wooden floor to. The steam forces water vapour into the joints between boards, swelling the wood and loosening adhesive. On any wooden floor, any finish, steam mops are best avoided entirely.
For those wondering whether essential oils are safe to add to floor cleaning mixtures: in very small dilutions (two to three drops per litre), oils such as lavender or tea tree are generally harmless on varnished floors. On oiled or waxed floors, some essential oils can interfere with the finish, so patch-test carefully and prefer plain castile soap over anything more complex.
The approach that brings all of this together is a simple one: treat your floor finish as the starting point, not an afterthought. Once you know what you are working with, the recipes become obvious, the risks disappear, and the whole business of keeping a wooden floor beautiful turns into one of the most satisfying parts of a natural home-care routine.