Lifting the corner of a patio tile you laid directly onto bare concrete is a bit like opening a letter you’d rather not have sent. The concrete underneath, which you thought was just a solid, inert slab, has been doing something all along. It breathes. It sweats. And in our reliably damp British climate, what forms beneath those tiles can range from a harmless white crust to something that actively undermines the entire installation.
Key takeaways
- Concrete isn’t impermeable—it continuously exchanges moisture with the air, and tiles laid directly on top trap this vapour underneath
- The UK’s freeze-thaw cycles (up to 100 annually) expand trapped water inside concrete by 9%, slowly destroying the slab from within
- That harmless-looking white powder under your tiles signals a bigger problem: mould can grow on trapped organic debris in a damp, sealed environment
What the concrete was doing all along
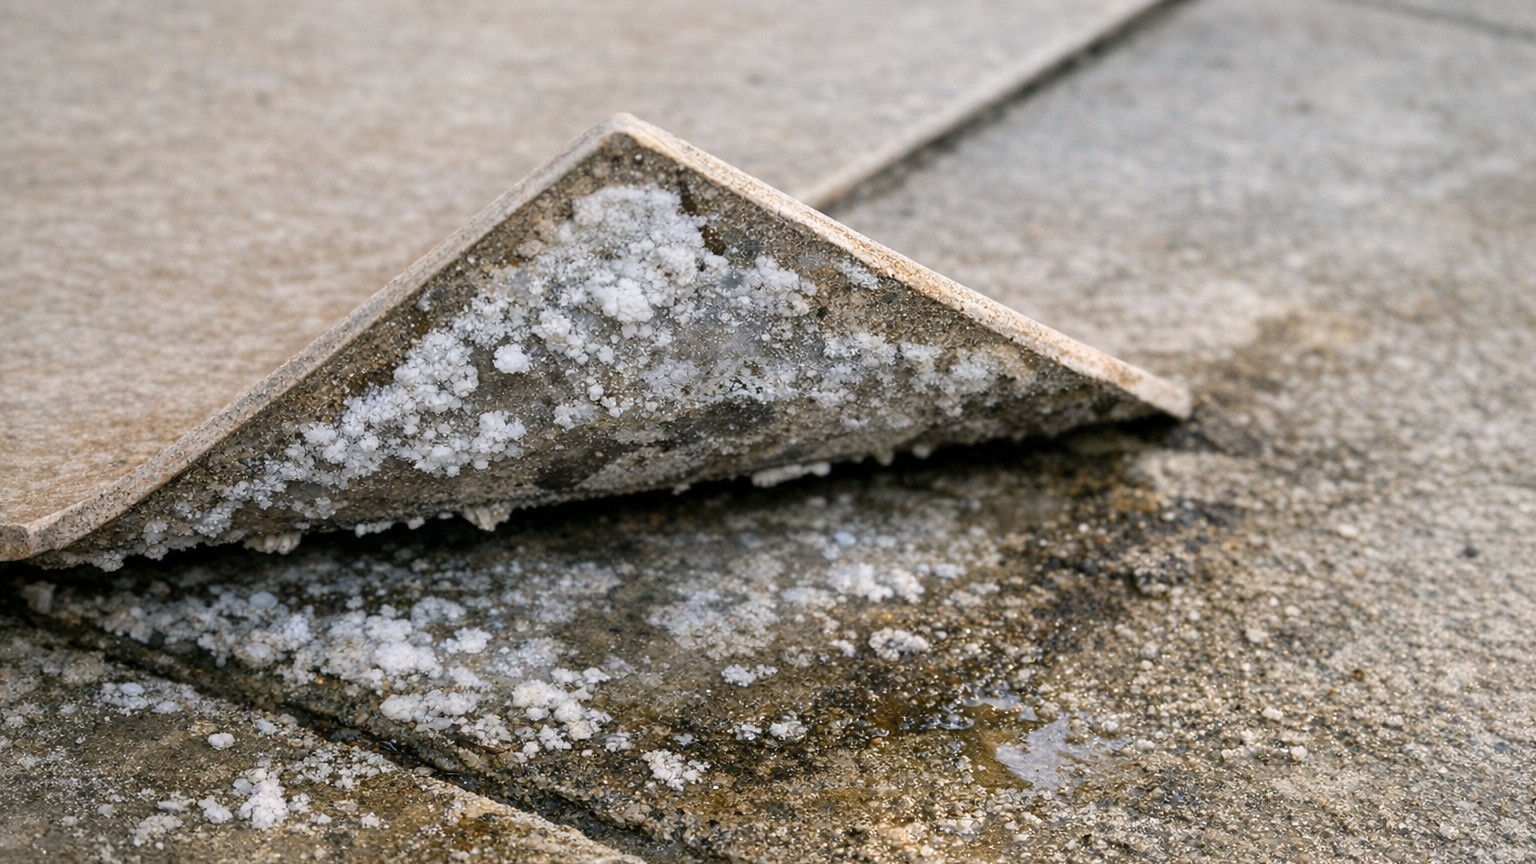
Concrete is not the sealed, impermeable material many of us imagine it to be. The same principles that govern moisture movement everywhere in nature apply directly to a concrete floor: if the humidity or level of moisture in the slab differs from the humidity in the air above it, the moisture will try to rise through the surface. Lay a tile flat on top with no adhesive, no membrane, and no air gap, and you have created a lid. The rising vapour hits the cold underside of the tile, condenses, and sits there.
That white powdery substance you find under, or on, the tiles is called efflorescence. It is a white deposit, usually calcium carbonate, that develops on the surface of grout and tiles as they dry out, happening when soluble mineral salts contained in Portland cement rise to the surface. It is most often caused by water evaporation, low temperatures, humidity, condensation and rain, and is thereby a naturally occurring process. So the white crust is not necessarily a sign the world is ending, but it is your concrete telling you something about moisture you should listen to.
The more troubling possibility is mould. Moisture cannot only weaken the bond between tiles and adhesive, but it can even allow bacteria to bloom into a mould. Now, the tile itself and bare concrete contain no organic food source, so mould cannot grow on them directly. But leaves, dust, pollen, and organic debris inevitably blow under loosely laid outdoor tiles over time, and that trapped damp environment becomes a perfect habitat. Mould needs moisture, a food source, and a place in order to grow. Most buildings provide ample food sources and space, moisture must be controlled in order to prevent mould from thriving.
Why loose-laid tiles make this worse in the UK
Slapping tile down directly on concrete will trap moisture and cause cracking at every hard freeze, since ceramic and porcelain tiles also expand and contract at different rates than concrete when heated and cooled, which can cause summer cracking too. This matters enormously in the United Kingdom. The UK climate creates particularly challenging conditions for concrete structures: temperatures frequently oscillate around 0°C throughout the winter months, creating 50 to 100 freeze-thaw cycles annually in exposed locations.
Think about what that means in practice. Water enters concrete through microscopic pores and hairline cracks invisible to the naked eye; when temperatures drop below 0°C, this trapped water freezes and expands by approximately 9%, creating internal pressure that forces the cement paste and aggregate apart, each freeze event acting like a slow-motion hydraulic jack, gradually weakening the concrete from within. When your tiles are loose on top, each winter effectively loosens them further. By spring, you may find they rock underfoot, or worse, that the grout lines (if you used any) have started to crack and crumble.
Even if your floor looks fine on the surface, moisture trapped underneath can cause mould growth between the layers of your floor, the adhesive holding tiles down can come apart, and serious damage to the concrete subfloor can follow. One useful diagnostic: a white chalky powder (efflorescence) on the grout or edges of tiles, or a floor that makes a hollow sound when tapped, are both signs of hidden water beneath your tiles.
Doing it properly: what should go between tiles and concrete
The good news is that the solution is not enormously complicated, and tackling it now rather than in five years will save a great deal of money and effort. The first principle is surface preparation. If you have just poured your slab, you will need to wait at least one month before tiling it. The concrete also needs to be flat with a slope of 1.5% so that rainwater can drain off easily once the terrace has been tiled. Rainwater pooling on a patio in Britain is not a theoretical concern, it is a weekly reality for much of the year.
The question of what to lay between tiles and concrete divides into two scenarios. If you are bonding tiles permanently, outdoor tiling on a concrete slab works best using a double-gluing method, applying adhesive to both the back of the tiles and the floor to ensure optimum adhesion even under heavy stress. Before any adhesive goes down, the concrete itself needs moisture protection. Ensure that your substrate is dry, which will necessitate the installation of a Damp Proof Membrane (DPM) within any floor build-up, either under the screed or the concrete.
For those who prefer the loosely-laid approach for patios, popular for raised terraces and rental properties because tiles can be lifted and replaced — the key is ensuring drainage cannot be blocked. Self-levelling pedestals are a practical choice for terraces and balconies without the need for adhesives or grouts: each pedestal’s height can be adjusted after tiles have been installed using extension pieces, and this dry installation leaves joints open and provides easy drainage. That open joint is what prevents the lid effect entirely. Moisture rises, and it has somewhere to go.
If the damage is already done
Perhaps you have lifted that corner tile and you are now looking at a chalky white residue, some dark spots you are not sure about, and tiles that have shifted slightly from where you placed them. The steps are manageable. Start by lifting all the tiles and stacking them safely. Sweep and rinse the concrete thoroughly, and leave it to dry fully, in British weather, that can mean waiting for a dry spell of several days. Excessive moisture can damage grout lines and tile mortar, leading to loose or broken tiles as bonds between them begin to break.
For the efflorescence itself, use safe, acid-based proprietary products in accordance with the manufacturer’s instructions, leaving the product in contact with the surface for a few minutes before thoroughly rinsing with clean water. Products such as HG Limex or Lithofin Cement Away are suitable, but should not be used on marble or limestone floors as they will attack the tile surface. Always test on a small, hidden area first.
Once clean and dry, apply a breathable waterproofing membrane or a penetrating concrete sealer to the slab before relaying. A breathable, penetrating concrete sealer, preferably silane-siloxane or lithium-based, repels water whilst still allowing moisture vapour to escape. Film-forming sealers should be avoided in freeze-thaw zones as they may peel and trap moisture beneath, the exact problem you are trying to solve.
One last thing worth knowing: efflorescence will not only cause problems with a stained concrete floor, it can also delaminate tile and warp wood floors. So if you have any timber decking adjacent to your patio, or a wooden threshold at a door, check those too. The same slow moisture migration affects them, just in a different way. The concrete slab beneath your outdoor tiles is never truly still — it is always exchanging moisture with the ground and the air around it, and the tiles above it need to be laid in a way that respects that, rather than fighting it.
Sources : lightspeedrestoration.com | ctasc.com