Wood filler on a cracked Countertop sounds like such a sensible, thrifty solution. A tube of the stuff costs very little, it goes on easily, and for the first hour or two, you’d be forgiven for thinking you’ve cracked it (pun very much intended). The trouble appears at the 48-hour mark, once the filler has fully cured and the wood around it has had time to respond. What you find is almost never what you expected.
Key takeaways
- Standard wood filler shrinks by up to 15% as it cures, leaving visible gaps at the repair edges
- Moisture and wood movement create new cracks around the repair within two days of application
- Colour and finish mismatches make the repair almost as noticeable as the original crack
What actually happens when wood filler cures on a countertop
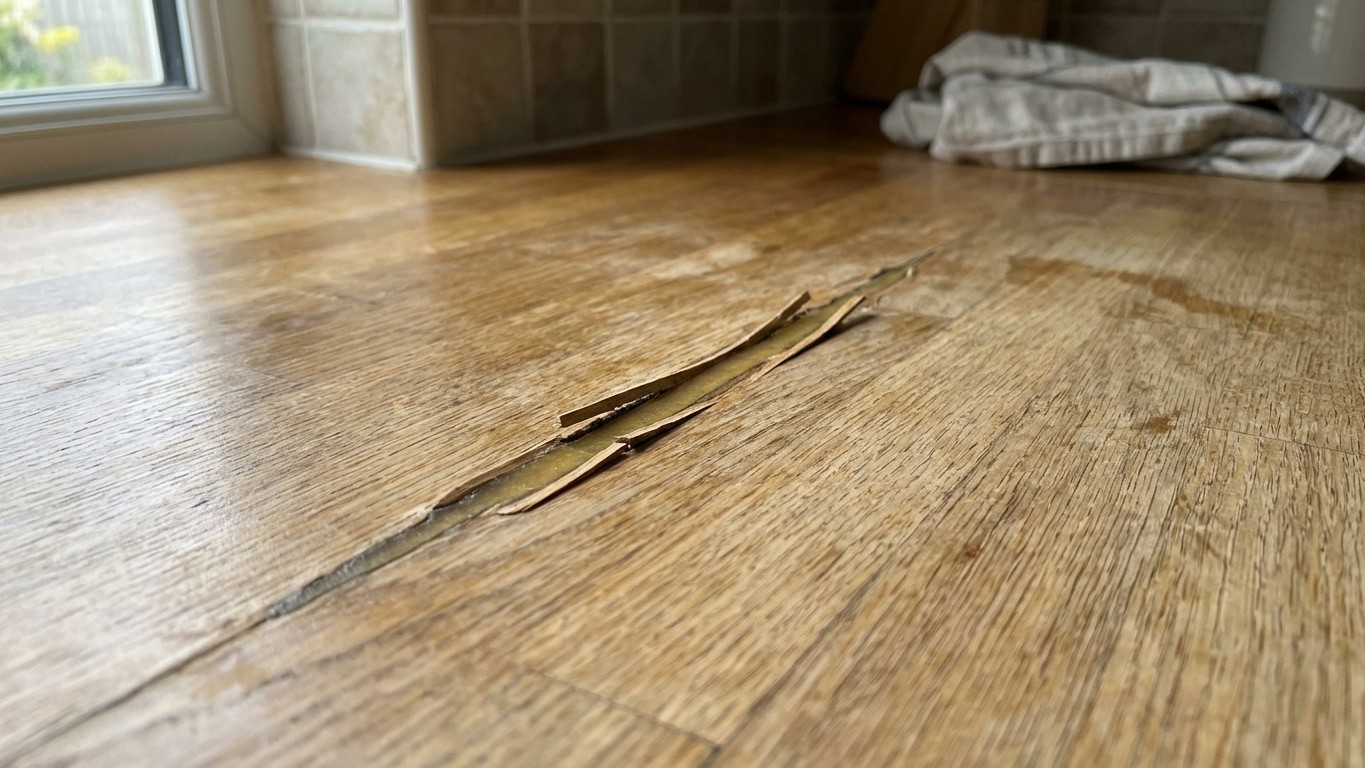
Most standard wood fillers, the kind you’ll find in any DIY shop or hardware section, are water-based or solvent-based compounds that work brilliantly on furniture legs, skirting boards, and window frames. Countertops are a different matter entirely. The surface is subject to heat, moisture, repeated wiping, and the occasional wet glass left standing overnight. By the 48-hour point, the filler has hardened fully and begun to show its real character.
The most common surprise is shrinkage. Wood filler shrinks as it dries, often pulling away slightly from the edges of the crack it was meant to fill. What looked flush and smooth the day before now has a faint but visible line running around the repair. On a flat countertop seen in good light, those lines catch the eye immediately. Some water-based fillers shrink by as much as 10 to 15 percent of their original volume during the curing process, which is why manufacturers often recommend a second application for anything deeper than a few millimetres.
There is also the matter of colour. Filler takes stain and finish very differently from natural wood. Even if you applied a stain before sealing, the repaired area will absorb it at a different rate, often looking either far darker or strangely pale against the surrounding grain. Forty-eight hours in, once the sealer has dried and the light shifts, that patch can look almost as obvious as the original crack.
The moisture problem nobody mentions at the point of sale
Kitchen and bathroom countertops live in a perpetually damp environment. Steam from a kettle, splashes from the sink, the slow seep of condensation under a chopping board. At 48 hours, if any moisture has reached the repair before a proper sealer was applied, the filler begins to soften around the edges. This is particularly noticeable with cheaper water-based fillers, which can rehydrate and lose their bond with the surrounding wood fibres.
The wood itself contributes to the problem. Timber expands and contracts with changes in humidity and temperature, a small but continuous movement that never stops. Filler, once cured, is essentially rigid. It cannot move with the wood. Over 48 hours in a warm kitchen, this mismatch starts to show as hairline cracking at the seam between filler and wood, or as a slight lifting at the edges. The repair begins to look, as my late mother used to say, “worse than the original trouble.”
For countertops that see regular water exposure, a two-part epoxy wood filler is considerably more reliable than standard compound. Epoxy bonds chemically rather than mechanically, resists moisture once cured, and has a much lower shrinkage rate. The trade-off is working time: most two-part epoxies give you only 5 to 10 minutes to shape the repair before they begin to harden, so a steady hand and good Preparation matter enormously.
How to actually get a lasting repair on a cracked countertop
Preparation is where most repairs succeed or fail, long before the filler goes anywhere near the crack. The surface needs to be completely dry, free of grease, and sanded lightly along the crack edges to give the filler something to grip. A quick wipe with white spirit on a clean cloth removes any invisible residue from cooking oils or cleaning products. Let it dry fully, which means at least 30 minutes in a warm room, before applying anything.
For a crack wider than 2mm, slightly overfill the repair so that once shrinkage occurs, you are sanding back to level rather than finding a sunken channel. Sand in stages, starting at 120 grit and finishing at 240, always working with the grain. This matters for the colour-matching step that follows.
Sealing is non-negotiable on a countertop, and the sealer you choose determines how much protection the repair actually gets. A hard-wearing polyurethane or oil-based finish applied in thin coats, with light sanding between each, gives the filler the best chance of blending in. Two coats is the practical minimum; three is better for a surface that sees daily use. Allow each coat the full drying time recommended on the tin, even if it looks dry sooner. Rushing the final coat is what usually causes peeling within a month.
One detail that trips people up: if your countertop has a factory-applied finish, matching it at home is genuinely difficult. Factory lacquers are often catalysed with UV light or heat and cannot be replicated with off-the-shelf products. In that situation, the most realistic approach is to seal the repair to the best of your ability and accept a slight visible difference, or consider whether a strategically placed chopping board might do the job more cheerfully than any filler ever could.
A small thing worth knowing: some woodworkers use a mixture of fine sawdust from the actual countertop material combined with a clear PVA glue as a filler. Because the sawdust comes from the same wood, the colour match after finishing can be surprisingly good. You would need to collect the dust during any sanding work on the surface itself, keep it in a small jar, and mix it to a stiff paste before pressing it into the crack. It is an old joiner’s trick, entirely free, and on natural wood countertops it often outperforms a shop-bought product in terms of final appearance.