For years, the ritual was exactly the same: drag out the sander, wrestle on the mask, cover every last stick of furniture, and spend the next three days discovering that drywall dust has somehow migrated into your biscuit tin. If you’ve ever tackled textured walls in an older British home, you’ll know that particular misery well. The good news is that there is a far kinder way to get beautifully smooth walls, and it involves nothing more exotic than a damp sponge and a tub of joint compound from your local builders’ merchant.
Key takeaways
- A surprisingly simple technique replaces decades of backbreaking, health-hazardous sanding work
- The method uses only water-activated joint compound and a damp sponge—no expensive equipment needed
- One decorator reveals why this approach costs under £50 and transforms the entire wall-smoothing process
Why Sanding Textured Walls Is Such a Menace
Let’s be honest about what dry Sanding Actually involves. When you sand plasterboard compound, crystalline silica and mica are released into the air as fine dust, minerals that are extremely dangerous to the lungs, embedding themselves in lung tissue when inhaled. This isn’t just a minor inconvenience for your hoover. Over time, breathing the dust from drywall joint compounds may cause persistent throat and airway irritation, coughing, phlegm production, and breathing difficulties similar to asthma. That white cloud you’ve been cheerfully sanding away in your spare bedroom? Crystalline silica is considered a human carcinogen and may cause lung cancer.
There is also the sheer physical punishment of it. To create sufficient friction for sanding, you apply considerable pressure to the sander, resulting in stress on the back, arms, and wrists. Twenty minutes in and your shoulders are screaming. Twenty years of this, as I can personally attest, is quite enough. The mess alone, coating every surface in a fine grey bloom, blocking HVAC filters, settling into soft furnishings — makes a supposedly simple decorating job feel like a week-long ordeal.
The Damp Sponge Method: What It Is and Why It Works
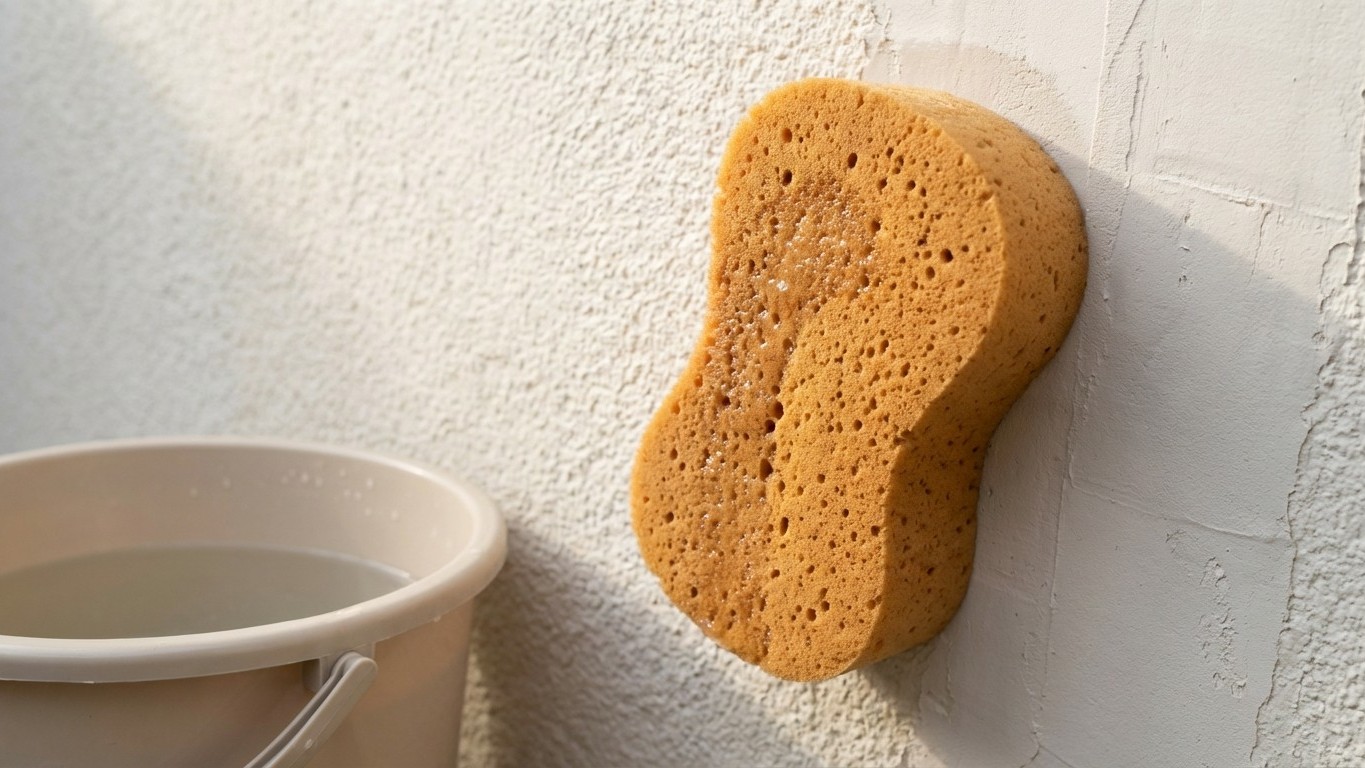
The process of smoothing textured walls with skim coating is fairly common. It refers to spreading a layer of joint compound over the walls to fill in the bumps and valleys in the texture, effectively creating a smooth surface. The damp sponge step is the clever twist that transforms this from a dusty slog into something almost meditative. You smooth out imperfections by lightly wiping the joint compound with a large, damp sponge, keeping a bucket of water nearby so you can rinse the sponge often.
The science behind it is simple and rather satisfying. Joint compound is activated by water, so the sponge must not be so wet that you remove all your hard work. Think of it less as washing the wall and more as coaxing the surface into submission. Start slowly to dampen the dried compound, work in long light strokes, and the mud will soften so you can feather it out as desired. Begin with the sponge just slightly damp and moisten little by little until it starts to work, it doesn’t take much. The result? The ridges and peaks left by the trowel dissolve away without generating a single puff of dust.
One small but vital point that catches beginners out: don’t stay in one place too long, as too much moisture will smear the once-dry compound rather than smooth it. Keep moving. Rinse out the sponge every so often so you’re not just redistributing compound mud back onto the wall. As for sponge choice, plenty of seasoned decorators recommend a large, dense car-wash sponge or a tiling grout sponge, both widely available at DIY shops, both entirely unpretentious, both perfectly effective.
Step by Step: How to Do It Properly
Good preparation makes all the difference. Before you begin, remove vent covers, outlet and light switch plates, and any hardware, and tape off your skirting boards or protect your floors with a dust sheet. Give the walls a wipe down to remove loose grit, nobody wants to skim over a layer of old cobwebs.
Mix all-purpose joint compound to roughly the consistency of mayonnaise, just thin enough to roll onto the wall. You’ll get shrinkage if you mix it too wet, so add water in small amounts and stir thoroughly. Premixed compound straight from the tub also works well if you’re new to this.
Apply the compound to your wall using a wide taping knife or a paint roller fitted with a thick nap sleeve, working in manageable sections. Scraping right on top of the existing texture and pulling the compound down the wall starts to fill the holes and create a smooth surface; work in roughly a two-foot area with smooth motions until the compound begins to set, at which point the final swipes with the taping knife can produce a fairly smooth surface without obvious seam lines.
Once the first coat is on and starting to firm up, not fully dry, but no longer shiny wet, bring in your damp sponge. After letting it dry completely, you can go over it with a wet sponge to smooth it down and eliminate a sanding step. You just want to do enough to smooth out any of those chunky areas you got.
Two coats are usually all that’s needed to erase orange-peel or a light knockdown texture. Heavier stippled or Artex-style finishes may need a third pass. If you have a really heavy texture, you’ll need more layers of joint compound. Each coat of mud should be smoothed in the same direction as it was applied with the roller, and you should alternate directions with each consecutive coat, if you rolled the mud vertically on the first coat, switch to horizontal for the next.
One trick worth knowing: shine a light at an angle on the wall you’re working on. The angle is important because it allows you to see more imperfections than you would with down-lighting. A cheap torch held sideways against the wall will reveal any lingering ridges you’d otherwise miss entirely, until the paint goes on, naturally, by which point it’s too late.
The Finishing Line: Priming Before You Paint
Fresh joint compound needs to be sealed with primer first, don’t skip this step and go straight to paint, even if it says it has primer in it. Paint with a quality drywall sealer next, as this seals the new mud and prevents the finish paint from soaking in — skip it and a two-coat job easily becomes a three- or four-coater. A single roller of decent sealing primer is a modest outlay that saves a great deal of frustration later.
The whole process is genuinely inexpensive. You can hire someone to smooth textured walls, but the labour cost would put the project out of most budgets; the cost of supplies and doing it yourself can bring the total investment to around £40-50 and a few hours of work. That’s a rather compelling argument for a weekend’s effort, especially when you consider that the alternative involves breathing in compounds that nobody should be inhaling in quantity.
The walls in older British homes, especially those built or renovated in the 1970s and 1980s, when textured finishes were popular partly because they allowed builders to get away with one less coat of mud and far less sanding — have always deserved better than their bumpy fate. A damp sponge, it turns out, is rather good at delivering justice. And the silence where the sander used to roar is, frankly, bliss.