Fresh plaster and neat emulsion paint are fundamentally incompatible, and the science behind that incompatibility is remarkably simple once you understand what new plaster actually is. When plaster goes onto a wall, it contains a very high moisture content, sometimes as much as 30% water by weight, and as it dries, it becomes intensely alkaline, with a pH that can reach 12 or higher. Roll neat emulsion straight over it, and you are essentially sealing that moisture and alkalinity beneath a film that cannot handle either. The result is a paint layer that never truly bonds to the surface below. It just sits there, waiting to fail.
Key takeaways
- Fresh plaster contains up to 30% moisture and extreme alkalinity—conditions that make standard emulsion paint fail almost immediately
- When you peeled back that corner, the paint hadn’t bonded at all—it was sitting on a damp, powdery surface that was actively breaking down
- A diluted mist coat applied first transforms everything, allowing plaster to breathe while creating a surface that paint can actually grip
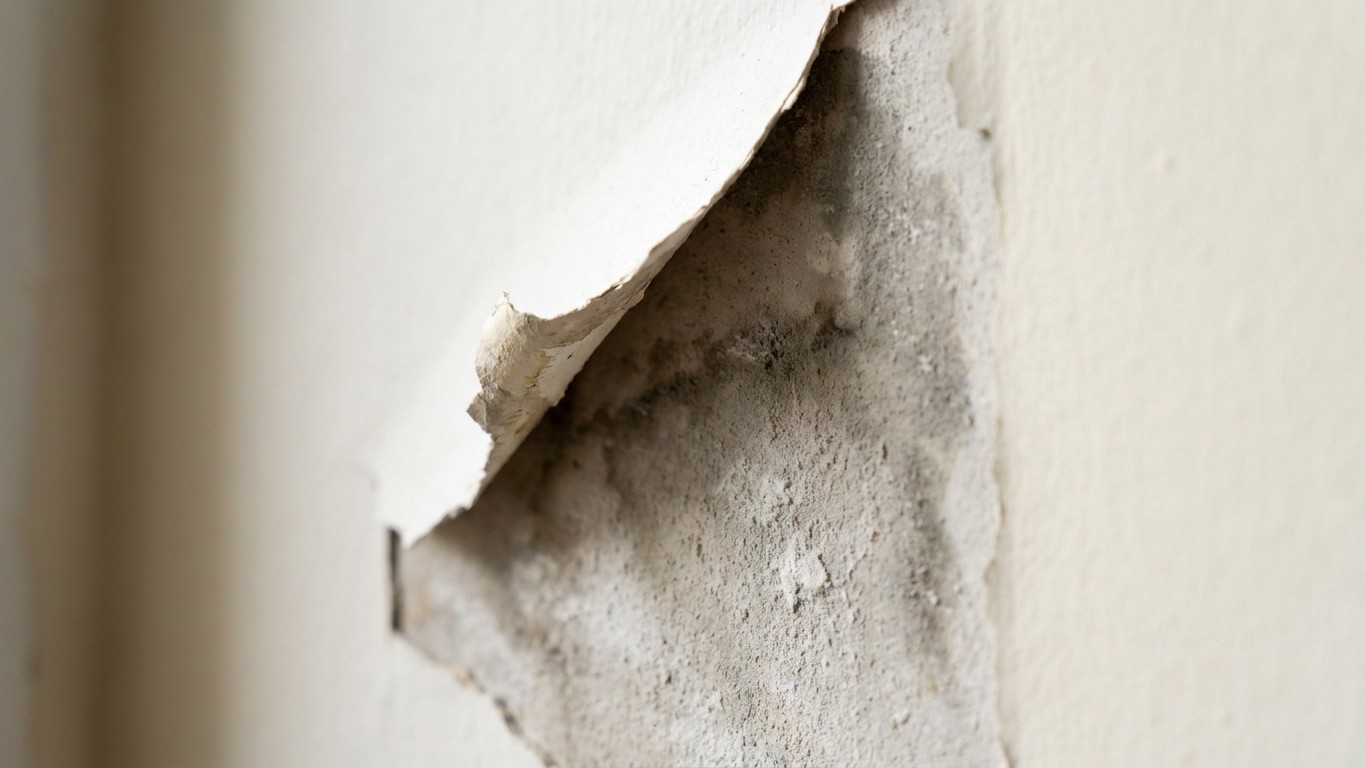
What was actually happening under that painted surface
When I peeled back the corner of my freshly painted wall seven days after decorating, I found something that looked like the underside of a bandage that had been applied to wet skin. The paint had formed a complete sheet, almost like a membrane, and the surface beneath it was still slightly damp to the touch. In places, the plaster had begun to powder, a process called efflorescence, where mineral salts had migrated to the surface as the moisture tried to escape and had nowhere to go.
The problem is that emulsion paint, particularly vinyl emulsion (which is what most of us buy), forms a relatively vapour-resistant skin. New plaster needs to breathe as it cures. Trap the moisture and you get one of two outcomes: the paint blisters and peels as steam pressure builds from behind, or the alkalinity literally breaks down the binder in the paint, turning it chalky and preventing adhesion altogether. On my wall, both things had happened at once. A real double failure, and entirely my own doing.
There is also a suction problem that many people overlook. Fresh plaster is extremely porous and thirsty. When you apply neat emulsion to it, the plaster draws the water out of the paint so aggressively and so quickly that the paint cannot flow and level properly. You end up with a patchy, uneven first coat that looks rough, even if the plaster itself was perfectly smooth. The paint essentially dries before it has time to form a proper film.
The right way: mist coat first, always
The solution is a mist coat, and it costs almost nothing extra. A mist coat is simply emulsion paint thinned down significantly with water, a rough guide is roughly one part water to three or four parts paint, though some decorators go as far as 50/50 for particularly thirsty plaster. This thin, watery mixture soaks into the plaster rather than sitting on top of it. It primes the surface, reduces suction, and crucially allows the plaster to continue releasing moisture vapour as it cures.
Use a cheap white emulsion for this. There is absolutely no need to use your finishing colour as the mist coat. A basic own-brand white matt emulsion, thinned to the right consistency, does the job perfectly well. Apply it with a roller and expect it to look terrible, thin, patchy, almost transparent in places. That is completely normal and entirely the point. You are not decorating at this stage; you are preparing a surface to accept decoration.
Once the mist coat has dried fully (give it a minimum of 24 hours, longer if the room is cool or poorly ventilated), run your hand over the wall. It should feel slightly rough to the touch, which is the mist coat having created a fine mechanical key. At that point your first proper topcoat of emulsion will go on cleanly, cover evenly, and actually stick.
How long should you actually wait before painting new plaster?
This is where most impatient decorators, myself included, go wrong. The common advice is to wait until plaster has turned a uniform pale pink or cream colour, with no darker damp patches visible. In a warm, well-ventilated room during summer, that might take two to three weeks. In a cold, north-facing room in autumn, it could take six weeks or more. Rushing this is almost always a false economy.
Pink plaster indicates that the surface is still actively curing. The colour comes from the chemical reaction between the lime content and the moisture, as that moisture leaves, the colour lightens. Some decorators use a damp meter to take the guesswork out of it, aiming for a moisture reading below 12% before applying any coating. A basic damp meter costs very little from a builders’ merchant and can save you a great deal of trouble later on.
One detail worth knowing: underfloor heating and dehumidifiers are sometimes used to speed drying, but forcing plaster to dry too fast can cause it to crack as the surface shrinks faster than the core. Gentle warmth and good air circulation are better than aggressive heat.
Rescuing a wall where emulsion went on too soon
If you have already made the same mistake I did, the repair depends on how badly the paint has failed. Light peeling and poor adhesion can sometimes be remedied by carefully removing all the loose paint, keying the surface with fine sandpaper, and starting again with a proper mist coat, as long as the plaster beneath is still sound and not powdery. If the plaster has been damaged or contaminated with paint residue that cannot be fully removed, a specialist bonding primer designed for alkaline or damp substrates will give you a better foundation than a standard mist coat alone.
Heavily failed sections where the plaster has lifted, crumbled, or cracked usually need to be cut back and re-plastered. Frustrating, but attempting to paint over compromised plaster simply delays the inevitable.
One small comfort from my own experience: the wall that failed so spectacularly was in a utility room, not the sitting room. The replastered and correctly prepared version has now held paint without any issues for several months, and the finish is noticeably smoother than the room I painted in a hurry. Patience, as it turns out, is the cheapest decorating product available.