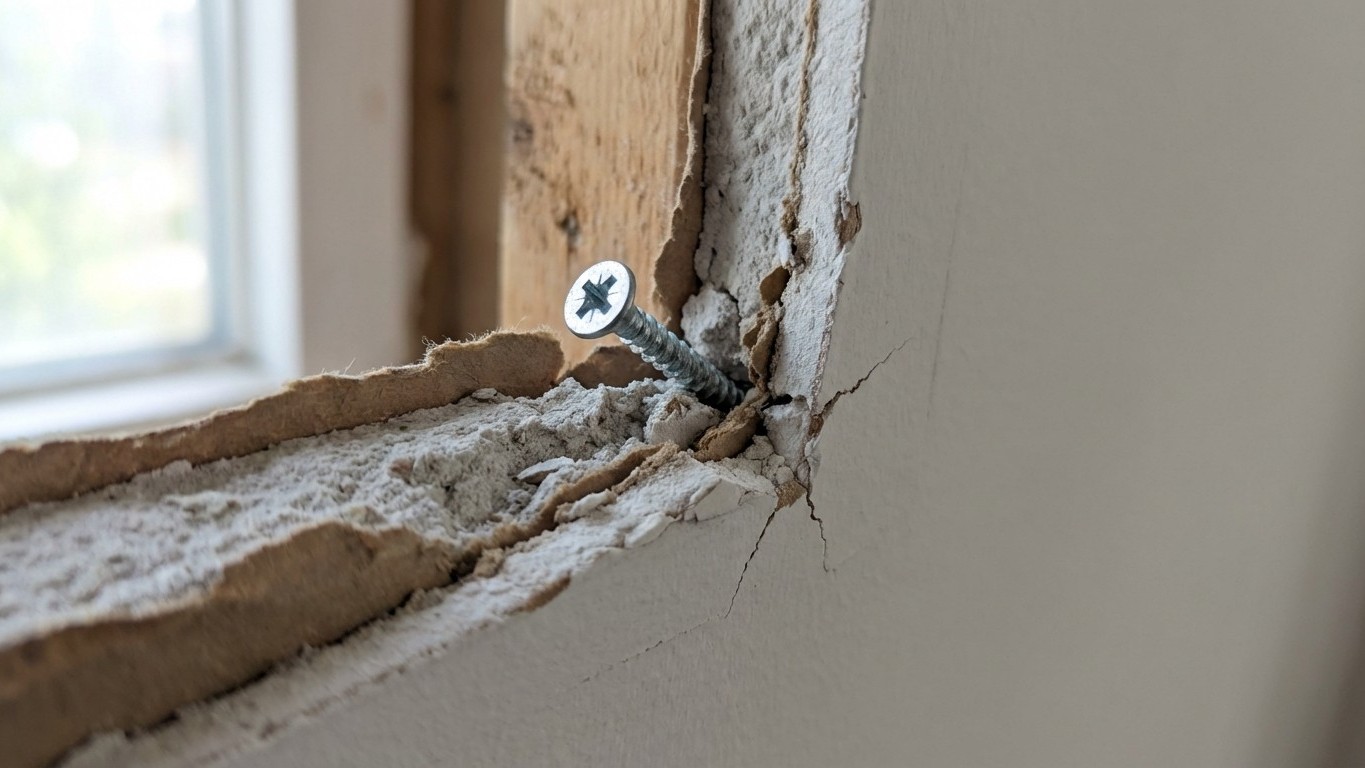
Plasterboard walls look perfectly solid when you first move into a home, and that can be rather misleading. Tap one with your knuckle and you’ll hear the hollow truth: behind that painted surface sits a relatively thin sheet of gypsum, held between two layers of paper, fixed to a timber or metal frame. Put a shelf on it without the right fixings, and the damage begins immediately, even if you can’t see it yet.
The one step that most people skip is this: checking whether their fixing is actually transferring the load to the stud behind the board, rather than relying on the plasterboard itself to hold the weight. It sounds simple, almost obvious. And yet, judging by the number of cracked, crumbling walls I hear about from readers, it’s skipped constantly. A standard screw driven straight into plasterboard, with no stud behind it and no cavity fixing, will hold for a few weeks. Then the board begins to compress around the fixing point. Then the surface starts to crack outward, like a spider’s web. By the time the shelf actually falls, the wall already needs replastering.
Key takeaways
- Plasterboard alone cannot safely support shelf weight—internal collapse begins immediately, often invisibly
- Most people trust stud finders completely, but they need a secondary confirmation method to work correctly
- When studs don’t align with bracket positions, cavity fixings can work—but only if load ratings are respected and installation is precise
What’s actually happening inside your wall
Gypsum plasterboard has very little tensile strength. It’s designed to create smooth, flat surfaces for decoration, not to bear sustained loads. When you drive a screw directly into it without a proper fixing, all the weight of your shelf, its brackets, and whatever sits on it, presses down through that screw onto the compressed edge of the board. Over time, the gypsum crumbles microscopically around the fixing hole. The screw tilts, the bracket loosens, and the cracking you see on the surface is simply the visible sign of internal collapse that’s been happening for months.
A shelf holding a few paperbacks might get away with it for a year. A shelf holding books, a vase, and a couple of framed photographs? That’s easily eight to ten kilograms, and many standard plasterboard walls simply weren’t designed to take that through the board alone. The mathematics are rather unforgiving.
Finding the studs, and why a stud finder alone isn’t enough
The traditional remedy, and still the best one, is to fix your shelf brackets directly into the timber or metal studs behind the plasterboard. A wooden stud will hold a screw far more securely than gypsum ever could, spreading the load across solid structural timber rather than a fragile composite sheet.
Most people reach for a stud finder and trust it completely. Here’s where a second step often gets missed. Electronic stud finders work by detecting changes in density behind the board, but they can be fooled by pipes, cables, noggings, and even variations in the plasterboard thickness. The sensible approach is to use the finder to get an approximate location, then confirm it. A thin bradawl or a long pin pushed gently into the wall at the suspected stud location will tell you definitively whether you’ve hit timber or found an air gap. No need to make a large hole. A tiny test puncture costs almost nothing to fill and could save you a shelf’s worth of grief.
Studs in British homes are typically spaced at either 400mm or 600mm centres, though older properties can surprise you with irregular spacing. Once you find one stud, you can usually work along the wall from that point. If your bracket positions don’t align with studs, that’s when you need to think carefully about the alternatives.
When there’s no stud where you need one
This is where the market has genuinely improved over the years. Cavity fixings designed specifically for plasterboard have become far more reliable than the old plastic plugs that many of us grew up with. Those hollow-wall anchors that expand as you tighten them, gripping the back face of the board rather than compressing the gypsum, can support a meaningful load when used correctly. The key phrase there is when used correctly.
Always check the load rating printed on the packet against what you actually intend to put on the shelf. Manufacturers test these fixings under controlled conditions, and they’re conservative with their figures, which is exactly what you want. Two fixings rated at five kilograms each doesn’t mean your shelf can hold ten kilograms safely if both fixings are close together in the same section of board. Spread your fixing points, use at least two per bracket, and keep the shelf load well within the stated limits rather than treating the maximum as a target.
For heavier loads, a batten fixed horizontally across multiple studs, with your shelf brackets attached to the batten, spreads the weight far more effectively than any number of individual fixings. It’s slightly more visible, yes, but painted to match the wall it becomes almost invisible, and it works properly. My own preferred approach for a heavy kitchen shelf, given the choice, every time.
The small things that make the difference
A few habits are worth building before you drill anything. Switch off the relevant circuit at the fuse box and use a cable detector before marking your drill points, particularly in older homes where wiring doesn’t always follow modern convention. Mark the drill depth on your drill bit with a small piece of masking tape so you don’t go deeper than necessary. And once your shelf is up, give it a gentle but firm downward tug immediately after fitting, then check it again a fortnight later. If it’s moved at all, something wasn’t right and it’s far better to discover that with an empty shelf than a loaded one.
Plasterboard walls are genuinely useful things, and there’s no reason a well-fixed shelf can’t sit on one happily for decades. The cracking, the crumbling, the shelves that droop and then drop, all of that comes from trusting the board to do a job it was never built for. The studs, the right fixings, the load ratings: they’re not overcaution. They’re just how it’s supposed to work. Makes you wonder what else in the house was put up in a hurry and is quietly waiting to announce itself.