A dripping tap is one of those small domestic torments that sneaks up on you. At first it’s barely noticeable, just a faint tick-tick-tick from the bathroom at night. Then you find yourself lying awake calculating how many litres you’re wasting, which is when most of us reach for the phone and call a plumber. I nearly did exactly that last spring, until my neighbour Frank, a retired builder with hands like shovels and a wonderful disregard for unnecessary expense — peered under my kitchen sink and said, “Margaret, love, it’s just the washer.”
He was right, of course. A rubber washer the size of a 10p coin was all that stood between me and a dry, peaceful night’s sleep. The repair took eleven minutes. The replacement washer cost less than a pound. And I’ve never forgotten how close I came to paying a call-out fee for something I could genuinely manage myself with a tea towel on the floor and a borrowed spanner.
Key takeaways
- Why 99% of dripping taps in British homes fail for the same mechanical reason
- What’s hiding under your tap handle that plumbers hope you’ll never find
- The exact 11-minute process that could save you hundreds in call-out fees
Understanding what’s actually causing the drip
Most traditional taps in British homes, the kind with separate hot and cold handles that you turn rather than lever, are what plumbers call compression taps. Inside each handle sits a mechanism that, when you turn the tap off, presses a small rubber washer down onto a metal seat to form a watertight seal. Over time, that washer wears down, hardens, or splits. When it can no longer seat properly, water squeezes past it. Drip, drip, drip.
The encouraging news is that this design has barely changed in a hundred years, which means spare parts are cheap, widely available at any hardware shop, and almost universally compatible. If your tap is a more modern ceramic disc type (the kind with a quarter-turn lever that clicks into position), the mechanism is slightly different, but the principle of a worn internal component causing the leak is usually the same. For this article I’ll focus on the traditional compression tap, since that’s what fills the majority of older British homes.
What you’ll need before you start
Gather a few things before you touch the tap. You’ll want an adjustable spanner, a flat-head screwdriver, a crosshead screwdriver, a small bowl or old towel to catch residual water, and replacement washers. Grab an assorted pack from your local hardware shop, they’re sold in mixed sizes and cost very little. A small amount of plumber’s grease is useful but not strictly necessary for a first attempt.
The single most important thing to do before anything else: turn off your water supply. Under the kitchen sink there’s usually an isolation valve on the pipe feeding the tap, a small slotted screw that you turn a quarter-turn with a flat screwdriver until the slot sits perpendicular to the pipe. If you can’t find one, or if your bathroom taps lack individual isolation valves, you’ll need to turn off the main stopcock, usually found under the kitchen sink or where the supply pipe enters the house. Turn on the tap afterwards to release any remaining pressure and drain the pipe.
The repair, step by step
With the water off, look at the top of the tap handle. There’s often a small decorative cap, sometimes marked H or C for hot and cold, that you can prise off gently with a flat-head screwdriver. Beneath it sits a screw, usually crosshead. Remove it, and the handle should lift straight off.
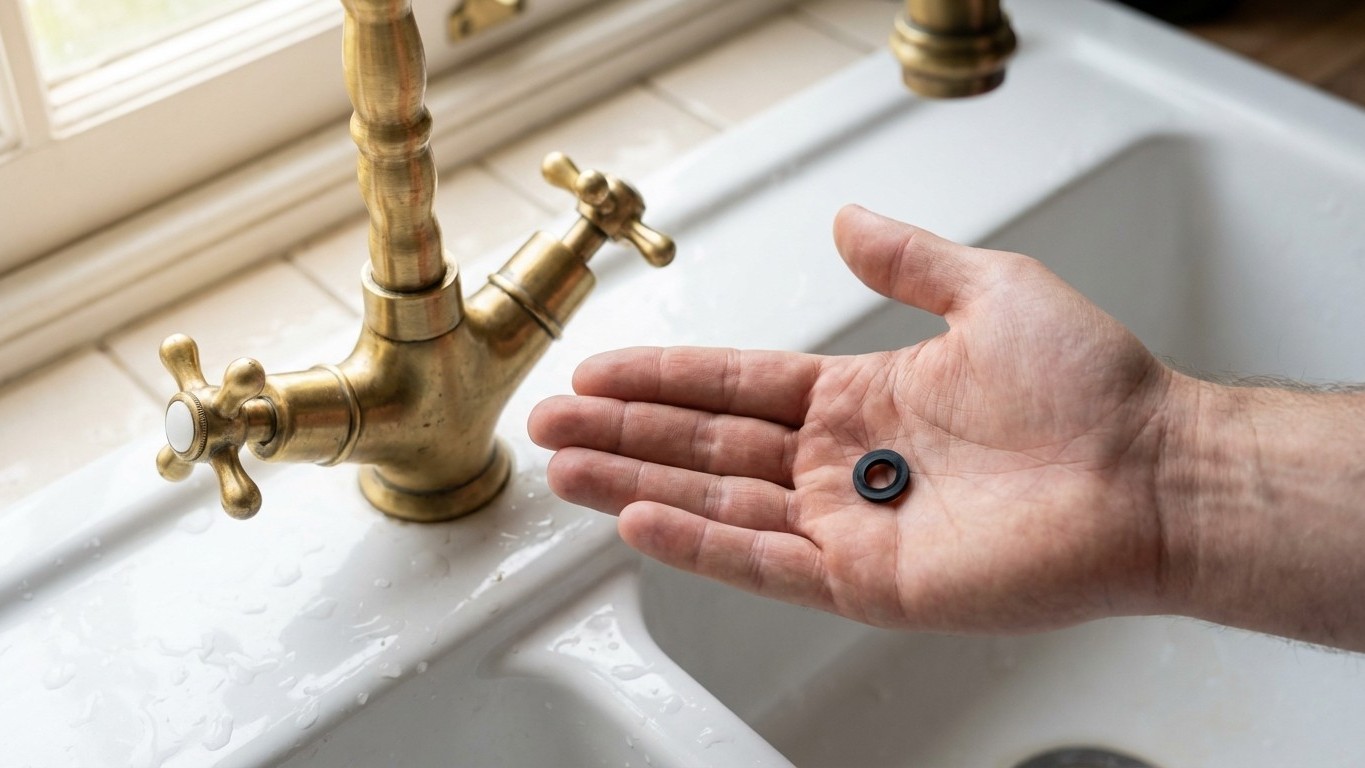
Once the handle is away, you’ll see a hexagonal brass nut called the packing nut or gland nut. Use your adjustable spanner to turn this anticlockwise and unscrew it completely. Lift out the valve assembly inside, which looks rather like a short bolt with a rubber cap on the bottom end. That rubber cap is your washer. It may be held in place by a small brass screw, or it may simply be clipped on. Remove the old washer, note its size, and press your replacement firmly into position. If it’s the screw-retained type, replace the screw snugly but without over-tightening.
Now simply reverse everything: drop the valve assembly back in, screw the packing nut back down clockwise (firm, but you’re not trying to snap anything), replace the handle, replace the screw, pop the cap back on. Turn your isolation valve back to the open position, or turn the main stopcock back on. Then turn the tap on and off a few times. Nine times out of ten, the drip is gone.
If water is still seeping after the repair, and it’s coming from around the base of the handle rather than the spout, the packing inside the gland nut may need replacing. That’s a slightly more involved job, though still manageable for a confident beginner. If the drip persists from the spout despite a new washer, the metal seat itself may be worn or pitted, and that’s the moment to genuinely consider a call to a plumber, or to ask whether the tap itself is simply ready for retirement.
The bigger picture of small repairs
A dripping tap left unattended can waste somewhere in the region of 5,500 litres of water a year, based on figures from water conservation guidance. That’s not just a number for the environmentally minded, it shows up on your water bill too, if you’re on a meter. The small effort of a Sunday afternoon repair pays back in ways that compound quietly over years.
There’s something else, though. Once you’ve done it once, you realise how much of what we call “plumbing” in domestic settings is really just mechanical common sense wrapped in slightly intimidating terminology. The washer is just a washer. The spanner turns the nut. The water stops dripping. I think about Frank every time I walk past a dripping tap now, and I find myself wondering how many other little household problems are waiting for someone to simply look at them properly, rather than reaching for the phone.