A sticking door that drags, binds, or refuses to latch properly is one of those household frustrations that chips away at your patience every single day. The instinct, almost universal, is to grab a plane and attack the edge where the door visibly rubs against the frame. For years, that is exactly what I did, and what most people do. The trouble is, a door rarely sticks where you think it does.
Key takeaways
- The visible rub mark on the latch side is almost never the actual problem—it’s usually a symptom of movement elsewhere
- A single sheet of paper can pinpoint the real tight spot in seconds, saving hours of unnecessary planing
- Loose hinges, paint build-up, and wood swelling cause most sticking doors—not excess timber where you’d expect
The latch side is almost never the real culprit
When a door sticks along its latch side, the most common cause is actually movement at the top or hinge side. Wood expands with humidity, hinges work loose over time, and the entire frame can shift as a house settles. All of that movement manifests as a gap that closes up, binding the door, but the binding tends to show itself at the latch edge because that is the last point of contact before the door shuts. You see the rub mark there, you plane there. Meanwhile, the actual problem sits untouched at the top corner or along the hinge stile.
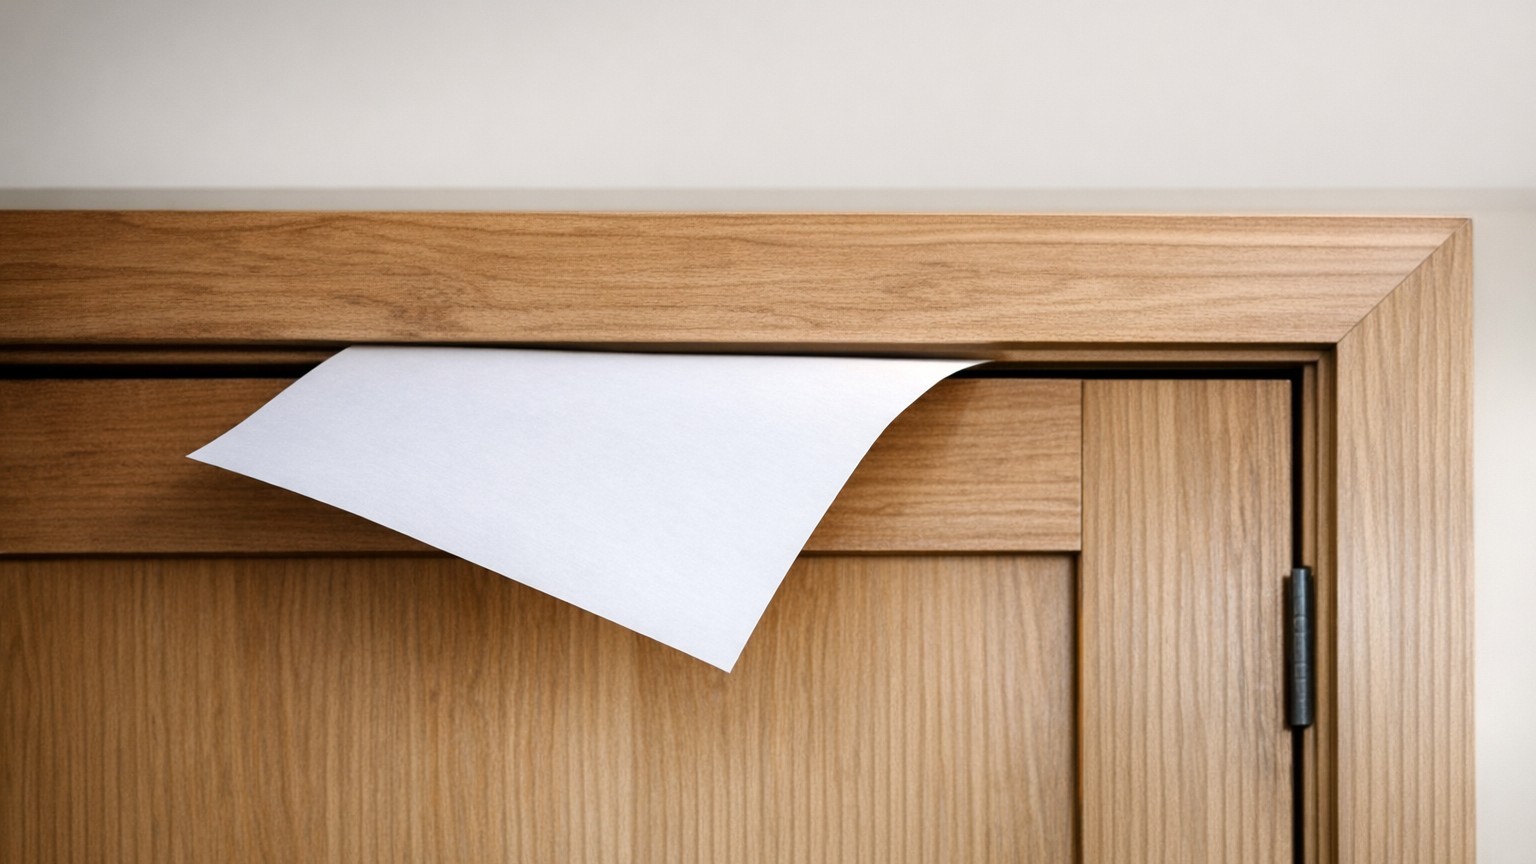
A carpenter I once watched at work made it look laughably simple. He closed the door slowly, watching the light around the frame rather than listening for the scrape. He slipped a thin piece of paper around the perimeter, the kind of check a mechanic might do on an engine gasket, and found the real tight spot in seconds. The paper passed freely along the latch side. At the top hinge corner, it would not move at all. “That’s where your door lives,” he said, tapping the top edge. He was right, and I have never forgotten it.
How to diagnose a sticking door properly before reaching for any tool
The paper test is genuinely the best place to start, and it costs nothing. Close the door gently and slide a single sheet of ordinary printer paper around every edge in turn. Where the paper drags or tears, that is where the door is binding. Where it moves freely, there is clearance to spare. Do this on a dry day if you can, because humidity swells timber and your findings on a damp morning in November may look quite different from a dry July afternoon.
Look at the hinge side next. Loose screws are an extremely common cause of a dropped door, and the fix can take under five minutes. If the door has sagged on its hinges, the latch corner drops and the top latch corner rises into the frame, creating a bind at the top edge. Tighten all the hinge screws first. If the screw holes have become enlarged and the screws no longer grip, fill the holes with wooden cocktail sticks and a dab of wood glue, let them dry fully, then refit the screws. The grip is restored and the door often rights itself without a single stroke of a plane.
Paint build-up is another overlooked factor, especially in older British homes where doors have been redecorated dozens of times. Several layers of gloss paint along the top edge and the hinge rebate can add a millimetre or two of thickness, enough to cause persistent binding. Running a sharp scraper along those surfaces before painting again can make a surprising difference.
When you do need to plane, here is how to do it safely
If the paper test confirms genuine excess timber, planing becomes necessary. Remove the door from its hinges and lay it across a pair of sawhorses or sturdy chairs padded with an old towel. Always plane with the grain where possible, working from the ends towards the middle to avoid splitting the corners. Take very thin shavings, a fraction of a millimetre at a time, and keep testing the fit by rehinging the door periodically. It is astonishing how little material needs to be removed. Half a millimetre of clearance feels like a different door.
If the tight spot is at the top edge, plane there. If it is at the hinge side, you may need to deepen the hinge recesses rather than plane the timber itself, this preserves the door’s width and avoids a gap developing on the latch side later. A sharp chisel and fifteen minutes of careful work can deepen a hinge mortise by the fraction you need.
One thing worth keeping in mind: after any planing on an external door or a door in a humid room, seal the freshly cut timber promptly with primer or paint. Bare wood absorbs moisture rapidly and can swell back to its original size within a season, undoing all your work. This is especially true of softwood doors, which are common in British homes built between the 1950s and 1980s.
Seasonal swelling and the longer picture
British weather means that almost every timber door will stick at some point. Wood is hygroscopic, it absorbs and releases moisture continuously, expanding in damp conditions and contracting when it is dry and warm. A door that binds badly in winter and swings freely in summer may need no work at all beyond patience. The traditional advice, still sound, is to wait for a dry spell before making any permanent adjustment, so you are not planing away material the door will need come October.
Internal doors fitted in new-build homes often stick within the first year simply because the building is drying out. The moisture in freshly plastered walls has to go somewhere, and it tends to find its way into every timber component in the house. Waiting a full twelve months before addressing a sticking internal door in a new property can save you a great deal of unnecessary work. The movement usually stabilises on its own once the structure has fully dried.