Chipping laminate with a jigsaw is one of those frustrations that makes you want to put the whole project on hold and brew a very strong cup of tea. The good news is that the cause is almost always the same thing, and once you understand it, the fix takes about thirty seconds.
Key takeaways
- Most jigsaws cut on the upstroke, which tears the top surface—but there’s a solution so simple you’ll wonder why nobody told you sooner
- The pros use a blade trick that joiners have relied on for generations to eliminate chip-out even on difficult materials
- One orbital setting adjustment and proper board support can mean the difference between a ruined worktop and a professional-looking installation
Why the blade is cutting in the wrong direction
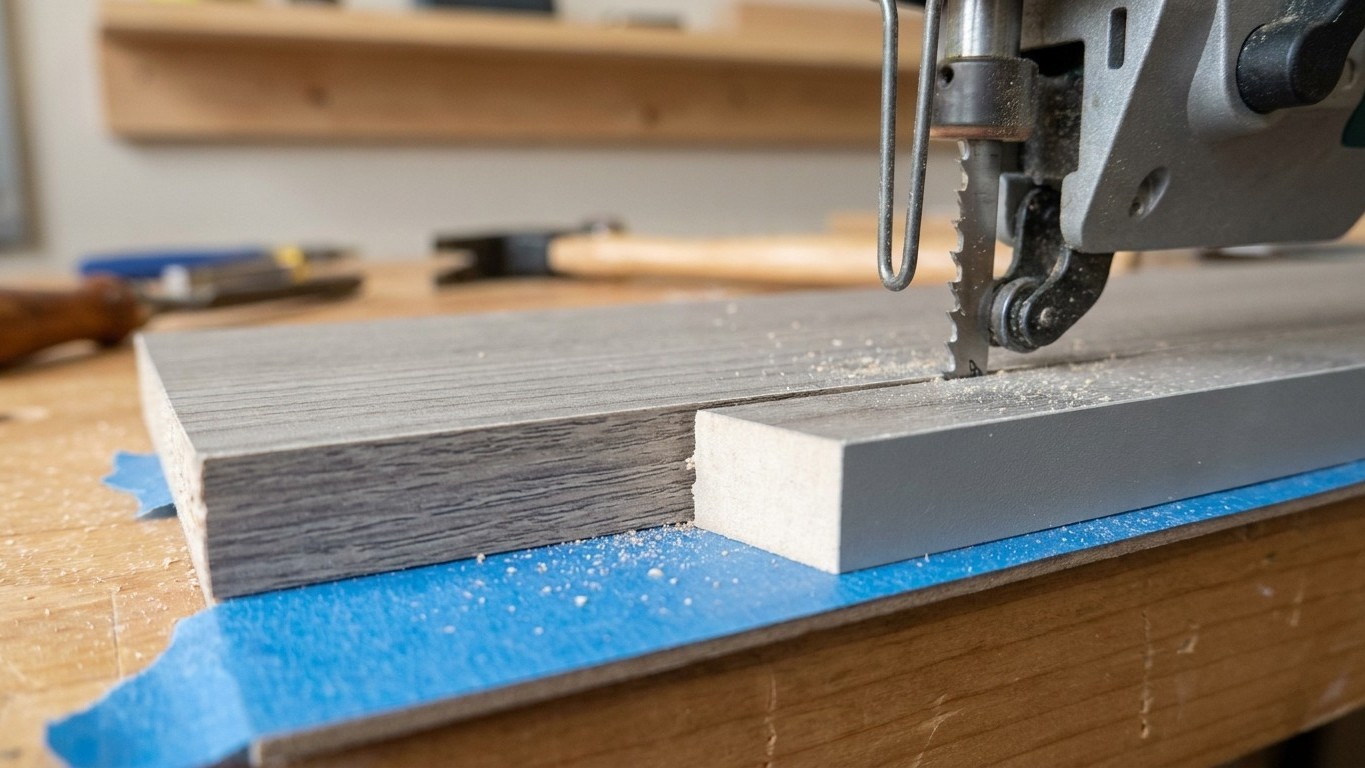
Most standard jigsaw blades cut on the upstroke. The teeth point upward, toward the saw body, which means the cutting action tears through the surface that faces up as you work. On laminate, chipboard, or melamine-coated boards, that upward tear pulls fibres and coating apart rather than slicing cleanly through them. The result is that characteristic ragged, splintered edge that ruins the look of a kitchen worktop or shelving unit before you’ve even started assembling it.
Here’s where most people go wrong: they assume better technique will fix a blade problem. They slow down, they steady their hands, they buy a more expensive saw. None of it helps because the geometry of the blade itself is working against them. The surface facing up will always chip with a standard upcut blade, no matter how steadily you move.
The remedy is straightforward. Cut with the decorative face of the board facing down, not up. Because the blade cuts on the upstroke, the force is directed into the underside of the board, and the clean exit happens on the face that’s resting against your workbench. Flip the board, draw your cut line on the back, and the visible surface comes out smooth. This one change resolves the problem for the vast majority of cuts.
When flipping the board isn’t practical
Sometimes you simply cannot work face-down. A fitted worktop that’s already in position, or a large unwieldy sheet that’s awkward to flip, puts you in a spot. This is where a downcut blade (sometimes sold as a reverse-tooth blade) earns its keep. These blades have their teeth pointing downward, so the cutting action presses into the top face rather than tearing it upward. The chip-out moves to the underside instead, which on a worktop or shelf is usually hidden against a cabinet or wall.
Downcut blades are widely available in hardware shops and cost only a little more than standard blades. They do cut somewhat more slowly because they’re working against the natural direction of the jigsaw’s stroke, so don’t rush them. A steady, unhurried pace produces the cleanest result. Forcing the saw forward creates heat and friction that will burn the laminate edge even if it doesn’t chip it, so patience really does pay here.
A trick that’s been used by joiners for generations is to apply a strip of low-tack masking tape along the cut line before you draw your pencil mark. The tape holds the surface fibres together as the blade passes through, dramatically reducing tear-out even with a standard upcut blade. It’s not a complete substitute for the right blade choice, but on decorative boards where every millimetre counts, it adds a noticeable improvement. Peel the tape back slowly at a shallow angle after cutting, and it takes nothing with it.
Getting the setup right before you make a single cut
Blade direction and orientation explain most chipping disasters, but the support underneath the board matters more than people expect. Laminate sheets flex. When the unsupported area on either side of the cut line bounces or vibrates with the blade’s movement, the surface cracks rather than cuts. Laying the board across two lengths of timber or a pair of sawhorses so that the cut line runs between the supports, with minimal overhang, keeps the material stable and lets the blade do its job without fighting movement.
The orbital setting on your jigsaw, if it has one, is worth checking too. Most jigsaws offer an orbital action that swings the blade forward on the upstroke as well as moving it up and down. This is brilliant for ripping through softwood quickly, but on laminate it increases chip-out considerably. Setting the orbital action to zero, or as close to zero as the saw allows, produces a much cleaner, straighter cut. You lose speed, but speed is not what you’re after here.
Blade condition matters as well. A blade that has already cut through a few metres of hard chipboard is no longer sharp enough for a clean laminate edge. Fresh blades are cheap, certainly cheaper than a replacement worktop, and a new blade on a well-supported board with the orbital setting turned off will surprise you with how glass-smooth the cut edge can be.
The final detail that separates a tidy finish from a professional one
Even a well-executed jigsaw cut leaves a slightly rougher edge than a circular saw or router would produce. On visible edges, running 120-grit sandpaper very lightly along the cut at a 45-degree angle breaks the sharp corner and removes any tiny remaining burrs. The chamfer this creates also prevents the laminate coating from lifting or peeling at the edge over time, which is particularly useful in kitchens where moisture and knocks are a daily reality.
One thing worth knowing: if you’re cutting worktop specifically, most manufacturers recommend that cut edges exposed to a sink or hob be sealed with a dedicated end-grain sealant. The laminate surface resists moisture well, but the chipboard or MDF core underneath is highly absorbent, and water getting into an unsealed cut edge is one of the main reasons worktops swell and delaminate within a few years. A small tube of sealant costs very little and extends the life of the surface considerably.