Scoring a clean line with a box cutter before you ever touch the saw blade is the single most effective way to stop plywood from splintering along the cut edge. A retired carpenter passed this tip to me years ago, almost as an aside, and I’ve never gone back. The wood fibres are pre-severed by the knife before the saw teeth have a chance to tear them ragged, and the result is an edge so tidy you’d think a professional had cut it on a workshop table saw.
Key takeaways
- What a carpenter whispered that changes everything about plywood cuts
- Why one side of your plywood always splinters (and how to exploit this)
- The $2 tool and one-pass technique that costs nothing but time
Why plywood splinters in the first place
Plywood is a peculiar material when you think about it. Those thin veneers are glued together with alternating grain directions, which gives the sheet its famous strength, but that top veneer is also its Achilles heel. Saw teeth move upward through the surface on one side of the cut (the “tearout side”), and as they exit the wood, they grab and rip the fibres rather than slice them cleanly. The result is that frayed, splintered edge that ruins what should have been a neat panel for a cabinet door or a shelf.
The problem is worse with certain types of saw. A circular saw cutting face-down will splinter on the underside; flip the sheet and it splinters on top. A jigsaw, which cuts on the upstroke, will tear the face you can see. Knowing which side will suffer helps you plan, but scoring with a knife eliminates the problem almost entirely regardless of which way you’re cutting.
The box cutter method, step by step
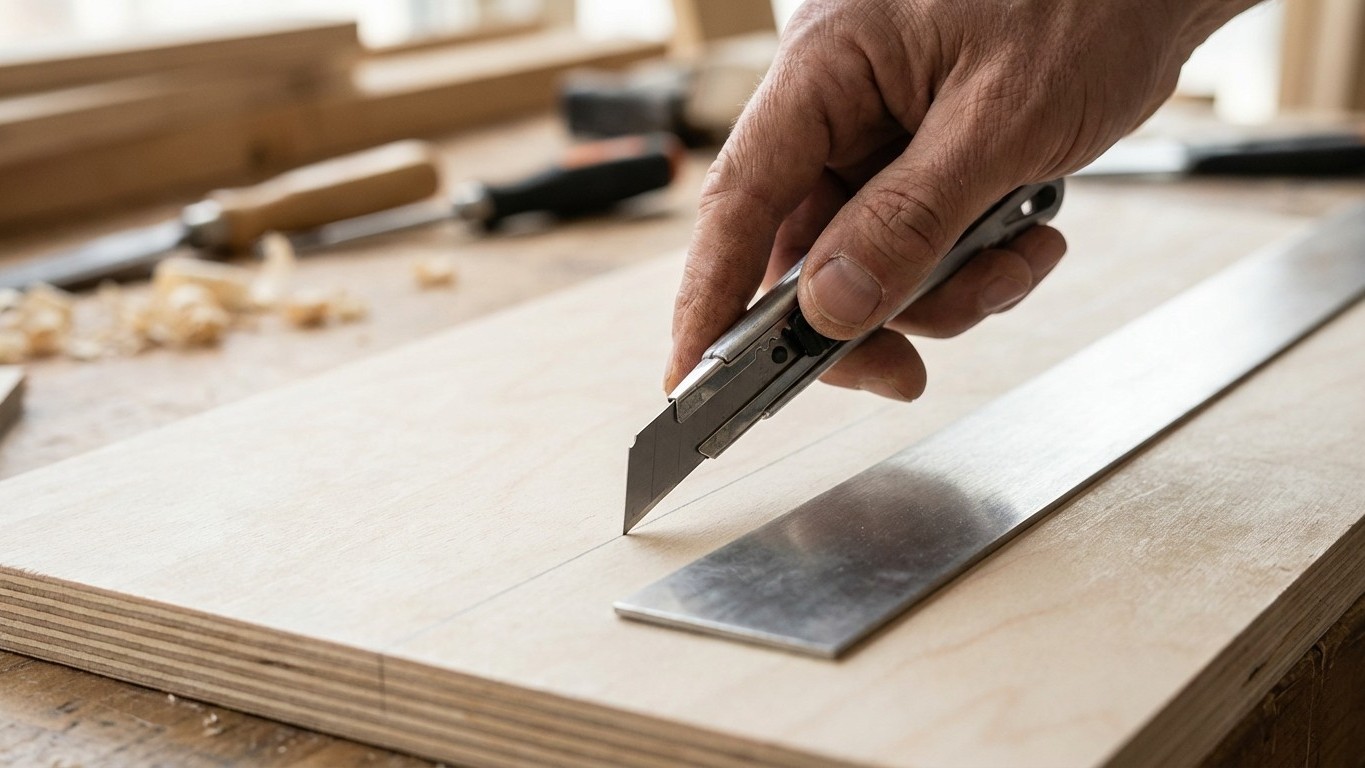
You don’t need anything specialist here. A sharp retractable box cutter (sometimes called a Stanley knife in the UK) and a long metal straightedge are all that’s required. The knife should have a fresh blade, or at least one that hasn’t been blunted on cardboard for the past fortnight. A dull blade drags rather than slices, and dragging actually causes its own minor tearout before you’ve even switched the saw on.
Mark your cut line clearly with a pencil, then lay your metal straightedge exactly along the line. Hold it firmly, press the box cutter into the wood with moderate pressure, and draw the blade toward you in one smooth pass. You’re not trying to cut through the plywood; you’re scoring the surface veneer to a depth of roughly half a millimetre, enough to sever those top fibres cleanly. One pass is usually sufficient on quality ply, though on cheaper sheets with a powdery surface veneer, two passes give a crisper result.
Now set your saw so that the blade cuts on the scored side, leaving the scored line just barely visible at the edge of the kerf. The teeth will reach the wood fibres and find them already neatly severed, so instead of tearing, they simply pass through. The edge that comes off the saw will need little to no sanding.
One small thing catches people out: the saw blade has a certain thickness (the kerf), so you need to position the scored line on the waste side of your cut, not on your finished panel side. Score the line that sits just outside your intended dimension. This way the tearout, if any remains at all, disappears with the offcut.
A few extra tricks that make a real difference
Tape is the other trick worth keeping in your back pocket. Masking tape or low-tack painter’s tape pressed firmly along the cut line before scoring achieves something similar by holding the fibres together as the blade passes through. Some woodworkers use tape alone, without scoring, and find it sufficient for occasional jobs on decorative-grade ply. For anything structural or very visible, though, I’d combine the two: tape on, then score through the tape with the box cutter. The tape peels away cleanly and takes any residual fray with it.
Blade choice matters too, though it’s often the last thing a beginner considers. A fine-toothed blade (look for 40 teeth or more on a circular saw blade designed for sheet materials) cuts more slowly but leaves a smoother edge. Aggressive, fast-cutting blades designed for framing timber will chew plywood mercilessly. The difference in cost between the two types is modest, and the finer blade will last longer if you’re cutting sheet materials regularly.
The direction of your cut also plays a role. Whenever possible, cut with the good face of the plywood placed downward for a circular saw, upward for a jigsaw. It feels counterintuitive to hide the face you care about, but understanding the geometry of how each blade exits the wood makes this obvious once you’ve seen the tearout pattern a few times.
When this matters most around the home
For everyday DIY, this technique pays dividends on shelving, kitchen cabinet carcasses, toy boxes, and any painted furniture where the edge will be visible. Plywood edges that have been torn rather than cut drink paint unevenly, and no amount of primer seems to fully tame the fuzz. A clean scored cut, by contrast, takes paint beautifully with just a single light sand.
Birch plywood, which has become a popular choice for visible furniture pieces over the past several years, is where this technique shines brightest. The pale, fine-grained veneer looks wonderfully crisp when cut properly, and perfectly dreadful when it isn’t. For a sheet of birch ply that costs a fair bit more than standard construction-grade material, it seems a shame not to spend thirty seconds with a box cutter first.
There’s something quietly satisfying about a method this simple solving a problem that frustrates so many people. No new tools, no expensive jigs, just a sharp blade drawn steadily along a line. The carpenter who told me was almost apologetic about how obvious it was. Thirty seconds of preparation, and the difference in the finished edge is the kind of thing that makes you wonder what other small rituals the experienced among us are quietly performing, and not telling the rest of us about.