A wall-mounted shoe rack sounds like a satisfying weekend project, and honestly, it is, until the moment you realise your fixings have gone into fresh plaster over a cavity, and the whole thing shifts sideways when you touch it. That was my Saturday afternoon last spring, and I’m telling you about it now so yours doesn’t end the same way.
Key takeaways
- A fixing mistake in a cavity wall sent my newly installed rack crashing down
- The wrong plugs were chosen for a hollow space—here’s what should have been used instead
- Simple steps to identify wall construction before drilling a single hole
Planning the rack: battens, spacing and a realistic timber budget
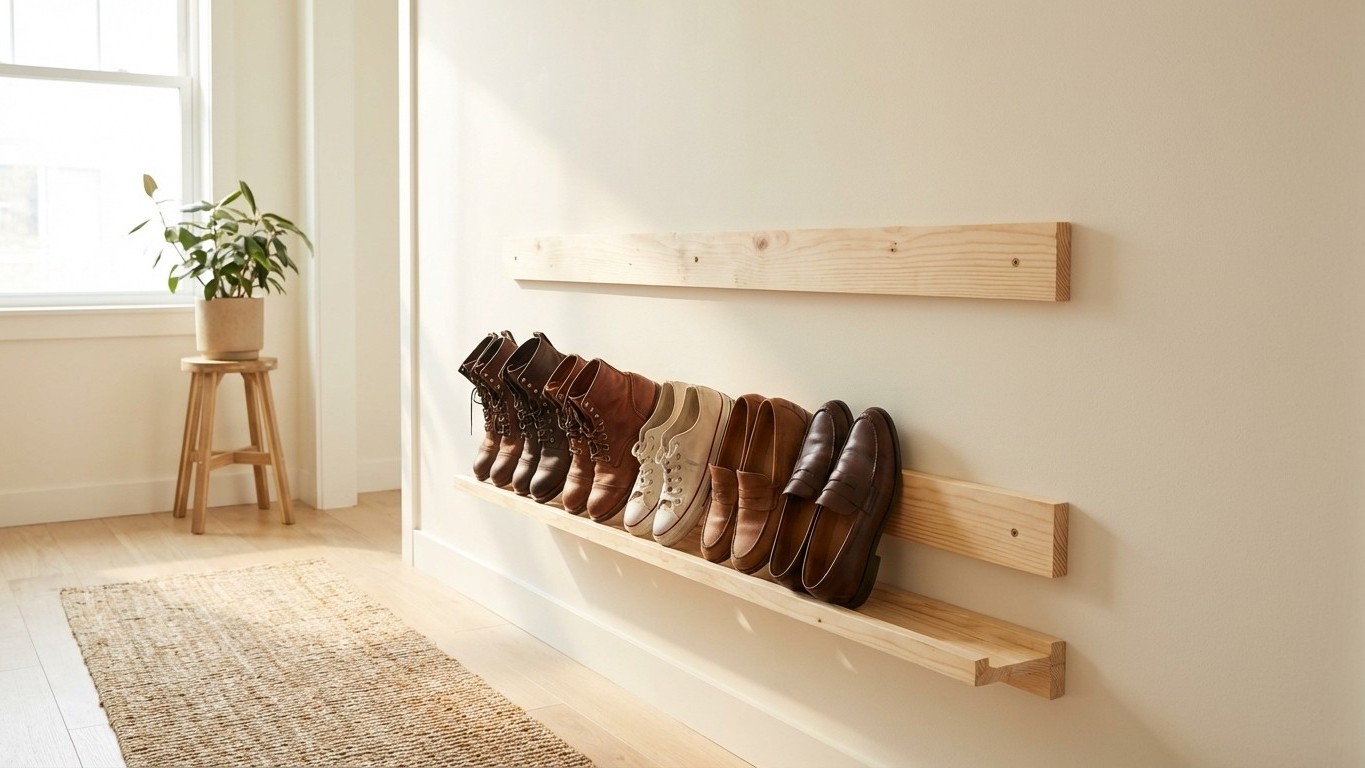
The design I settled on is beautifully simple. Two horizontal battens fixed to the wall, staggered at different heights, act as ledges that hold shoes by their soles. No shelves, no boxes, just timber and gravity doing their work. A single length of 45mm × 20mm pine batten from a builders’ merchant will cost you very little, and a standard 2.4-metre length gives you enough for a rack that holds eight to ten pairs of shoes comfortably.
The two rails sit at different depths from the wall. The lower one protrudes about 100mm and holds the toe end of the shoe, while the upper one, fixed roughly 170mm higher up the wall, sits shallower at around 60mm and supports the heel. Shoes rest at a gentle angle between them, toes down, heels up. It looks tidy, takes up almost no floor space, and the ventilation means your trainers Actually dry out between wears rather than festering in a cupboard. My hallway has never smelled better, and I say that without a trace of irony.
For a rack roughly 900mm wide (enough for two to three pairs side by side), you’ll need four lengths of batten cut to that width: two for each rail tier, doubled up for strength. Sand them smooth, give them two coats of a hard-wearing floor or furniture paint if you like, or simply leave them natural and seal with a clear varnish. The timber cost for the whole project should come to well under a tenner if you shop sensibly.
The fixing mistake that nearly undid everything
Here is where I must be honest with you. I made the classic error of drilling without checking, and in an older terraced house like mine, the wall construction is not always what you expect. A stud finder (the basic magnetic type costs just a few pounds) would have saved me twenty minutes of remedial work and a fair amount of muttering.
What happened was this: I marked my fixing points, Drilled confidently into what I assumed was solid brick or blockwork behind the plaster, and pushed my wall plugs home. They went in far too easily. I had hit a cavity. The screws had nothing solid to bite into, and when I hung the first batten and gave it a gentle tug, it pulled clean away from the wall, plaster dust and all.
The remedy, once you’ve identified a cavity, is to use cavity wall fixings rather than standard plastic plugs. These are the toggle-style or snap-toggle fixings that expand behind the plasterboard or hollow section once inserted. They grip the back face of the material and can hold a Surprising amount of weight. For a loaded shoe rack, use fixings rated to at least 25kg each, and space them no more than 300mm apart along your batten. If you can locate and fix into the timber studs behind plasterboard instead, so much the better. A solid timber stud fixing with a 50mm screw is stronger than almost any hollow-wall anchor.
Before drilling a single hole in your final position, hold the batten against the wall and use a spirit level. Check it horizontally and give it a gentle knock with your knuckle to listen for the hollow sound that betrays a cavity beneath. Mark your stud positions with a pencil if you find solid timber, and pre-drill the batten itself so the screw enters straight and true.
Assembly, finishing touches and making it last
Once the lower rail is fixed solidly, measure up 170mm to the centre of your upper rail position and repeat the process. A small countersink on each fixing point keeps the screw heads flush and stops shoes catching on the metalwork. Two fixings per batten length is the minimum; three is better if your rack spans more than 600mm.
The finished rack looks cleaner than you’d expect from something built on a Sunday morning with basic tools. Painted in the same shade as your hallway woodwork, it almost disappears into the wall, and visitors tend to assume it was always there. A friend of mine insisted I must have bought it somewhere because it looked “too neat to be homemade,” which I took as the highest possible compliment.
One small addition that makes a real difference: a narrow strip of hook-and-loop tape, or even a thin foam Draught excluder strip, along the top face of each batten cushions the shoes and stops them scratching. It takes five minutes and protects both your shoes and the paintwork on the rack.
The whole project, done properly the second time around, took about three hours including drying time for one coat of paint. Total outlay was under fifteen pounds, most of which was the timber. The cavity fixings added a pound or two. Compare that to a ready-made wall-mounted rack from any home shop and you’ll find you’ve saved yourself a considerable sum for something that fits your exact wall width and holds exactly the shoes you own.
The real question now, having solved the hallway, is whether the same batten system would work in a bedroom wardrobe for boots. I have a feeling it would, and I suspect that project is only a matter of time.