Every spring, as soon as the first warm days arrive, the wasps do too. Before you know it, they’re hovering over the jam jar at your garden table, investigating the bin lid, and generally making themselves unwelcome guests at every outdoor moment you’d planned. Shop-bought traps do work after a fashion, but generations of British gardeners managed perfectly well without them, using little more than a scrap of plastic pipe and a jar. That tradition is worth reviving, it costs almost nothing, takes ten minutes to put together, and, done correctly, it genuinely works.
Key takeaways
- One queen wasp in March can become 5,000 aggressive workers by August—but there’s a critical window to stop her
- The bait changes everything: protein in spring, fermented honey in summer, and a tiny detail about bees that matters more than you’d think
- A jar, a piece of leftover plumbing pipe, and ten minutes of assembly create a trap that caught 200+ wasps while a nearby beehive stayed untouched
Why Spring Is the Critical Moment
Queen wasps typically emerge from hibernation as soon as the weather warms, which can be as early as March in some parts of the UK. That queen is the entire future colony. One of the first signs of her emergence is a larger-than-usual wasp hovering near the eaves of houses or around outbuildings, as she searches for a suitable nesting site. Queens then begin constructing new nests using wood pulp gathered from fence posts, garden furniture, or even cardboard. By the summer months, wasp nests are working overtime, with up to 300 eggs being produced every day and up to 5,000 adults feeding grubs and building the nest structure.
The arithmetic here is sobering. Catching a queen in March is a completely different proposition to dealing with five thousand agitated workers in August. A well-placed trap in early spring, before the colony is established, is one of the most sensible things you can do in the garden all year. The earlier you treat a wasp problem, the less aggressive the colony is going to be. Old-timers understood this instinctively. They set their traps early, before the trouble started.
A word of honest balance, though: wasps are beneficial in gardens, feeding their grubs on caterpillars and other insects, and so can reduce plant damage. Wasps not only provide similar pollination services to bees, but they are also a natural form of pest control and very efficient decomposers, making them extremely useful garden companions. The goal of a homemade trap isn’t to eliminate every wasp within half a mile; it’s simply to keep numbers manageable close to the house and patio, where they become a genuine nuisance.
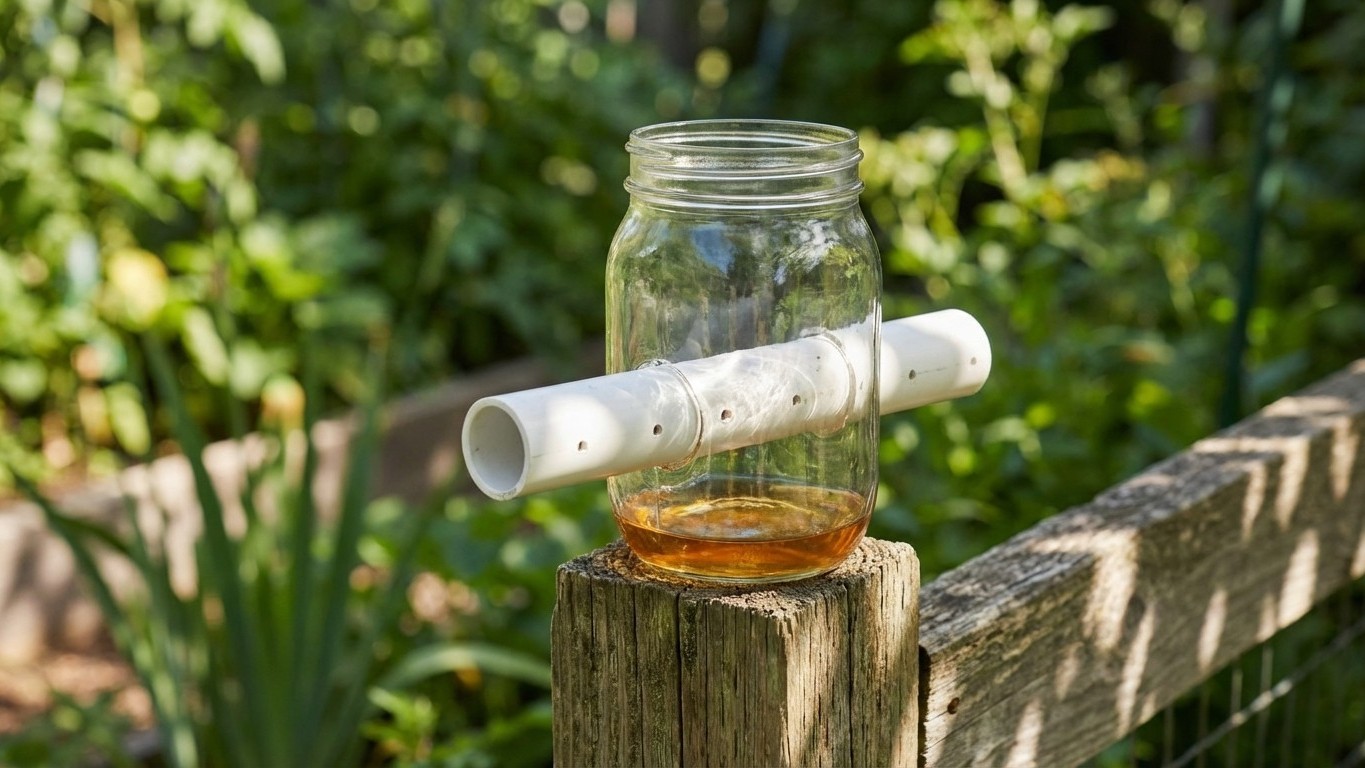
The PVC Pipe and Jar Trap: How It Works
The beauty of this design is its elegance. A very successful design consists of a large transparent plastic jar, into which you cut two holes, the same size as a piece of plastic waste water pipe of about 35 mm diameter — on opposite sides of the jar, roughly halfway up. This can be done with scissors. No specialist tools required, no trips to the ironmonger.
Drill three holes of about 8 mm diameter in the plastic tube, spaced about 25 mm apart. The holes should be in a line but should not go right through to the other side. Then push the pipe through the holes in the jar with the holes facing downward. This downward orientation is the clever part. The aroma from the bait rises through the three holes and exits through the ends of the pipe, so wasps easily follow the scent and crawl down through the holes but are unable to escape. They go in easily enough, following the smell upward through the tube openings, and then cannot find their way back out.
If you have a hot glue gun, you can glue the pipes to the bottle to ensure that the pipes don’t come out of their openings, potentially releasing angry wasps. Wise precaution. Once assembled, hang the trap somewhere sheltered and sunny. Place the trap away from where you gather, you don’t want to lure wasps right into your midst. A fence post at the far end of the garden, or near the shed, is ideal.
The Bait Makes All the Difference
Here is where many a home trap fails: the wrong bait at the wrong time of year. Wasps are more interested in protein in spring and early summer. It is only near the end of the season that their cravings for sugar spike. For early season use, consider rotten meat in plain water inside the bottle. A small piece of raw chicken or a fish scrap will do the job admirably in April and May, when the queen and her first workers are building the colony and hunting protein to feed the larvae.
From midsummer onwards, switch to a sweet liquid. The best attractant is a 50:50 mixture of honey and water, left for at least 24 hours to start fermenting before use in the trap. Bees are not the slightest bit interested in fermenting honey, but it will attract every wasp in the vicinity. That last point matters enormously, protecting honeybees while targeting wasps is something any conscientious gardener should care about. To ensure no honeybees are attracted to your wasp trap, add a few drops of vinegar into the mixture.
Put about 500 ml of the fermenting mixture in the jar, enough to drown the wasps that enter, but not so much that it sloshes out when the wind picks up. You can also enhance the chances of the trap working by putting a few drops of dish soap into the water. This prevents the insects from gaining any traction on the surface and will speed their demise. A touch brutal, perhaps, but effective.
One rather satisfying account describes setting up just such a trap beside a beehive that was under serious wasp attack. By 10 am the following morning there were more than 200 drowned wasps and not a single bee. That is a remarkable result from a jar and a bit of leftover plumbing pipe.
Keeping It Working Through the Season
The effectiveness of any trap, whether homemade or purchased, depends upon the timing used and how vigilant you are about keeping it clean. Empty it regularly, if you allow the dead wasps to stack up, newcomers will be prevented from drowning. A weekly check is plenty in most gardens; more often during a warm spell when activity is at its peak.
Change the bait every ten days or so, especially in warm weather when liquid evaporates and protein bait can become, frankly, rather too aromatic for comfort. Refresh the trap, top up the liquid, and it will carry on doing its work quietly throughout the season. Hanging the trap is preferable to leaving it on a flat surface, as a gust of wind can send a full trap flying, and a jar full of dead wasps and fermenting honey landing on your lawn is no one’s idea of a pleasant afternoon.
Beyond the trap itself, a few small habits help enormously. Planting aromatic herbs like spearmint, thyme, and eucalyptus may naturally discourage wasps from settling in your garden. Eliminating wasp nests before they get large is key to control, start looking in spring and keep checking every few days. Wasps love horizontal surfaces, usually under something — roof eaves, barbecues, and even the underside of garden benches are prime spots.
There is something rather satisfying about the whole enterprise, if I’m honest. A clean jam jar, a scrap of plastic pipe from under the sink, and a spoonful of honey, and you’ve built something that outperforms many a gadget from the garden centre. The old gardeners who devised this weren’t being frugal for the sake of it; they simply knew their wasps, understood their seasonal rhythms, and worked with that knowledge rather than against it. Whether spring this year arrives early or late, the trap can be ready and waiting. The question is only which jar you’ll sacrifice to the cause.