Introduction
Kitchen cabinets have a hard life. Even in the tidiest home, cooking sends a fine mist of fats into the air, and it settles where you least fancy it: cupboard doors, handles, trims, and the strip above the hob. Then dust sticks to it, and suddenly your lovely cabinets feel tacky. The twist is that many “natural” approaches can leave their own sticky residue if they are too strong, not rinsed, or paired with the wrong cloth.
This guide is written for one clear goal: finding a natural degreaser for kitchen cabinets that actually lifts grease and dries clean, with no dulling, no smears, and no film you can feel with your fingertips. We will keep it practical, budget-conscious, and kind to different finishes, with a few little grandmotherly pointers along the way.
Why opt for a natural degreasing routine for kitchen cabinets?
Effects of many conventional products: residue, indoor pollution, irritation
Many supermarket degreasers work fast, but they often rely on strong solvents, heavy fragrance, or “shine” additives. Those shine agents can be the very thing that leaves a slippery layer behind, which then grabs dust and cooking grime again. In a warm kitchen, lingering fragrance and solvent vapours can also feel unpleasant, especially if you have a small space or anyone in the household who is sensitive to scents.
I also find that harsh sprays can encourage over-scrubbing. That is how cabinet doors end up with tiny scratches that trap grime and make the next clean harder. A gentler system, done little and often, tends to keep cupboards looking newer for longer.
Health and environmental sense in natural alternatives
A natural routine usually means simpler ingredients, lower fragrance load, and fewer harsh solvents. You can also control the concentration, which matters when you are cleaning finishes like lacquer, laminate, or painted MDF. As of February 2026, many households are still trying to cut waste and reduce single-use plastics, and mixing a small bottle of cleaner at home can help. You do not need a cupboard full of products to keep a kitchen truly clean.
Understanding the problem: why does grease cling to kitchen cabinets?
Where the greasy film comes from
Cooking fats aerosolise. Frying, roasting, and even sautéing send microscopic droplets into the air. Those droplets settle on the nearest cool surfaces, cabinet fronts, cooker hoods, splashbacks, and the top edge of doors. Add steam from boiling, and you get a lightly sticky layer that behaves like glue for dust.
Over time, the grease oxidises and thickens. That is when it turns from “a quick wipe” into “why is this so stubborn?” You are not imagining it, it does get more tenacious.
Which surfaces are affected (wood, laminate, lacquer, melamine, and more)
- Laminate and melamine: common, durable, usually easy to clean, but can dull if you use abrasives.
- Painted or lacquered doors: can show streaks, and harsh solvents may soften or haze the finish.
- Varnished wood: generally robust, but dislikes soaking and overly acidic cleaners left sitting.
- Oiled wood: can be patchy if you use strong degreasers, because they may lift oil along with grease.
- Handles and trims (metal, plastic, mixed materials): often hold the worst grime, especially textured styles.
Principles of effective natural degreasing (Without-turning-up-the-heat/”>Without a greasy film)
Cleaning vs degreasing vs detergency
It helps to know what you are asking your cleaner to do:
- Cleaning removes loose dirt and light marks.
- Degreasing targets fats and oils, which do not mix with water.
- Detergency is the “bridge” that helps water lift and carry away grease. Mild soaps excel here, and they rinse well when correctly diluted.
That last point is where many natural methods go wrong. A cleaner that “cuts grease” may still leave behind its own residue if you use too much or skip the rinse.
Natural anti-grease ingredients and what they are good at
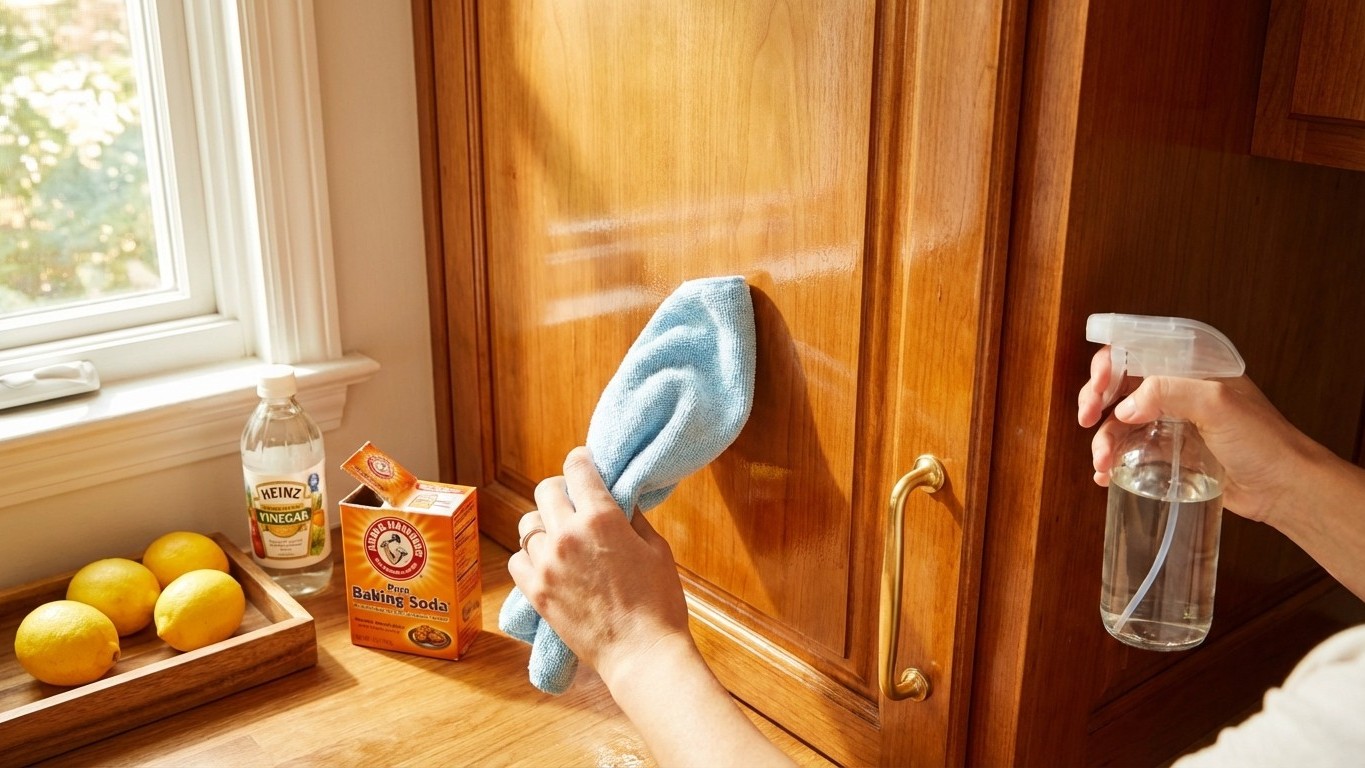
- White vinegar (acetic acid): helps break down mineral haze and some grime, and it improves rinsing. It is best used diluted and not left to dwell on wood.
- Bicarbonate of soda: mild abrasive and deodoriser. Excellent as a paste for spot work, not ideal as a whole-cabinet daily cleaner because it can leave powdery residue if not rinsed.
- Liquid soap (Castile-style or other simple liquid soaps): a gentle surfactant that lifts grease into the wash water. The key is correct dilution and a final wipe with clean water.
- Warm water: not glamorous, but very effective. Warmth softens grease, helping everything else do its job.
The best natural degreaser recipes for kitchen cabinets
Each recipe below is designed to dry clean, not sticky. Choose one that suits your cabinet finish and the level of grime, and please do a small patch test inside a door first if you are unsure.
White vinegar and water spray, for everyday use
This is a light-duty option for fresh splashes and general maintenance, especially on laminate, melamine, and painted doors.
- Warm water: 400 ml
- White vinegar: 100 ml
- Optional for greasy areas: 2 to 3 drops of plain washing-up liquid
Method: Mix in a spray bottle. Spray onto a cloth, not directly onto cabinet seams, then wipe. Follow with a plain-water wipe for a squeaky finish.
My take: Vinegar is helpful, but it is not magic on heavy grease. Its real talent is helping rinse clean so you do not get that clingy “film” feeling.
Bicarbonate of soda paste, for stubborn spots
Use this for the strip above the hob, around handles, and any yellowed splatters that have set.
- Bicarbonate of soda: 2 tablespoons (about 30 ml by volume)
- Warm water: 1 tablespoon (about 15 ml), add slowly
Method: Make a paste like soft icing. Apply with a damp cloth or a soft sponge to the greasy spot only. Rub lightly in small circles for 10 to 20 seconds. Wipe away with a clean damp cloth, then wipe again with plain water, then dry.
Note: Avoid this on high-gloss lacquer unless you are very gentle. Even mild abrasives can micro-scratch glossy finishes.
Gentle liquid soap solution (Castile-style), effective and low-streak
If you want one all-round natural degreaser for kitchen cabinets that behaves predictably, a properly diluted soap solution is hard to beat. It lifts grease, and it rinses clean when you do not overdo it.
- Warm water: 500 ml
- Liquid soap: 1 teaspoon (about 5 ml)
Method: Mix in a bowl or bottle. Dip a microfibre cloth, wring it well, and wipe cabinet fronts. For the final finish, wipe once with a cloth dampened with plain water, then dry.
Why it avoids film: The dilution is modest. Most “sticky cupboard” stories come from using soap almost neat, or from skipping the plain-water wipe.
Combinations to avoid (risks and incompatibilities)
- Vinegar plus bicarbonate in a bottle: they react and neutralise each other, leaving mostly salty water. The fizz looks busy, but it is not a stable, effective cleaner for cupboards.
- Strong vinegar left sitting on wood: can dull some finishes over time. Use diluted, wipe on, wipe off.
- Abrasive powders on glossy lacquer: can create fine scratches that catch grease later.
- Too much soap: the classic route to a tacky film. More is not better.
Step-by-step: degrease kitchen cabinets naturally with no residue
Step 1: Dusting and surface prep
Start dry. Grease plus dust quickly turns into a grey paste.
- Use a dry microfibre cloth to remove dust from doors, edges, and the top lip of cabinets.
- If there are crumbs in trims, a soft brush or an old, clean toothbrush works nicely.
- Open a window if you can, and put a towel on the worktop to catch drips.
Step 2: Apply your natural degreaser the smart way
Choose one recipe from above. My general rule is soap solution for most doors, bicarbonate paste for spots, and the diluted vinegar spray for light maintenance and final “rinse-help” on shiny finishes.
- Spray or apply cleaner to the cloth, not directly onto cabinet joints or hinges.
- Wipe in the direction of the grain or the door’s finish lines, and do not forget the bottom edge where fingers often rest.
- Let the dampness sit for 30 to 60 seconds on greasy patches, then wipe again. Time does some of the work, saving your elbows.
Step 3: Rinse and dry to prevent streaks and film
This is the step people skip, then wonder why the doors feel sticky a day later.
- Take a second cloth dampened with plain warm water, wring it very well, and wipe the same area once.
- Dry immediately with a clean tea towel or dry microfibre cloth.
If you have very shiny doors, buff lightly at the end. It feels fussy, but it is quicker than re-cleaning smears tomorrow.
Extra tips for handles, corners, and mouldings
- Handles: Use the soap solution first. For textured grime, use a soft toothbrush dipped in the solution, then wipe with plain water and dry.
- Corners and profiles: Fold a cloth around a butter knife (blunt), so you can run it gently along grooves without scratching.
- Above the hob: Warm water first, then soap solution. Save bicarbonate paste for the last stubborn strip, and rinse twice.
Precautions by cabinet material
Raw or varnished wood: what to choose and how to dilute
Wood dislikes soaking. A well-wrung cloth is your best friend.
- For varnished wood, use the diluted soap solution. Avoid leaving vinegar sitting on the surface.
- For oiled wood, keep the mix very mild, and work in small sections. If you notice uneven patches, stop and switch to just warm water with a tiny amount of soap, then dry well.
- Never flood panel seams. Water can creep in and cause swelling over time.
Laminate, lacquer, melamine: avoid scratching or dulling
- Use a soft cloth and the soap solution for most cleaning.
- Skip abrasive pads and gritty powders on glossy finishes.
- If you want a vinegar spray, keep it diluted and use it mainly as a final wipe on shiny surfaces, then dry.
Preventing grease build-up on kitchen cabinets
Simple daily habits that actually help
- Use lids when frying or simmering, and run extractor fans early, not after the steam has filled the room.
- Wipe the cabinet strip nearest the hob once or twice a week with a damp cloth, before grease thickens.
- Wash hands after handling oil bottles. It is astonishing how many cupboard marks are “olive oil fingerprints”.
A natural maintenance rhythm (and a realistic frequency)
- Light wipe of high-splash areas: weekly
- Full cabinet fronts: every 3 to 6 weeks, depending on cooking habits
- Deep detail work around handles and trims: every 2 to 3 months
If you cook most days, a short weekly wipe is cheaper than a big monthly scrub, and kinder to your cabinet finish too.
Error-avoidance: common mistakes and quick fixes
Too much product and too little rinsing: how the film happens
Sticky residue usually comes from surplus soap, concentrated vinegar mixes with added “extras”, or from leaving bicarbonate dust in corners.
- Fix for soap film: Wipe once with a cloth dampened in warm water, then dry. If it persists, add a small splash of diluted vinegar to the rinse water, then wipe again with plain water.
- Fix for bicarbonate haze: Rinse twice with plain water on a well-wrung cloth, then buff dry.
- Fix for streaks on glossy doors: Use less product, more drying. A barely damp finishing cloth followed by a dry buff is the tidy secret.
Choosing the right cloth or sponge (microfibre and natural alternatives)
- Microfibre is excellent for lifting grease with less product, but it must be clean. A cloth that has fabric softener residue can smear.
- Cotton cloths and old tea towels work well for drying and buffing.
- Avoid rough scouring sponges on cabinet faces. Save them for pans, not finishes.
FAQ on natural degreasing for kitchen cabinets
What is the best natural degreaser for kitchen cabinets to remove a greasy film?
For most homes, a properly diluted liquid soap solution, 500 ml warm water to 1 teaspoon of soap, works best because it lifts grease into the cloth and rinses clean. Follow with a plain-water wipe and dry straight away, and you avoid the lingering tackiness that many people mistake for “grease returning”.
Is white vinegar effective against ingrained grease on wood or laminate?
White vinegar helps, but it is rarely enough on its own for heavy grease. On laminate it is fine when diluted and used with a cloth, especially as a finishing wipe. On wood, keep it mild and brief, wipe on and wipe off, and do not let it sit. For ingrained grime, soap solution first, then targeted bicarbonate paste on the worst spots, followed by careful rinsing.
How do I avoid a sticky film after cleaning my kitchen cabinets?
- Use less product than you think you need, especially soap.
- Apply to the cloth, not directly to doors and seams.
- Always do a quick plain-water wipe after degreasing.
- Dry immediately, particularly on glossy or dark finishes.
More helpful reads and related pages
If you are building a whole-kitchen routine, it is easier when each task has its own little method. You might like natural kitchen cleaning hacks for everyday upkeep beyond the cabinets, and natural cleaning hacks for room-by-room ideas without turning your cupboard into a chemistry lab.
Grease rarely stops at the cupboards. For the cooker itself, clean oven naturally with baking soda and vinegar pairs well with the cabinet methods here. And if kitchen odours are lingering, natural ways to clean a fridge and remove smells is a lovely next step, because a clean fridge makes the whole kitchen feel fresher.
A gentle next step
Pick one cabinet door near the hob and try the soap solution plus the plain-water rinse and dry, then see how it feels the next morning. If it is clean and not tacky, you have your baseline routine. Once that is sorted, which kitchen “hot spot” would you like to tackle next, the extractor hood, the bin area, or the fridge door handles that everyone forgets?