Introduction
A well-used oven is a lovely thing, until you open the door and the smell of last month’s lasagne greets you before you’ve even preheated. In February 2026, plenty of households are trying to cut down on harsh chemicals, save a few pounds, and keep indoor air a bit kinder, especially in smaller kitchens where fumes linger. That’s where the classic pairing of bicarbonate of soda and white vinegar earns its keep.
This guide is focused on one job only: how to clean oven naturally with baking soda and vinegar, step by step, with sensible measurements, safe timings, and the little cautions that protect enamel, seals, and your patience. I’ll also share a quick upkeep spray so you’re not doing the “deep clean marathon” quite so often.
Why choose a natural method for cleaning your oven?
The downsides of chemical oven cleaners
Traditional oven cleaners work fast because many are strongly alkaline and designed to dissolve baked-on fats. That strength can be a mixed blessing. In real kitchens, it often means:
- Irritating fumes that can sting eyes and throats, especially in winter when windows stay shut.
- Risk of skin burns or rashes if splashed, even in tiny amounts.
- Residue worries if rinsing is rushed, which can create a lingering “chemical” smell the next time you bake.
- Damage to certain finishes if used too frequently or left too long, and some products are not suitable for self-clean linings.
I’m not here to scold anyone who’s used a strong cleaner in a pinch. Sometimes life is busy. Still, for routine build-up, bicarbonate and vinegar are gentler, cheaper, and far easier to live with.
Benefits of baking soda and vinegar for health and environment
Bicarbonate of soda (baking soda) is a mild alkali and a fine, soft abrasive. It helps loosen greasy grime and neutralise odours. White vinegar is acidic, useful for cutting mineral films and helping lift residues. Used sensibly, they reduce reliance on stronger products and create less harsh indoor air while you work.
Budget-wise, they’re pantry staples for many households. You can buy small amounts, store them easily, and use the leftovers for other cleaning jobs. If you’d like a wider sweep of kitchen-friendly ideas, the page on surfaces” title=”Natural kitchen cleaning hacks : graisse, odeurs et surfaces impeccables”>natural kitchen cleaning hacks is a handy companion.
Equipment and ingredients you’ll need
Detailed kit list
- Bicarbonate of soda (baking soda)
- White vinegar (clear distilled vinegar)
- Warm water (a kettle boiled and cooled for a minute is perfect)
- 2 bowls (one for paste, one for rinsing)
- Measuring spoons or a small cup measure
- Rubber gloves (washing-up gloves are fine)
- A spatula or old spoon for mixing paste
- A soft sponge or microfibre cloth
- An old toothbrush (for corners and around the door)
- A plastic scraper or an old bank/loyalty card (avoid metal)
- A spray bottle (optional but very helpful for vinegar)
- Kitchen roll or old towels
- A bin bag or large washing-up bowl for soaking racks
If your oven racks are truly crusty, line your sink or bath with an old towel first to prevent scratches, then soak the racks separately. It saves your back and your mood.
Where to buy decent baking soda and vinegar
For oven cleaning, standard household bicarbonate of soda and plain white vinegar are perfectly adequate. You’ll find them in most supermarkets, discount stores, and hardware shops. Look for:
- Bicarbonate labelled for food or household use, stored dry and free-flowing (no hard lumps).
- White vinegar that is clear and unscented. Avoid fancy infused vinegars for this job, they can leave residues or aromas.
No need to hunt for niche “cleaning vinegar” unless you already have it. Simple is best, and it’s kinder to the purse.
Step-by-step: clean an oven with baking soda and vinegar
Prepare the oven before you start
Start when the oven is fully cool. If you’ve just cooked, wait at least 2 to 3 hours. Safety first, and paste dries too fast on warmth.
- Turn the oven off at the wall if you can, or at least ensure all knobs are off.
- Remove racks, trays, and any thermometer.
- Shake or brush out loose crumbs into the bin.
- Lay old towels or newspaper on the floor in front of the oven. Drips happen, even to the best of us.
If your oven has a fan cover or removable panels, check the manual before taking anything apart. When in doubt, clean around them rather than dismantling.
Step 1: make the baking soda paste
You want a spreadable paste, like thick yoghurt or toothpaste. Too wet and it slides; too dry and it crumbles.
Basic paste (enough for most single ovens):
- 6 tablespoons bicarbonate of soda (about 90 ml by volume)
- 3 to 4 tablespoons warm water (45 to 60 ml)
Mix in a bowl. Add water slowly, one spoon at a time. If you accidentally overdo it, add another tablespoon of bicarbonate to thicken.
For a very greasy oven: add 1 teaspoon washing-up liquid to the paste. It helps emulsify fats. Use a mild one if you can, and rinse thoroughly later.
Step 2: apply and leave it to work
Wear gloves. Using a sponge or your fingers (gloved), spread paste over:
- The oven floor and sides
- The inside of the door (avoid the rubber seal itself)
- Around stubborn spots, corners, and the back panel (avoid direct contact with heating elements)
Keep the paste away from:
- Heating elements
- Vents and fan openings
- Light fittings (wipe around them carefully instead)
Time to leave it:
- Light soil: 1 to 2 hours
- Moderate build-up: 4 to 6 hours
- Heavy baked-on grime: overnight (8 to 12 hours)
Overnight is my preference for a truly grubby oven. It’s quiet work while you sleep, and you wake up to a much easier scrub.
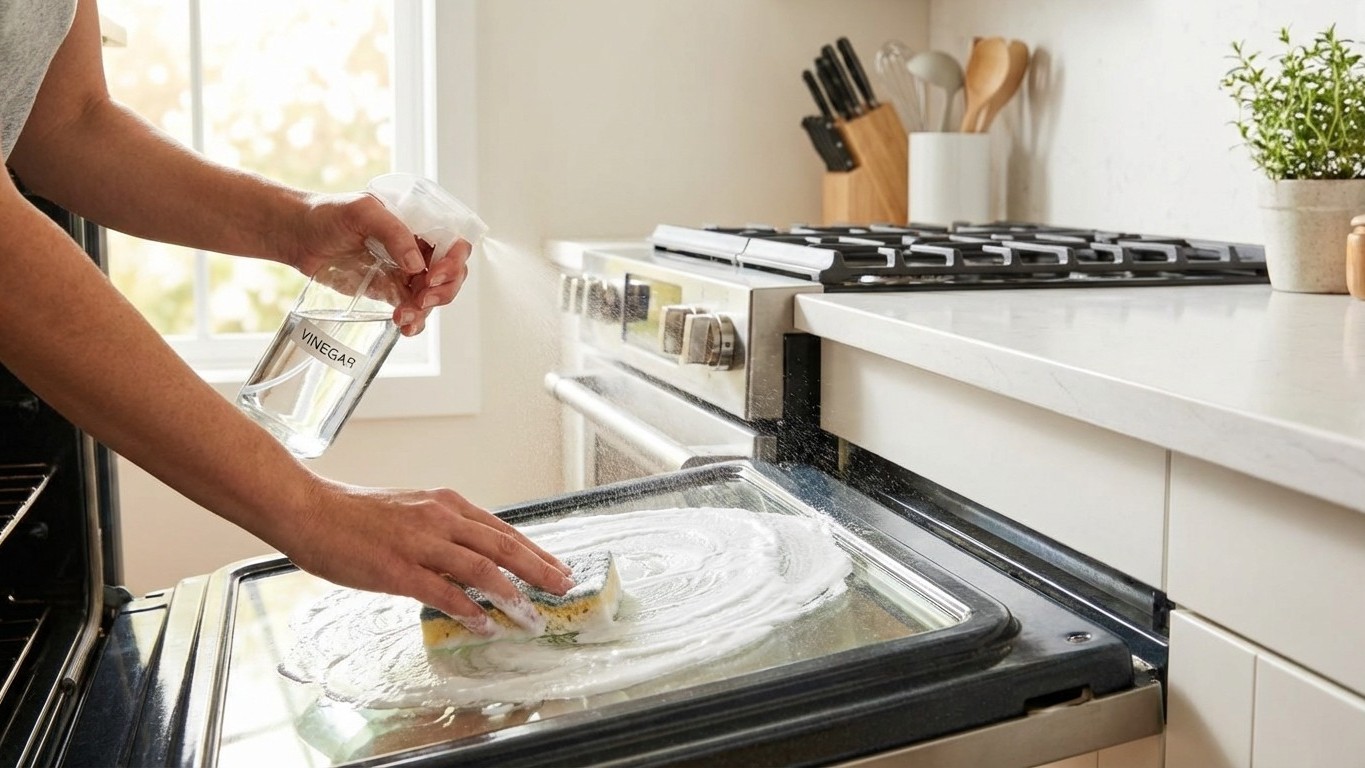
Step 3: what vinegar does, and how to use it properly
Here’s the bit many people misunderstand. Mixing vinegar and bicarbonate in a bowl creates a lively fizz, but most of the cleaning “muscle” comes from using them in sequence. The fizz helps lift loosened debris and makes it easier to wipe away, but if you neutralise everything too early, you can reduce the effective action.
How to apply vinegar:
- Fill a spray bottle with white vinegar, undiluted.
- Lightly mist the areas covered in paste. You’ll see fizzing where paste remains.
- Wait 5 to 10 minutes. Let it bubble and soften the residue.
No spray bottle? Put 2 to 3 tablespoons of vinegar on a damp cloth and dab it over the paste. It’s slower, but it works.
If you’re dealing with a stubborn, blackened patch, use your old toothbrush to agitate the paste after the vinegar has fizzed for a few minutes. Gentle circles beat furious scrubbing every time.
Step 4: rinse and finish for a clean, calm oven
Now for the part that decides whether the oven looks lovely or looks “sort of clean but streaky”. Rinsing is the unglamorous hero.
- Use a damp microfibre cloth to wipe up the paste. Rinse the cloth often in warm water.
- For thick paste, lift it with a plastic scraper or an old card, then wipe.
- Change the rinse water when it turns grey and gritty. Cloudy water just redistributes grime.
Once the paste is gone, do a final wipe with a clean cloth dipped in plain warm water, then a quick pass with kitchen roll or a dry towel. This helps prevent white bicarbonate haze.
Drying: leave the oven door open for 20 to 30 minutes. If you’re in a hurry, turn the oven on low (about 100°C) for 10 minutes once you’re sure no paste remains, then switch off and let it cool with the door ajar.
Racks can go back once everything is fully dry. If you soaked them, rinse well and dry immediately to avoid surface rust on older racks.
Mistakes to avoid and safety notes
Ovens and messes that need extra care
Some ovens have special internal coatings, including catalytic liners or enamel surfaces designed to resist sticking. In 2026, many newer ovens also have delicate door glass assemblies and tight seals for energy efficiency. Treat them kindly.
- Self-clean (pyrolytic) ovens: you can still do spot-cleaning, but avoid pushing paste into vents and edges. Pyro cycles are intense, so keep seals clean and intact.
- Catalytic liners: don’t scrub aggressively. Use the paste lightly and wipe gently. If you’re unsure, consult the appliance manual.
- Burnt sugar spills: these can be stubborn and glassy. Soften with paste overnight, then use a plastic scraper. Avoid metal blades that can gouge enamel.
- Thick, sticky grease: it may need two passes. First pass loosens, second pass finishes. That’s normal, not a failure.
Tools and habits that can damage enamel and seals
- Avoid steel wool and metal scouring pads. They scratch enamel and can leave rust specks.
- Skip razor blades on the inner cavity. They can nick coatings and create future sticking points.
- Don’t soak or saturate the rubber door seal. Wipe it with a barely damp cloth, then dry.
- Never pour vinegar directly into the bottom of the oven and leave it pooled. Acid sitting in seams isn’t kind to metal over time.
Does bicarbonate damage enamel? Used as a paste with water and wiped off, it is generally gentle. The trouble starts when people use it dry like sandpaper, or scrub with a harsh pad. Keep it creamy, keep it soft, and let time do the heavy lifting.
Extra tips to keep your oven clean naturally
Simple preventive habits
A clean oven is mostly won in small moments. My favourite habits are inexpensive and realistic.
- Wipe splatters after cooking, once the oven is cool but still slightly warm to the touch. A damp cloth works well.
- Use a baking tray under bubbly dishes (fruit crumbles are notorious for this) to catch drips.
- Cover roasting tins with foil only when needed and keep it away from heating elements and vents.
- Don’t leave spills “for later”. Later tends to turn into carbon.
For greasy kitchen surfaces outside the oven, like cabinet fronts near the hob, a dedicated method helps. The page on natural degreaser for kitchen cabinets pairs nicely with this oven routine, because airborne cooking grease travels farther than you’d think.
Quick natural maintenance spray (fast recipe)
This is for maintenance, not for heavy carbon. Use it weekly or fortnightly, depending on how often you roast.
- 250 ml warm water
- 1 tablespoon white vinegar (15 ml)
- 1 teaspoon bicarbonate of soda (5 ml)
Mix it carefully in a bowl first. Add bicarbonate slowly, it will fizz. Once the fizz settles, pour into a spray bottle. Label it clearly.
How to use: spray lightly on the cool oven door glass and easy-to-reach enamel, wait 2 minutes, then wipe with a damp cloth and dry. Avoid spraying into vents, and don’t store this mixture for months, it loses pep and can build pressure if sealed tightly. I prefer making a fresh small batch.
Frequently asked questions and common myths
“How can I clean a very dirty oven Without chemicals?”
For a truly encrusted oven, time is your friend. Use the bicarbonate paste, leave it overnight, then do the vinegar mist and wipe. If the first round removes 70%, do a second round focusing only on the worst patches, rather than re-coating the whole cavity. That saves ingredients and effort.
Racks often make the job feel harder than it is. Soak them separately in very hot water with 2 to 3 tablespoons bicarbonate for at least 1 hour, then scrub with a non-scratch sponge. Rinse and dry well.
“Can I mix vinegar and baking soda to make it clean better?”
They can be used together, but not as a single premixed “miracle bottle”. When combined, they react and neutralise each other. The practical approach is:
- Use bicarbonate paste first, leave it to loosen grease and odours.
- Use vinegar second to fizz and lift the paste and grime for easier wiping.
That sequence gets the benefit of both without wasting the reaction in the mixing bowl.
“Will baking soda scratch or ruin my oven?”
On enamel, bicarbonate is typically safe when used as a wet paste and wiped with a soft cloth. Problems arise with aggressive scouring, harsh pads, or using the powder dry. If your oven has a special liner, treat it gently and check the manual if possible.
Odours, safety, and compatibility with newer ovens
- Vinegar smell: it fades as it dries. Ventilate the kitchen while you clean, and leave the door open to air out.
- Stinging eyes: much less likely than with strong oven sprays, but any cleaning can irritate. Open a window and wear gloves.
- Modern ovens: fine for enamel and glass when you avoid elements, vents, and prolonged soaking of seals.
- After-clean smoke: usually residue left behind. Wipe again with plain water and dry, then heat briefly on low.
More help for a naturally clean kitchen
Beyond the oven: grease, smells, and appliances
Once you’ve tackled the oven, the rest of the kitchen often feels easier. For a broader sweep of room-by-room ideas, the hub page natural cleaning hacks is a useful bookmark for building an affordable, low-tox routine across the home.
Smells can migrate between appliances, too. If the oven is clean but the kitchen still feels “off”, a fridge refresh can make a surprising difference. Have a look at natural ways to clean a fridge and remove smells for a gentle deodorising approach.
Sister pages to support a healthier routine
- natural kitchen cleaning hacks for everyday kitchen surfaces and odours
- natural degreaser for kitchen cabinets for sticky cupboard fronts and handles
- natural ways to clean a fridge and remove smells for appliance freshness
- natural cleaning hacks for whole-home, budget-friendly recipes
One last nudge, from someone who’s scrubbed more ovens than she can count: keep a small tub of bicarbonate under the sink and a bottle of white vinegar in the cupboard, and you’ll reach for them before mess becomes a monument. Which kitchen job would you like to make easier next, hob splatters, sink limescale, or that mysterious sticky patch on the fridge handle?