A dripping garden tap seems like the simplest problem in the world. You replace the washer, it stops dripping, and you congratulate yourself on a job well done, until the following spring, when it starts all over again. For years, that was my annual ritual, a little rubber disc and a spanner, ten minutes of work, problem solved. Then a plumber visiting for an unrelated job watched me reach for the parts drawer and asked if he could show me something first.
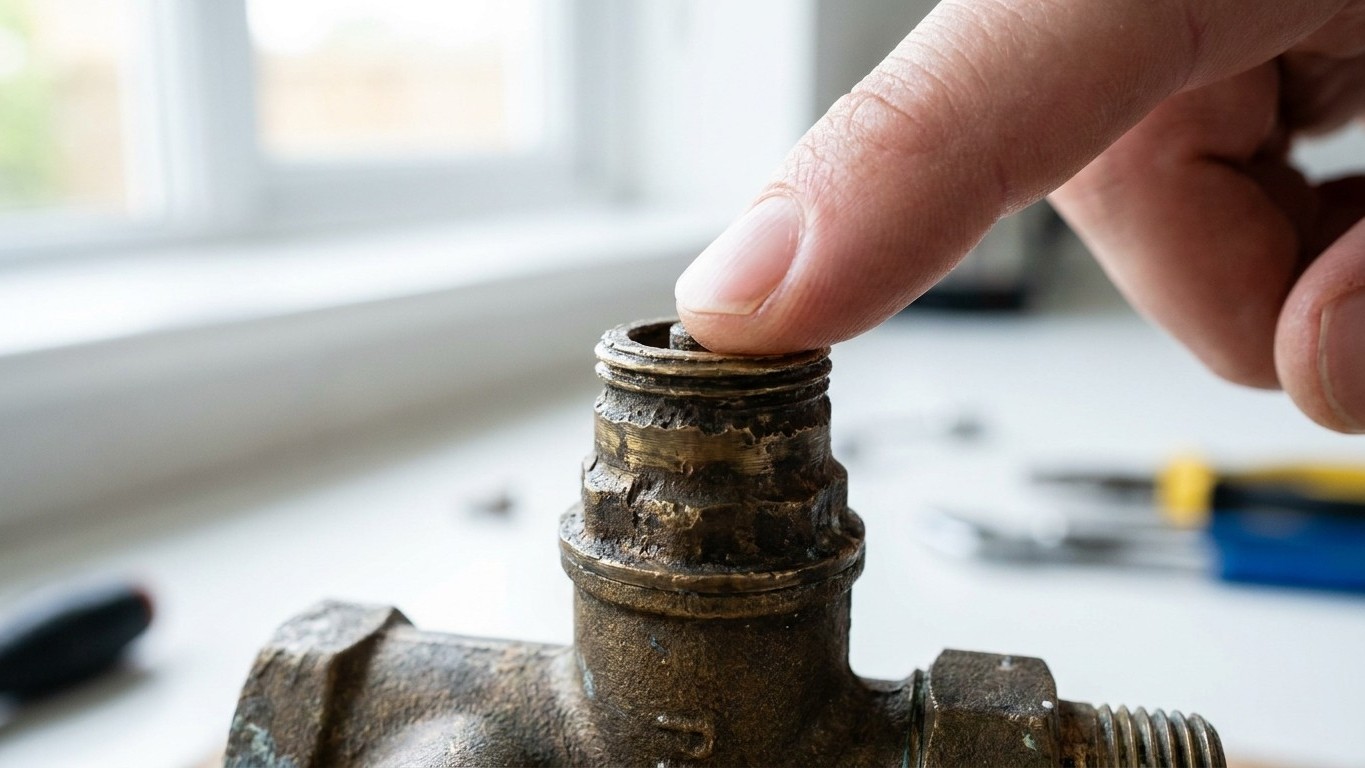
He turned off the water, removed the tap head, and took my hand (yes, really) and pressed my fingertip against the brass valve seat inside the tap body. It wasn’t smooth. It felt like the rim of an old coin, slightly ridged, pitted in places. “That,” he said, “is why you’re back here every year.” The washer wasn’t the problem. The surface the washer was pressing against had been slowly destroyed by the very water flowing through it.
Key takeaways
- The brass seat inside your tap is being slowly destroyed by pressurized water — a process called wire drawing that no new washer can overcome
- A plumber showed the author the pitted, ridged surface that washers can’t seal against, revealing decades of misdiagnosis
- Two real solutions exist: either reseat the tap with a hand tool, or replace the brass seat insert entirely for a permanent fix
What’s actually happening inside your garden tap
Most outdoor garden taps fitted to British homes are the traditional bib tap design, where a rubber washer is compressed against a brass seat to stop the water flow. The washer takes all the blame when a tap drips, but it’s only half the story. The brass seat beneath it endures thousands of open-and-close cycles, the constant pressure of mains water, and something rather destructive called wire drawing.
Wire drawing occurs when water is forced at high pressure through a tiny gap, such as a tap that isn’t turned off quite firmly enough. That pressurised stream acts almost like a jet cutter on the soft brass, gradually scoring a groove into the seat. Once a groove exists, no washer, however new and supple, can form a perfect seal against it. The water finds the groove and trickles through. You change the washer. The groove is still there. The drip returns within weeks or months.
British mains water pressure typically runs between 1 and 3 bar at the household supply, though some properties see considerably more, and every time you close the tap, that pressure is pushing against the new washer, pressing it harder into the damaged surface and making the problem slightly worse. It’s a quiet, slow process, which is why the deterioration often takes years to become obvious.
The fix that actually lasts
There are two real solutions, and the right one depends on how much damage has already been done. The first is reseating the tap. A tap reseating tool (sometimes called a tap reseater or seat grinder) is a small, inexpensive device that you fit into the tap body and rotate by hand to grind the brass seat back to a flat, smooth surface. These tools have been sold in UK hardware shops for decades. The process takes about five minutes and genuinely works when the pitting is moderate rather than severe.
The second option is fitting a new seat insert. Some tap bodies accept a replaceable brass seat that simply screws in once the old one has been drilled or tapped out. A plumber can do this in under half an hour, and the result is essentially a brand-new seating surface. Combined with a fresh washer, the tap can give another decade or more of reliable service without a single repeat visit.
One detail worth attending to: the washer material matters more outdoors than inside. Standard red rubber washers are the traditional choice, but they harden over winter when the tap isn’t in use and the temperature drops. A washer made from EPDM rubber (ethylene propylene diene monomer, since you asked) stays more flexible across a wider temperature range, which is why plumbers increasingly recommend it for outdoor taps. If the seat is sound, an EPDM washer is less likely to give you that first-spring drip caused simply by a washer that’s gone stiff in the cold.
While you’re in there, check this too
The garden tap is also a sensible moment to inspect the gland nut, the packing just above the valve mechanism that prevents water from seeping up around the spindle. If you’ve ever noticed water weeping from the tap body itself rather than the spout, that’s the gland rather than the seat. Tightening the gland nut a quarter-turn often resolves this completely, but overtighten and the tap becomes stiff and unpleasant to use. A small square of PTFE tape wrapped around the spindle before reassembly makes a thoughtful upgrade.
Also consider whether your outdoor tap has a proper backflow preventer fitted. Since 2010, UK Water Regulations have required that any garden tap connected to mains supply incorporates a double-check valve to prevent contaminated water siphoning back into the drinking supply if, say, a hose is left submerged in a water butt. Many older taps were never retrofitted. The check valve fits neatly between the tap and the hose connector and costs very little from any plumbing merchant.
The plumber who showed me all this charged me nothing for that particular lesson, which felt generous, though in fairness I suspect he knew I’d spent a decade buying washers when one proper repair would have done the job. A reseating tool costs roughly the same as two or three years’ worth of washers, and once you own one, the garden tap stops being an annual chore and becomes a solved problem. The real satisfaction isn’t just in saving money. There’s something deeply pleasing about understanding why a thing fails, rather than just patching it season after season and hoping for the best.