You’ve got your drill in hand, a new sheet of plasterboard pinned to the studs, and you’re making excellent progress. Then it happens. You glance back at your last few screws and notice the paper face of the board is torn, slightly sunken, or dimpled in a way that looks quite wrong. The head has gone too far. That one small moment, a fraction of a second too long on the trigger, is the single most common plasterboard mistake DIYers make. The good news? It takes about two Minutes to fix, and once you understand why it happens, you’ll never do it again.
Key takeaways
- One fraction of a second too long on the trigger causes the most common plasterboard failure—but almost nobody talks about it
- The paper face of plasterboard is load-bearing, not decorative. Penetrate it and your screw becomes a time bomb
- A dimpler bit or clutch-adjusted drill transforms this from a guessing game into precision work—and the fix takes genuinely two minutes
The Mistake: Overdriving the Screw
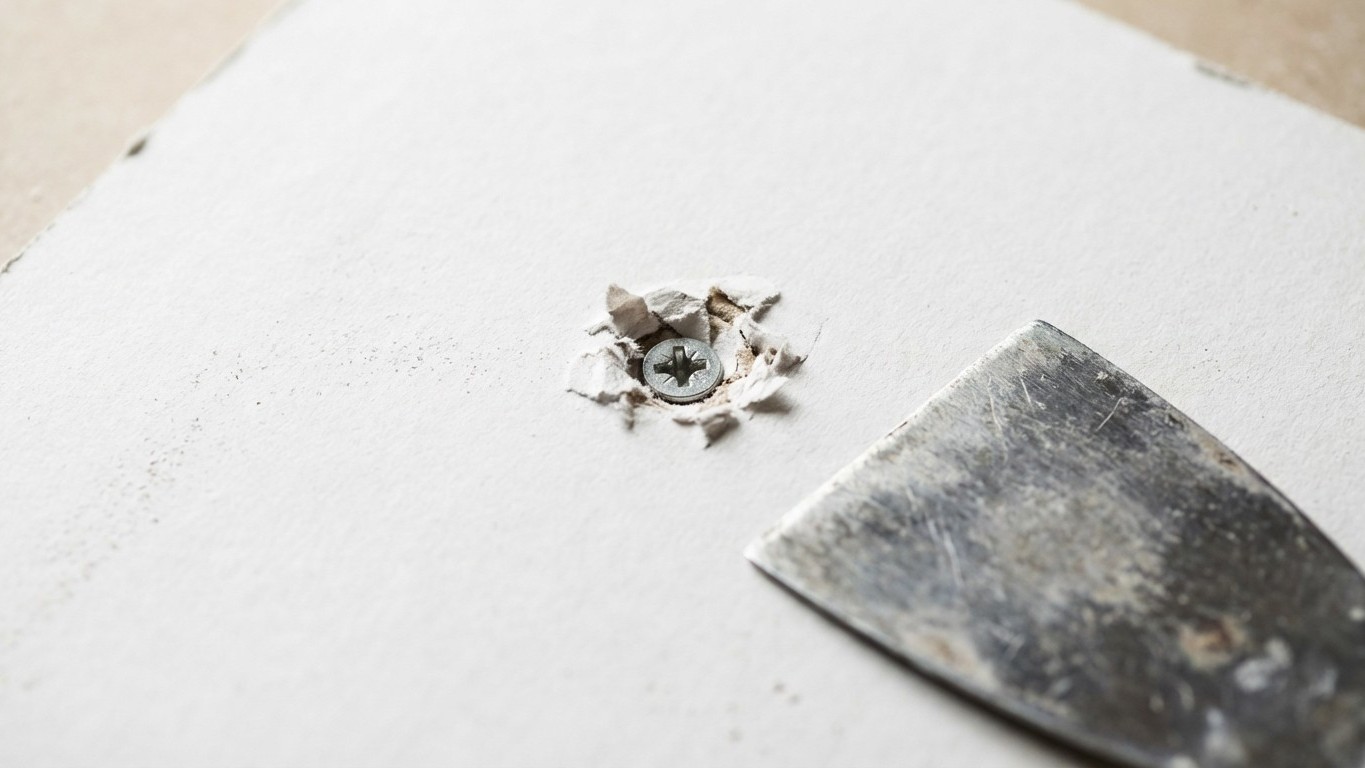
Plasterboard is essentially a gypsum core wrapped in paper. That paper facing is not merely decorative, it is the structural skin of the board, carrying tension and keeping the whole panel rigid. Screws that are installed too deep, and penetrate the paper lining of the board, may pop out over time. Think of it like pressing your thumb through the crust of a pie: once the surface is broken, the strength underneath crumbles far too easily.
Driving a screw too deep can cause the plasterboard to compress excessively, leading to a weakened hold on the underlying stud. This can result in a loose screw that’s prone to coming out over time, especially when subjected to stress or weight. And the problem isn’t just structural. When screws are improperly set, it can lead to dimples or bulges in the surface, complicating the taping and finishing process. A torn paper face means your filler coat has nothing solid to bond to, so the finish will crack back out within months, just in time for guests to notice.
What makes this mistake so sneaky is that it feels fine in the moment. The drill whirrs, the screw sinks, you move on. It’s only when you run a hand or a scraper blade across the surface that you feel the tell-tale torn, soggy patch around the head. By then, you’re often three metres further along the wall.
What the Correct Depth Actually Looks Like
The target is satisfyingly specific. The objective is to drive the screw head just below the surface of the plasterboard, creating a slight “dimple” that can be easily covered with joint compound. The screw head should be slightly recessed, creating a small dimple, and the plasterboard paper around it should be intact, not torn or frayed. That is the whole game: dimpled, not damaged.
Bugle heads are countersunk so they sit flush with the plasterboard without breaking the paper or plaster. The bugle head shape, that gentle flared curve below the head, is specifically engineered to spread the load and seat itself at precisely the right depth without punching through. The screw heads of plasterboard screws must be shaped so that they can be driven slightly below the surface of the plasterboard without punching through the face paper. This head shape is called a “bugle head”. Self-drilling bugle head screws offer a smooth, flush finish and the design allows all forces on the screw to be distributed over a much wider area than is possible with a flat head screw.
A practical trick worth keeping in your back pocket: run your filling knife lightly over the screw head area. You’re aiming for that moment when the head is just dimpled beneath the surface, you can feel a slight depression, but there’s no torn paper and no proud metal. Proud metal (a screw head sitting above the surface) is the opposite problem, and causes just as much grief: screws must not sit above the surface, as this will obstruct the finish.
The 2-Minute Fix for an Overdriven Screw
Right, so you’ve done it, the paper is broken and the screw is sitting a millimetre or two too deep, with a crater around it. Don’t be tempted to try backing the screw out; that will simply enlarge the hole. The correct approach is refreshingly simple.
Place another screw 20mm away in the case of over-driven screws, and then remove or leave the over-driven screw. That new screw, driven to the correct depth, will do the holding work. The over-driven one can stay where it is, it’s not causing active harm sitting quietly in the board, or you can back it out gently once the new fixing is secure. If a screw pop occurs, drive a new screw a few inches away into the stud and repair the existing site.
Once your replacement screw is in correctly, fill the damaged spot. A little ready-mixed jointing compound or decorators’ filler, applied with a flexible filling knife, pressed into the torn paper area and feathered out flat, is all that’s needed. Let it dry fully (an hour in a warm room), sand lightly with fine-grit paper, and prime before painting. The repair will be invisible. It really is a two-minute job for the actual fixing part, plus some patience while the filler cures.
Preventing It Happening in the First Place
Prevention, as ever, is far more satisfying than repair. The most reliable tool for consistent screw depth is a dimpler bit. A dimpler is a screw bit with a collar which helps to stop the screw going into the core of the board and therefore compromising the integrity of the board. You simply fit it into your drill or driver, and the collar physically stops the bit at exactly the right point. No more trigger-finger guesswork.
If you don’t have a dimpler, adjust the clutch on your drill driver. You can use a manual screwdriver or a drill to drive your screw into the plasterboard, but keep it on a low torque setting to avoid damage. Start with a torque setting lower than you think you need, drive a test screw into a scrap offcut, and check the depth before committing to the real thing. Experiment on a scrap piece of drywall to find the ideal setting that creates a slight “dimple” without breaking the paper. It takes thirty seconds and saves a great deal of frustration.
One tool to avoid entirely: an impact driver should not be used, as the knocking effect will damage the core of the plasterboard. Impact drivers are brilliant for structural timber and metal, but plasterboard is unforgiving of that percussive action. Stick to a standard drill driver with a clutch.
Screw length matters too, and getting it wrong compounds the depth problem. For 9.5mm plasterboard use 32mm screws, and for 12.5mm plasterboard use 38mm screws. Too short a screw and you won’t get purchase in the stud; too long and you’re wrestling the driver through excess resistance, making depth control much harder. For a stud wall you will need a coarse thread screw with a bugle head to screw into the wood, while if you are screwing plasterboard into a metal frame you will need to use a fine thread screw with a bugle head.
Mastering screw depth in Plasterboard is one of those quiet skills, nobody applauds you for it, because a well-done wall simply looks like a wall. But the difference between a surface that takes a skim coat cleanly and one that maps its screws through three layers of emulsion is, quite literally, a matter of millimetres. Makes you wonder what else in DIY comes down to just knowing when to stop, doesn’t it?