The phone was already in my hand. A thin crack had appeared across my bedroom ceiling, running almost half a metre from the light fitting toward the window, and my first instinct was to ring a plasterer. Then my neighbour Janet, she’s been renovating Victorian terraces since before I was born — popped her head over the fence and talked me out of it. Fifteen minutes and a tub of filler later, you’d never know the crack was there. If your ceiling has a similar story to tell, read on before you dial anyone.
Key takeaways
- Over 65% of older homes have ceiling cracks—but most are just cosmetic issues caused by natural settling
- A surprisingly simple V-scoring technique makes filler grip the crack and creates invisible repairs
- One non-negotiable rule separates harmless cosmetic cracks from structural problems that demand professional help
Don’t panic: most ceiling cracks are completely harmless
Over 65% of properties more than 25 years old show some form of ceiling cracking, so you are absolutely not alone. The sight of a line running across the plaster does set alarm bells ringing, but the vast majority of the time it’s your house simply breathing. Buildings naturally settle over time, causing stress that can manifest as cracks, and fluctuations in temperature and humidity cause materials to expand and contract, which leads to the same result. The UK’s damp winters and occasional warm summers are particularly good at nudging plaster into this kind of behaviour.
The most common type of ceiling cracks are the hairline fractures that appear at joints between sheets of plasterboard, typically fairly straight and less than about 0.2mm wide. These are essentially cosmetic. Hairline cracks less than 1/16 inch in width usually aren’t a cause for concern, they’re simply unsightly and often caused by paint build-up or plaster expanding and shrinking due to fluctuating humidity levels, and are a cosmetic rather than a structural issue.
That said, you do need to spend sixty seconds distinguishing your crack from the worrying kind. Wider gaps suggest movement, moisture, or a joint that keeps flexing. Cracks that are thick, deep, or larger than 3mm in width tend to indicate structural issues. Other signs include a crack where the wall meets the ceiling, a large number of cracks, or ones causing sagging, in these cases, a Professional-workbenches-from-wobbly-diy-disasters/”>Professional needs to take a look as soon as possible. And if the crack is brown or yellow? Discoloured cracks are a sign of water damage, which, even if not linked directly to structural damage, can lead to more serious problems. Sort out the source of any damp before touching filler.
The 10-minute trick Janet showed me
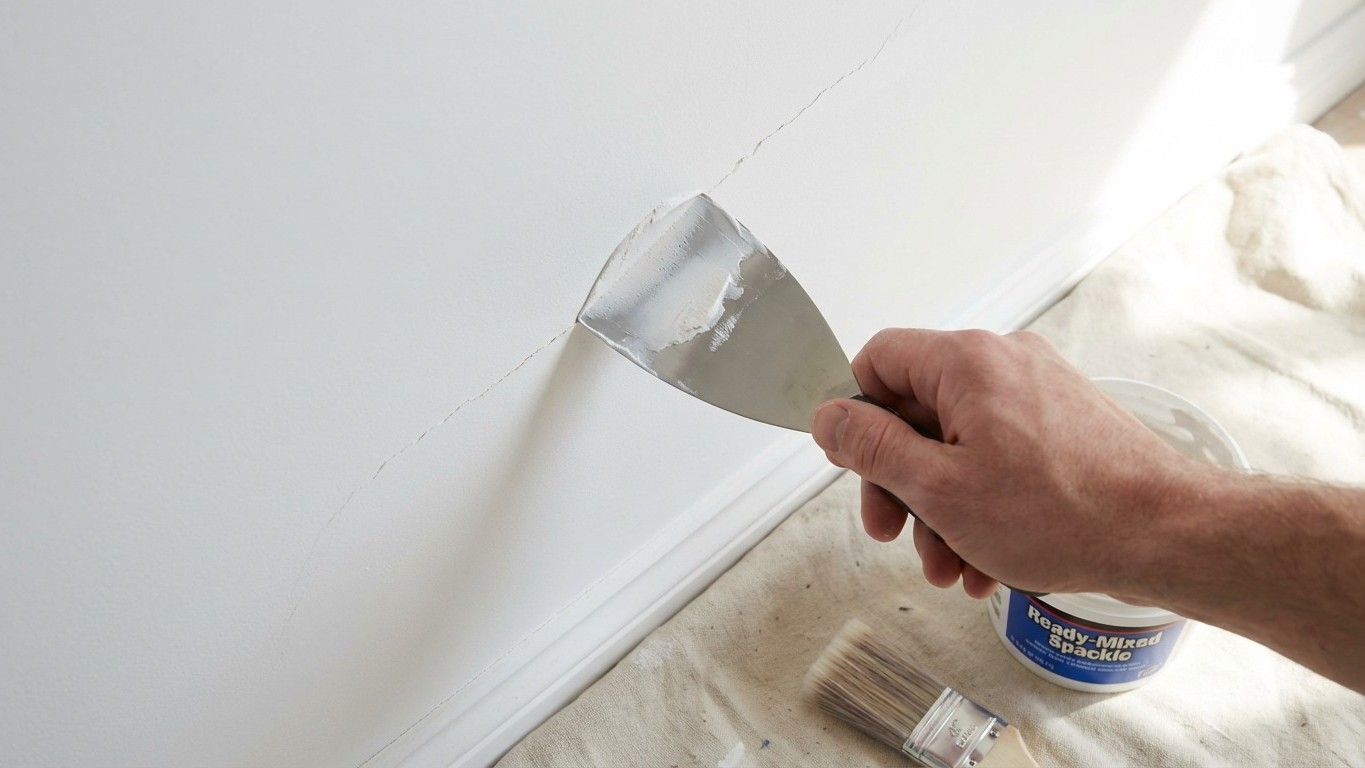
Assuming your crack is a classic hairline or modest shrinkage crack, the fix is genuinely quick. You don’t need a plasterer, a mixing paddle, or a weekend free. What you need is a utility knife, a small soft brush, a flexible 2–4 inch putty knife, and a tub of ready-mixed lightweight filler, the sort you’ll find in any DIY shop for a few pounds.
Score the crack lightly with a utility knife to open a neat V-shape, then dust out any debris with a soft brush or vacuum. This step surprises a lot of people: opening the crack slightly feels counterintuitive, but it gives the filler something to grip. It sounds counterproductive, but widening the crack slightly lets you get more filler into the gap. Think of it like cleaning out a wound before dressing it, the prep is the whole point.
Now the satisfying part. A lightweight spackling compound pairs speed with control, and a flexible knife drives the filler into the gap and leaves a shallow skim. Press filler across the crack at a right angle, then pull along it, feathering the edges thin to avoid a hump under paint, and leave a slight crown, because sanding will level it perfectly. Work in small sections; rushing leads to ridges you’ll notice every time the morning light hits the ceiling at an angle.
Lightweight fillers sit where you put them, resist sagging on overhead surfaces, sand easily, and shrink less than heavier compounds, and that combination really matters on ceilings, where light shows every ripple. Once dry (usually 30–60 Minutes for a thin application), sand gently with a fine block, wipe away the dust with a barely damp cloth, and paint over the patch. Cut in with a small roller over the patch, then feather out beyond the repair by 30–50 cm; two thin coats beat one thick coat for a seamless look.
When the crack keeps coming back
Sometimes you fill a crack, paint over it, and within a season it reappears like an unwelcome relative. This usually means the joint beneath is still moving, common in older lath-and-plaster ceilings or where a plasterboard join was never properly taped. Add mesh tape if the line follows a plasterboard joint and opens seasonally, and use a flexible acrylic filler where minor movement persists. Decorator’s caulk is slightly pliable, so it shouldn’t crack again — a useful alternative to standard rigid filler in areas prone to movement.
For recurring cracks on older plasterboard, hairline cracks between boards may only need localised decorative attention with flexible filler and emulsion, although in some cases all the joints between boards and room edges will need to be scrim taped and filled before a fresh coat of ceiling plaster is applied. That’s a slightly bigger job, but still well within the reach of a confident DIYer on a Saturday morning.
A small practical tip from Janet, passed on faithfully: note the date of your repair and snap a photo. If the line returns in the same season next year, you can judge whether movement or moisture is driving it and choose a flexible or taped solution accordingly. It’s the sort of sensible record-keeping that saves money over years of homeownership.
One rule that is non-negotiable
Call a professional if the crack widens past 3–5 mm, runs diagonally across joists, shows fresh water stains, or keeps coming back. Movement near chimneys, stairwells, or new extensions can mean structural change, and a surveyor or experienced contractor can trace the cause and protect the finish you’ve just restored. No ten-minute trick is a substitute for proper structural advice when it’s genuinely needed.
Safety on the job matters too. Overhead work deserves care: use a stable platform rather than a wobbly chair, and wear goggles and a dust mask while sanding. Ceiling dust in the eyes is nobody’s idea of a good Tuesday.
The broader lesson here might be this: British homes crack. They breathe, they shift with the seasons, they settle into their foundations over decades. A fine line in the plaster is rarely a crisis, it’s usually just the house telling you it’s been here a while. The question isn’t whether it will crack, but whether you’ll know how to answer back before reaching for the phone.